Admittedly, removing NSX from an environment was not my first choice of topics to cover, but I have found that the process is often misunderstood and done improperly. NSX isn’t just a few virtual machine appliances that can be deleted – there are hooks into numerous vCenter objects, your ESXi hosts and vCenter Server itself. To save yourself from some grief and a lot of manual cleanup, the removal must be done properly.
Thankfully, VMware does provide some high level instructions to follow in the public documentation. You’ll find these public docs for NSX 6.2.x and 6.3.x respectively here and here.
There are many reasons that someone may wish to remove NSX from a vSphere environment – maybe you’ve installed an evaluation copy to run a proof of concept or just want to start fresh again in your lab environment. In my case I need to completely remove NSX 6.2.5 and install an older version of NSX for some version-specific testing in my home lab.
From a high level, the process should look something like this:
- Remove all VMs from Logical Switches.
- Remove NSX Edges and Distributed Logical Routers.
- Remove all Logical Switches.
- Uninstall NSX from all ESXi hosts in prepared clusters.
- Delete any Transport Zones.
- Delete the NSX Manager and NSX Controller appliances.
- Remove the NSX Manager hooks into vCenter, including the plugin/extension.
- Cleaning up the vSphere Web Client leftovers on the vCenter Server.
In my lab, I’ve got NSX 6.2.5 installed in a vSphere 6.0 Update 3 environment with the following components:
- NSX Manager 6.2.5
- 1x NSX Controller
- 2x Distributed Logical Router instances
- 1x Edge Services Gateway in HA mode
- 10x Logical Switches
- 1x Prepared NSX cluster with two ESXi hosts
- 1x Transport Zone
So let’s walk through the eight step process I outlined above.
Step 1 – Remove all VMs from Logical Switches
The first step you’ll want to do in preparation for the removal of NSX is to ensure that there is nothing connected to your logical switches. Don’t worry about ESGs and DLRs at this point – only your VMs.
There are a few different ways you can do this, but your choice of method will likely depend on whether or not you want your machines to remain online and accessible as well as how many VMs you have to deal with.
The three methods available to you via the UI are as follows:
- You can manually ‘Edit Settings’ on each of the connected VMs and move them to another portgroup that is not associated with a Logical Switch. This may be okay for a small number of VMs but for larger environments will be time consuming.
- You can use the ‘Remove Virtual Machines’ wizard from the Logical Switches view in the vSphere Web Client. This allows you to disconnect VMs from logical switches, but the VMs will not be moved to valid portgroups as part of this process.
- You can use the Distributed Switch ‘Migrate Virtual Machine’ wizard from the Networking view of the vSphere Web Client. This is what you’ll want to use if you wish to move VMs from Logical Switches to other portgroups.
All three of the above options will get you to the desired result, but in my case, I’ll just use option 2 since I’m not concerned about the connectivity of my VMs. I still have a VM called test-linux1 connected to the ‘Web Tier’ logical switch that I’ll remove.
Simply select the Logical Switch, and click the little VM icon with the red ‘X’ on it.
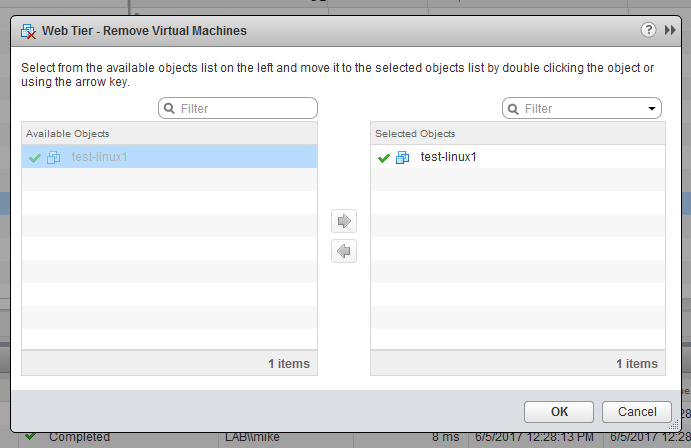
The great thing about this wizard is it allows you to multi-select all VMs in the logical switch for quick removal.
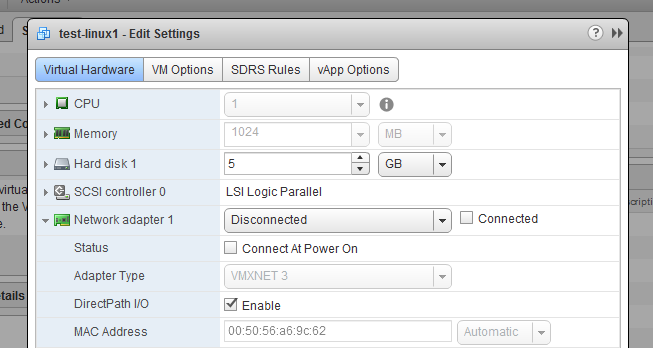
One thing to be aware of is that when you remove a VM using this method, the vNIC of the guest will be in a disconnected state and the portgroup dropdown will list ‘Disconnected’ in the vSphere Web Client. This is a non-existant portgroup and is what we call an ‘invalid backing’. To get this VM’s vNIC connected again later on, you’ll need to select a valid portgroup from the drop-down list and also check both the ‘Connected’ and ‘Connect At Power On’ checkboxes.
Unless you need these VMs connected, you can just leave them in this state.
Step 2 – Removing the ESGs and DLRs.
Now that the VMs are no longer connected to the Logical Switches, we’ll need to remove the DLRs and ESGs. Removing them isn’t difficult, but I do recommend taking a few extra steps to ensure they are properly removed.
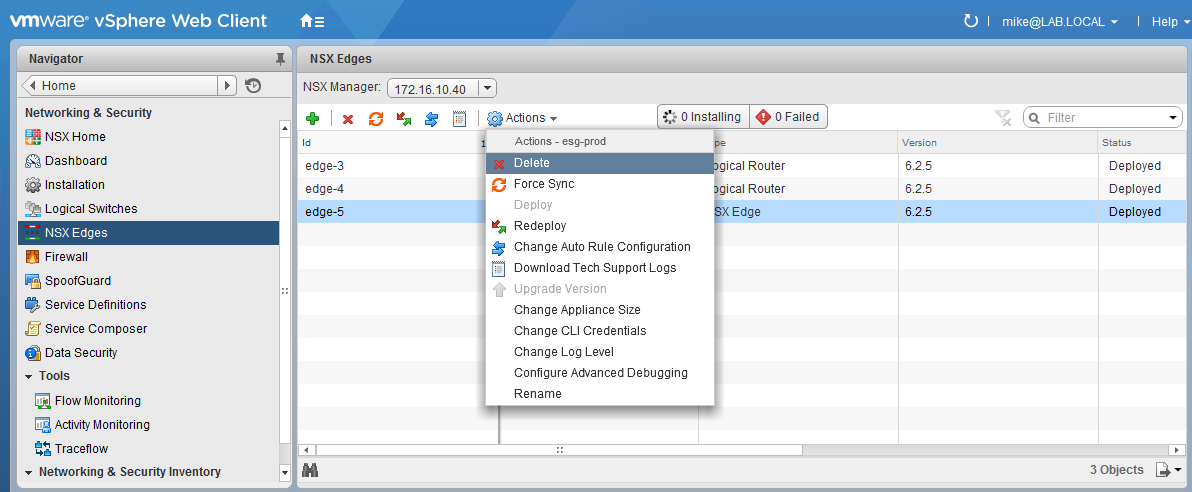
From the NSX Edges view in the vSphere Web Client, you simply need to select the ESG or DLR instance and then click Actions and then Delete. After clicking ‘Delete’ you’ll get a warning pop-up telling you that both the appliances and service configuration will be removed. It’s important to note that deleting an Edge in this way will remove both the Active and Standby appliances if HA is turned on, as well as all traces of configuration for this Edge.
If the ‘Delete’ is successful, you should see the Edge disappear from the list of appliances in the vSphere Web Client.
I’d also recommend checking the recent tasks in vCenter. It’s important that the appliances are indeed removed. There have been a few issues reported where the appliances are not actually removed and only the configuration is deleted from NSX manager.
If you are interested in reproducing a situation where this can easily happen, simply shut down all VMs in the cluster, put all ESXi hosts in maintenance mode and then try to delete the ESG. From an NSX perspective, the Edge will disappear but the delete task will actually fail and the appliance will remain in the vCenter inventory.
The tasks you want to see in vCenter occur look a lot like what’s below. You’ll see both the Active and Standby appliances be powered off, and then deleted. It’s always a good idea to check the vCenter Inventory to ensure that they are gone.

The reason this validation step is important is because quite often, you’ll want to reuse the Edge interface IPs at some point. If the ESG is still up and running, you risk duplicates.
Removing the Distributed Logical Router appliances are pretty much the same as the ESGs, but I’d recommend one additional validation step. DLR appliances are only for dynamic routing and not actually involved in the actual datapath. Because of this, you’ll want to ensure that not only the appliances are gone but also the DLR instances on the ESXi hosts.
From one of the NSX prepared NSX hosts, running the below net-vdr command will list out all distributed routing instances the host is aware of.
[root@esx-a1:~] net-vdr -I -l

VDR Instance Information :
---------------------------
As seen above, an empty list means that the NSX control plane correctly notified the ESXi host about the removal of the DLR instance.
We can also see the actual instruction provided to the ESXi host via the netcpa control plane connection. The /var/log/netcpa.log file should contain messages similar to what’s below:
[root@esx-a1:~] cat /var/log/netcpa.log |grep -A 2 Erased
2017-06-05T15:37:34.961Z info netcpa[FFEF3B70] [Originator@6876 sub=Default] Erased vdr instance vdr name = production+edge-4, vdr id = 5002, auth token = 92f73cd2-262f-473c-96c6-1ce9fce5ced6, universal = false, localEgress = false,
2017-06-05T15:37:34.961Z info netcpa[FFEF3B70] [Originator@6876 sub=Default] No flap edge CP link for vdr id 5002
2017-06-05T15:37:34.961Z info netcpa[64762B70] [Originator@6876 sub=Default] Vdrb: delete ID 1743764586 from session 172.16.10.41:0
Step 3 – Remove all Logical Switches
Objects in NSX will usually have associated objects in the vCenter Inventory. In the case of Logical Switches, each one will be associated with a specific Port Group on one of more Distributed Switches. It’s important that these Logical Switches be removed properly so that the configuration is removed from NSX and that the VC objects are also removed.
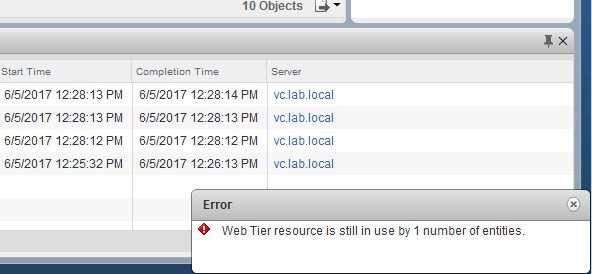
Since we’ve already deleted all DLRs and ESGs, so there should be nothing connected to the logical switches. If you happened to miss a virtual machine and try to remove a Logical Switch, you’ll be greeted with an error similar to:
If you haven’t already done so, you’ll need to disconnect the virtual machines from the logical switches using one of the methods described earlier.
Once all of the VMs are off of the logical switches, deleting them is a simple matter of selecting the logical switch and clicking the icon with the little red ‘X’.
The important thing to validate is to ensure that the distributed port groups associated with the removed logical switches are also removed. In my situation, the distributed switch had 10 matching port groups with the prefix vxw-dvs:
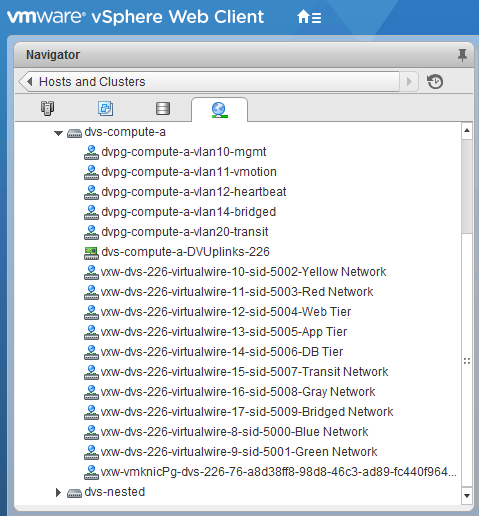
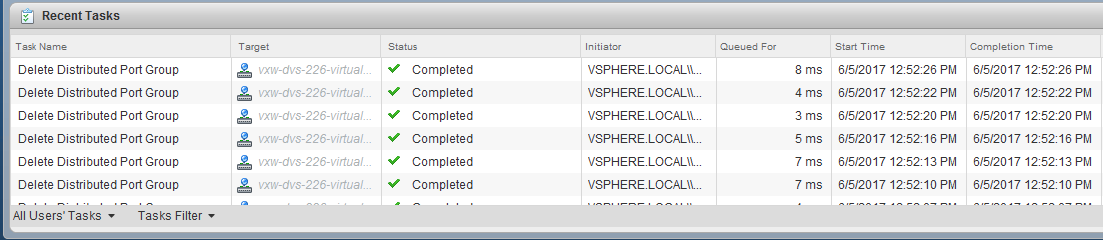
After removing the logical switches, you can see numerous vCenter tasks triggering the deletion of the associated distributed portgroups:
The distributed switch should look a lot sparser now with only VLAN backed portgroups and one NSX portgroup prefixed with vxw-vmknicPg. This is the portgroup where all VXLAN VTEP kernel ports reside for ESXi hosts in prepared clusters. Even though there are no Logical Switches remaining, resist the urge to remove this portgroup – we’ll get to that a bit later.
Step 3 – Remove the NSX Transport Zones
Before you can uninstall NSX VIBs on a prepared cluster, it’s necessary to disassociate the cluster from NSX Transport Zones.
One common problem I’ve seen people run into is trying to use the ‘Disconnect Cluster’ option, and being unable to remove the cluster because the checkbox is greyed out:
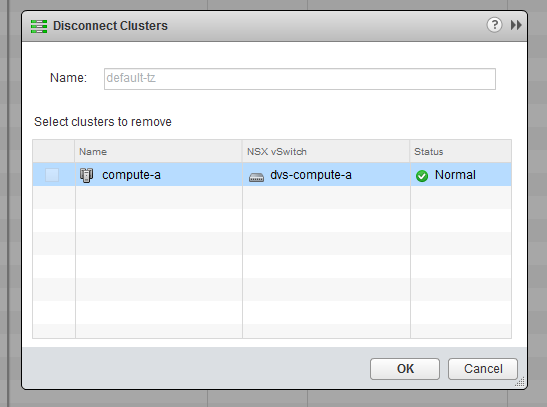
This occurs because you cannot disconnect the last remaining cluster in a transport zone – you have to completely remove the zone. If there were more than one cluster listed here, it would be possible to remove all except for one.
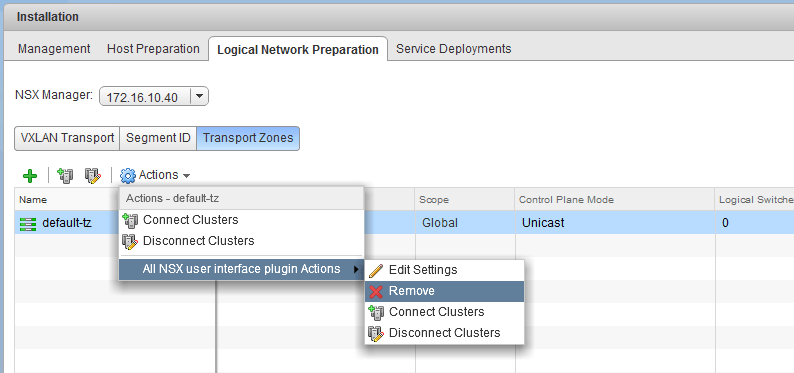
In our case, we simply want to delete the transport zone, but the option is a bit hidden. To delete the transport zone, select it, click Actions then ‘All NSX user interface plugin Actions’ and then Remove.
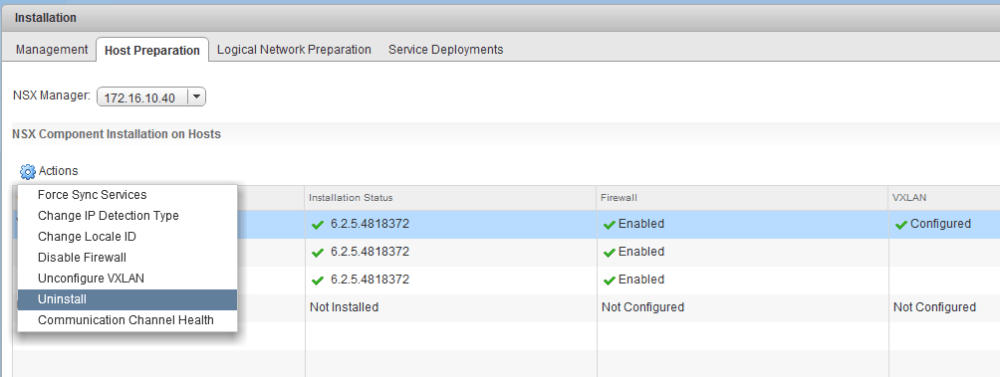
Step 4 – Uninstall NSX VIBs on Prepared Clusters
Once the transport zone is removed, we can proceed to uninstall the NSX VIBs on any NSX prepared clusters. Although you may be tempted to ‘Unconfigure VXLAN’ to get rid of the VTEPs before uninstalling the VIBs, don’t bother. They’ll all get removed as part of the uninstall process.
In my case, I’ve got only one prepared cluster called ‘compute-a’. Select the cluster, click Actions and then click Uninstall.
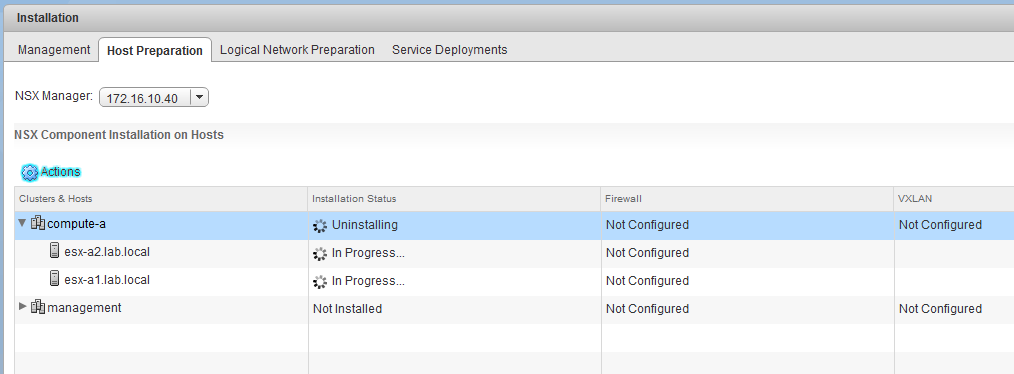
After clicking ‘Uninstall’ you’ll be greeted with a pop-up stating that a reboot will be required. Don’t worry, your hosts won’t automatically reboot at this point.
As you can see below, the installation status column will read ‘Uninstalling’ while all the background tasks are running.
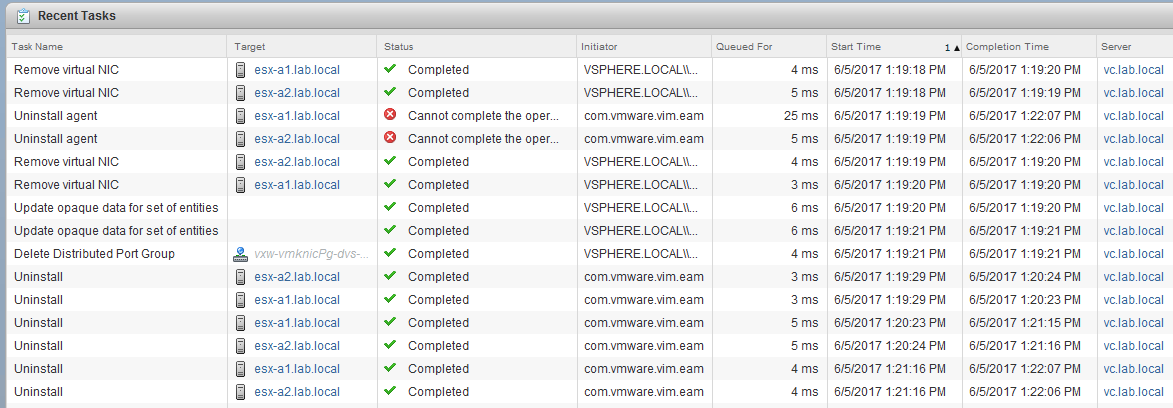
It would be a good idea to keep an eye on the tasks being kicked off in vCenter. You’ll see tasks getting initiated by both vCenter and ESX Agent Manager (EAM). EAM will handle the host scanning and uninstall of the VIBs, where calls to vCenter will handle the deletion of VTEPs and some other tasks. In my experience, it’s not unusual to see some of the tasks fail. As seen below ‘Uninstall agent’ tasks failed but the other Uninstall tasks were successful.
Once all of the tasks complete, you may expect to see some indication of success, but unfortunately EAM reports back with a less than verbose ‘Not Ready’ installation status. Don’t be alarmed – if you click the ‘Not Ready’ link, you’ll see a reason displayed for each host in the cluster. In this case, the install status is ‘Not Ready’ because a reboot is pending.
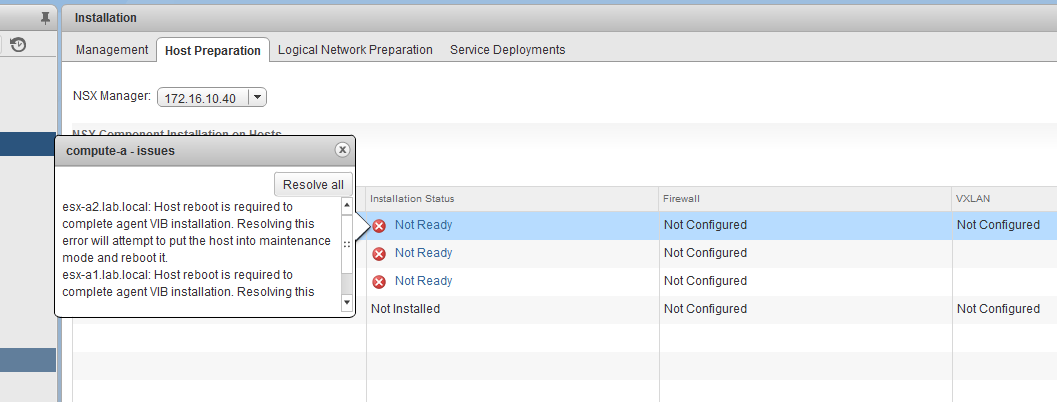
You can verify this by looking at the hosts in the Hosts and Clusters view of the vSphere Web Client. The summary page will indicate if a reboot is pending or not.
Rather than rebooting the hosts manually, it’s better to do a ‘Resolve all’ from the Host Preparation tab. If DRS is in fully automated mode in the cluster, you’ll see your hosts evacuate and then reboot in a controlled manner.
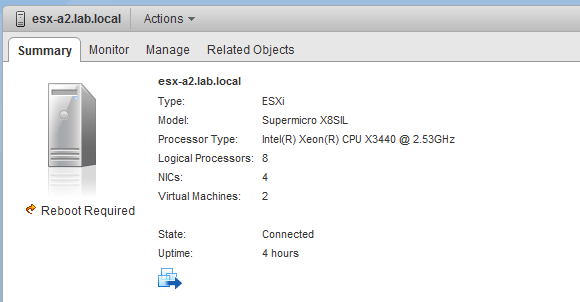
Below you can see in my case, it evacuated host esx-a1.lab.local, put it into maintenance mode and then initiated a reboot. Once host esx-a1.lab.local came back up, I saw the same set of tasks happening to host esx-a2.lab.local.

Once all the hosts in the cluster have been rebooted, the installation status will show as ‘Not Installed’. This is what we want.
If you really want to be 100% sure all of the host removal tasks were completed successfully and that there were no remnants left behind, we’ll need to do some manual checks. I’ll show how to do most of this from the command line and will show what the output should look like while NSX is installed, and after it’s removed.
First we’ll check to ensure the VTEPs are removed. From an SSH shell, check to ensure that there are no vmkernel ports associated with the VXLAN networking stack on the host left behind using the following command:
[root@esx-a2:~] esxcfg-vmknic -l |grep -i vxlan
If the VTEPs have been removed, you should see no output returned at all. If you see something like what’s listed below, then you have leftover VTEPs that were not successfully removed from the host:
[root@ esx-a2:~] esxcfg-vmknic -l |grep -i vxlan
vmk3 79 IPv4 172.16.76.13 255.255.255.0 172.16.76.255 00:50:56:65:22:4B 9000 65535 true STATIC vxlan
There are several reasons this could have happened, including an earlier issue with duplicate VTEPs perhaps. VMware KB 2144605 talks more about this bug.
The good thing is that we’ve completely removed NSX from this host and that these kernel ports are just sitting there doing nothing. It should be safe to manually remove them from the UI or from the CLI.
Next, we’ll want to make sure that the NSX software VIBs have been removed from the ESXi host using the following command.
[root@esx-a2:~] esxcli software vib list |grep -E "esx-vsip|esx-vxlan"
If the VIBs have been successfully removed, you should see nothing at all in response to the above command. If they exist, you may see something similar to what’s listed below.
[root@esx-a2:~] esxcli software vib list |grep -E "esx-vsip|esx-vxlan"
esx-vsip 6.0.0-0.0.4796405 VMware VMwareCertified 2017-03-08
esx-vxlan 6.0.0-0.0.4796405 VMware VMwareCertified 2017-03-08
Again, it’s unlikely that you’ll see lingering VIBs if NSX reports that the uninstall completed successfully. If there are lingering VIBs, you can manually remove them using ‘esxcli software vib remove’ commands followed by a host reboot.
Step 5 – Deleting the NSX Manager and Controller VMs
Unfortunately, this is the step a lot of people will jump straight to when trying to remove NSX. Deleting the appliances before all of the above steps are done will leave a lot of mess behind in vCenter that’ll need to be manually cleaned up.
If everything went well so far, we can now go ahead and power off the NSX manager and any NSX controllers. Once they are powered off, we can go ahead and ‘Delete from Disk’ from the Hosts and Clusters view of the vSphere Web Client.
Step 6 – Removing the NSX Plugin/extension from vCenter
Now we’re getting very close to the end of the process. The next step is to remove the NSX plugin from your vCenter Server. I’ll be walking through the process on a vCenter Server Appliance. This process is well documented in the VMware public docs for NSX in steps 7 to 12.
First, you’ll want to unregister the NSX extension from vCenter. This should have the effect of removing the NSX plugin and you’ll see the ‘Networking and Security’ icon disappear from the vSphere Web Client.
To do this, you’ll need to log into the vCenter ‘Managed Object Browser’. You can access this by going to the following URL:
https://<vcenter_name_or_ip>/mob/
Just replace the <vcenter_name_or_ip> placeholder with the FQDN or IP address of your vCenter Server. Once there, you’ll be prompted to login. You can use any account with administrative privileges in vCenter, but I generally use the administrator SSO (administrator@vsphere.local in my case) account as it’ll have the required privileges by default.
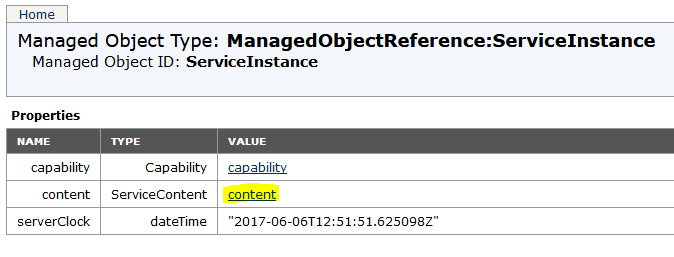
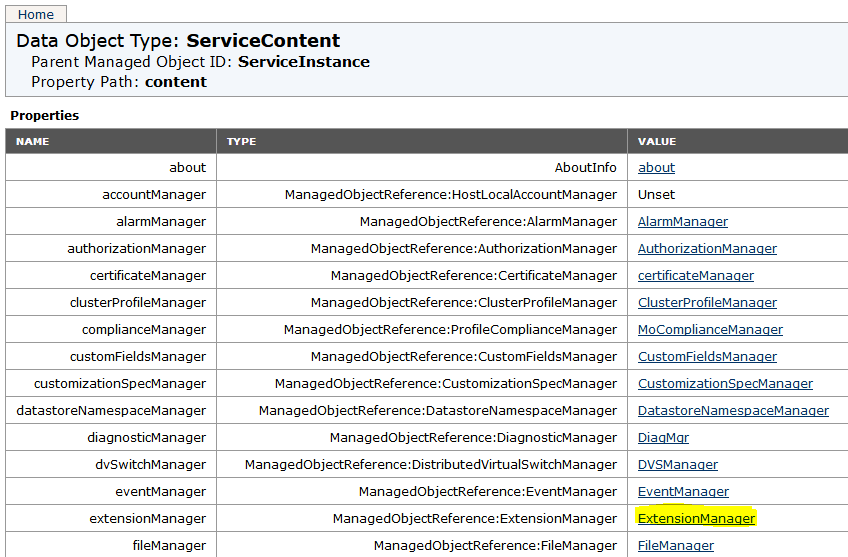
Click content, then on the following page, click ExtensionManager.
Once on the ExtensionManager page, you’ll have several tools available to you. The two of interest are FindExtension and UnregisterExtension. You can use FindExtension to see if the NSX manager extension is still installed and to get more information about the extension. In our case, we’ll use UnregisterExtension first.
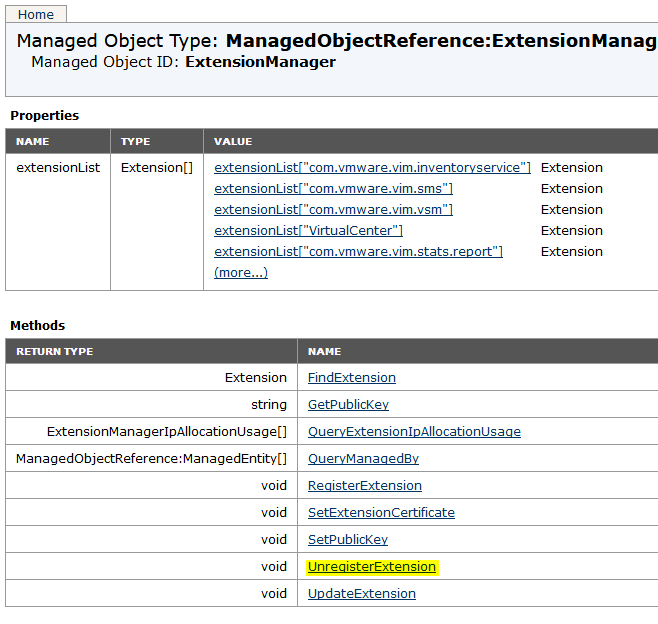
After clicking UnregisterExtension, you’ll be greeted by a new window asking for the extensionKey. Although it’s still called vShieldManager, don’t worry – this is correct for NSX-V. Enter com.vmware.vShieldManager and click Invoke Method.

If the process works correctly, you’ll get a rather nondescript response as follows:
Method Invocation Result: void
If you’d like to confirm that the extension is gone, you can use the FindExtension option mentioned earlier. If the extension is gone, you’ll get the same response of ‘void’ listed above. If it still exists, you’ll get the following along with information about the NSX extension:
Method Invocation Result: Extension
Step 8 – Final Cleanup
Once the NSX plugin extension has been deleted, the very last step of the process is to clean up the vSphere Web Client serenity files that may be left behind on the vCenter Server.
Because the file locations vary depending on the vCenter version and whether you are running the Linux appliance or Windows, I’d recommend checking out step 12 of the process outlined in the public docs for the file locations.
In my case, this is a 6.0 Update 3 Linux appliance, so the files of interest are located in the following location:
/etc/vmware/vsphere-client/vc-packages/vsphere-client-serenity/
First log-in to the Linux appliance using SSH. When you are greeted by the Command> prompt, you’ll want to enter the bash shell. To do this, you may need to first enable shell access:
Using username "root".
VMware vCenter Server Appliance 6.0.0.30200
Type: vCenter Server with an external Platform Services Controller

Last login: Tue Jun 6 15:31:50 2017 from jump.lab.local
Connected to service

* List APIs: "help api list"
* List Plugins: "help pi list"
* Enable BASH access: "shell.set --enabled True"
* Launch BASH: "shell"

Command> shell
Shell is disabled.
Command> shell.set --enabled True
Command> shell
Now before you go and start nuking directories as the public docs seem to imply, you may want to first see what’s in the referenced directory:
vc:~ # ls -lha /etc/vmware/vsphere-client/vc-packages/vsphere-client-serenity/
total 16K
drwx------ 4 vsphere-client users 4.0K May 29 17:24 .
drwx------ 3 vsphere-client users 4.0K May 8 18:07 ..
drwx------ 3 vsphere-client users 4.0K May 8 18:07 com.vmware.vShieldManager-6.2.5.4818372
drwx------ 3 vsphere-client users 4.0K May 29 17:24 com.vmware.vdp2-6.1.4.30
Clearly, you can see that caution is needed. This location not only contains the NSX plugin, but potentially others as well. In my case you can see that both the NSX and VDP (VMware Data Protection) plugins are in this location. In other words, don’t just blow away everything in the vsphere-client-serenity directory.
A command that should safely remove only the NSX plugin directory would be something similar to the following:
vc:~ # rm -R /etc/vmware/vsphere-client/vc-packages/vsphere-client-serenity/com.vmware.vShieldManager-*
Then as a last step, you’ll need to restart the vSphere Web Client service by running the following command:
vc:~ # service vsphere-client restart
Stopping VMware vSphere Web Client...
Stopped VMware vSphere Web Client.
Starting VMware vSphere Web Client...
Waiting for VMware vSphere Web Client......
running: PID:29170
The above is for vCenter 6.0. If you are running 6.5, you’ll need to use the service-control tool to stop and then start the service as follows:
root@vc [ ~ ]# service-control --stop vsphere-client
Perform stop operation. vmon_profile=None, svc_names=['vsphere-client'], include_coreossvcs=False, include_leafossvcs=False
Successfully stopped service vsphere-client
root@vc [ ~ ]# service-control --start vsphere-client
Perform start operation. vmon_profile=None, svc_names=['vsphere-client'], include_coreossvcs=False, include_leafossvcs=False
2018-03-27T13:51:03.162Z Service vsphere-client state STOPPED
Successfully started service vsphere-client
Restarting the vSphere Web Client service may appear to happen quickly from the CLI, but it may be several minutes until the background initialization completes and you’ll be able to log back into the Web Client.
And there you have it! Once you are logged back into the vSphere Web Client, the Networking and Security icon should be gone and all traces of NSX removed.

Just to note, for NSX 6.3, VMware modified your Step 3 a bit. So for Step 3 – Remove Transport Zones, VMware changed the wording, which now says “All vShield Manager Actions” instead of “All NSX user interface plugin Actions”.
BTW, excellent article! I too wanted to test removing NSX (as it’s bound to be needed at some point!). I was stuck at “Disconnect Cluster” with the greyed out checkbox. Tried everything. Your article pointed me in the right direction! Many thanks!!!
Thanks for the feedback, Joe!
Out of curiosity, what version/build of NSX 6.3.x did you see the “All vShield Manager Actions” drop down selection? I just checked in a 6.3.2 lab, and still see that option listed as “All NSX user interface plugin Actions”
It’s surprising that even though NSX has been out for years and vCNS has been end-of-life for some time, there are still mentions of vShield in the NSX product and logging!
Little addition in new version..
am using vspher 6.7 with nsx 6.4 .. In the last step, where you run the command to find dir in vsphere-client-serenity/… i see one more additional plug in for HTML 5 client.. com.vmware.nsx.ui.h5-6.4.4.11197766
By following your steps it got removed from web client but not from html client. To remove it from HTML client, i had to delete this plug in too and restart the HTML 5 client service (service-control –start vsphere-ui)
Thank you for your article.
Thanks very much for the extra info! I’ll try to update the article soon to include this as well.
Still did the same as you mention but cant remove the plugin from HTML client.