Ten Tips for Working from Home

The recent COVID-19 situation around the world has resulted in a large number of people having to work from home. Most in IT roles have had to work from home at one time or another due to illness, inclement weather or some other reason, but they generally don’t have to for longer than a few days consecutively. Having to work from home longer-term is a whole other ballgame in my opinion. Depending on your personality, it can be a really daunting prospect. Those that are very extroverted and strive on social interaction may find it difficult but if you are like me – more of an introvert – you may adapt more easily. Regardless of your personality-type, there are a number of things you can do to survive or even thrive at home. I decided to focus less on the technical aspects and more on the other side of the equation. Most people know that a laptop, good internet connection and VPN access is essential, but it’s the other things that aren’t always obvious.

I’ve got about four and a half years of working from home under my belt. During that time, I learned a few lessons along the way. Here are some tips for those of you finding yourself in this situation.

1. Maintain a Morning Routine

About two or three weeks into my WFH experience I found myself waking up later and later in the morning. Having a commute that involves nothing more than walking down the hall is great, but it eventually got to the point where I’d roll out of bed about five minutes before I had to be online. Believe me, this isn’t a great way to start your day and will make you feel crummy all day long. If you’ve got kids that you have to get ready for school, or if your significant other has to commute, this will be less of a problem for you. If not, be sure to give yourself at least an hour every morning to start the day off right. Make a decent breakfast, have your coffee and do all of the same personal hygiene related things you’d do before commuting to the office. Avoid working from home in your pyjamas and you’ll feel a lot better all day long.

2. Maintain a Proper Work Space

Sitting on the couch with your laptop and your feet up sounds great at first, but this simply isn’t a good idea long-term. It isn’t good for your posture, joints and health – and you simply won’t be as productive. At the very minimum, I’d recommend having a proper desk and high-quality office chair so that you can sit upright. Ideally, you should be using a keyboard, mouse and external monitor (or multiple displays) at the proper height. Another key piece of hardware to have with you at all times is a high-quality headset. Wireless is best as it’ll allow you to move around the house during calls. I was fortunate to be able to take home a great office chair and some 24” displays from the office and received some financial assistance to purchase a desk and other essentials.

3. Pick a Room to Call Your Office

This may not be possible for everyone depending on the size of your home or apartment, but if you can, find a quiet room or space that will be dedicated for home office use. Sticking your desk in the living room where your kids are watching TV at full volume and crawling all over you may not be the best place to setup shop. Considering using a spare bedroom, or a quieter corner of your home. Be sure the room is comfortable and well-lit, or you simply won’t work effectively. I don’t recommend sticking yourself in a dark, damp corner of an unfinished basement, even if it is quiet there. Having a dedicated room also helps you to mentally separate work from home, which is good for work-life balance as I’ll cover in another point.

4. Keep In Touch with Colleagues

The old saying “out of sight, out of mind” can be relevant to employees that work from home. When I was at the office, I worked with a large local team and also collaborated with colleagues all over the world. I was naturally more inclined to speak to the people around me than to reach out to colleagues at other offices. Suddenly, when I had to work from home, everyone was remote. There was no more local team that I saw every day. If you are not the social type, it can be important to find ways to keep in touch with your teammates. Remind everyone that you are still around. Pick up the phone and ask people what they are working on. If you were close at the office, keep in touch about what’s going on outside of work as well. Even if you are “out of sight” you need to make sure you are not “out of mind”. This will help you to continue to feel like a valuable part of the team and will help you to stay engaged.

5. Keep In Touch with Your Manager

This is similar to the previous point, but I wanted to make special mention here. Over the last few years, I’ve had several managers. Some were terrific at making the remote workforce feel like part of the team and others were not. If you start hearing about changes in the team from others or have missed out on special projects and opportunities you would have been interested in, this could be a red flag. Be sure that you are doing some “managing” yourself. Take the initiative to stay in touch with your manager to discuss the things you are working on. Make sure you are still having those one-on-one meetings and checking in regularly regarding your development goals. If your team doesn’t have regular team meetings, encourage your manager to get them setup. If your manager doesn’t make the effort to stay in touch with you, it’ll be up to you to ensure this happens.

6. Use Video Conferencing

Using the phone and instant messaging apps will always be part of the day to day, but video conferencing can be a great tool for the remote workforce. When my team started working from home, we would do multi-participant zoom video meetings just to chat and check in with each other. Seeing everyone face-to-face in their home offices was comforting because we knew we were all in the same situation. If you can’t meet in person, this is the next best thing. Over the years, technology has improved so much in this area. I remember back in the early-2000s how cumbersome and challenging video conferencing was to get going. Today it is readily available and simple to use. Take advantage of it! If you don’t already have a high-quality external USB camera, I’d recommend picking one up. They aren’t expensive and are much better for those with external monitor setups than the one integrated in the laptop.

7. Maintain a Healthy Work-life Balance

Not having to commute and being closer to family should – in theory – promote a much better work-life balance. Surprisingly, for some people, working from home can have the opposite effect. Sometimes you just get “into the zone” and the line between work and home gets blurred. It can be tempting to keep working past 5:00 just because you are already home. Or perhaps you’ll leave your laptop signed in to keep an eye on things. If you never go into the office, then you never left the office either – you may feel trapped in a perpetual state of work. This degree of availability may be expected in some roles, but if it isn’t, try to set boundaries between work hours and home hours. Consider powering off your laptop and only allowing critical alerts through on your phone should you be needed. Tell your colleagues to call you if anything urgent comes up instead of staying glued to your laptop. Believe me – it’s a lot easier to fall into this when you are at home versus commuting into an office.

8. Take Breaks and a Proper Lunch

This one could have been lumped in with the previous point, but I think it deserves special mention. Breaks and lunch are often social events. At the office, your colleagues may reach out to you to see where or when you want to go for lunch. There are queues to let you know it’s time to take a break – people start leaving the office, the smell of microwaved leftovers begins emanating from the break rooms. When you are working from home, you simply don’t get these reminders. When I first started, I would find myself skipping lunch, or taking breaks way too late, usually after mental exhaustion has already set in. Consider creating a calendar invite to remind yourself. Also, be sure to get away from your laptop for at least part of your lunch. Get up, stretch, take a walk. Don’t be tempted to simply grab some food and eat in front of your screen.

9. Get Some Daily Exercise

Working from home usually means you are moving less. It may not seem obvious, but when you commute you are doing a lot more walking. You walk to your car, from the parking garage to your office. Maybe up some stairs, or between buses or subway stations even. While at the office, you’ll probably also move around more – to the cafeteria, between buildings and to meeting rooms. There have been some clear scientific links between healthy mental function and physical exercise. If you are already out of your element working from home, find some ways to introduce some physical exercise into your routine. Take a walk around the block at lunch time, or simply get up and go up and down the stairs a bit. I have a treadmill in the basement that I try to use each day when time permits.

10. Enjoy the Benefits!

Last but not least, enjoy the many benefits of working from home! Once you overcome the challenges, you’ll begin to appreciate the benefits as time goes on. To be honest, I have become so accustomed to working from home that it would be very difficult for me to start commuting again. If you are able to create a functional workspace, effectively communicate with colleagues and keep a healthy work-life balance, you can be just as productive at home than you can at work. Depending on the type of work you do, I’d go so far as to say you can be even more productive. Don’t forget the financial benefits as well – less spent on petrol, car maintenance and transit. There are also some tax benefits you should explore. Here in Canada, a portion of your home utility bills are tax deductible if you are a permanent work-from-home employee. For those who have to commute, getting that hour or two back that would normally be spent sitting in a car can be priceless. That is time that can be better spent with family and doing the things you love.

I hope these tips help others. If you have other suggestions, please feel free to add a comment below or on Twitter.

Noctua NH-U9DX i4 and NH-D9DX i4 3U Heatsink Review

There are many different approaches you can take when building a VMware home lab, but I always prefer to do custom-build tower systems. This allows me to select the components I want – the fans, heatsinks, PSU – to keep the noise to a minimum. Even though I keep the lab in the basement, I really don’t like to hear it running. I don’t need the density that a rack provides, and I’m quite happy to have my nearly silent towers humming along on a wire shelf instead. Not to mention that lower noise usually equates to lower power consumption and of course, it keeps my wife happy as well – the most critical metric of all.

I finally got around to upgrading my three ancient compute nodes recently. I have been using the included Dynatron R13 1U copper heatsinks that came with the motherboards I bought on eBay. They work, and keep the CPUs relatively cool, but as you can imagine, noise was not a key consideration in their design. They are as compact and as efficient as possible at only an inch tall. At idle, the Supermicro X9SRL-F keeps them at a low RPM, but put any load on the systems and you’re quickly at 7500RPM and the noise is pretty unbearable. No problem for a datacenter, but not for a home lab.

Today I’ll be taking a bit of a departure from my regular posts and will be doing an in-depth review of two high-end Noctua heatsinks. Noctua was kind enough to send me a review sample of not one, but two of their Xeon heatsinks – the NH-U9DX i4 and the NH-D9DX i4 3U.

Noctua

noctua_200x200pxNoctua is an Austrian company well known for their low noise fans and high-end heatsinks. I’ve been using Noctua heatsinks for ages. In fact, I reviewed some of their original heatsinks and fans many years ago when I used to write hardware reviews. This included their original NH-U12P, the NH-C12P and the smaller NH-U9B. Back then, I praised them for their high-quality construction, near silent operation, excellent mounting hardware and most importantly – excellent cooling performance. That was over ten years ago, and it seems that Noctua is still very well respected for all the same reasons today.

Their gear has always been pricey compared to the competition, but when it comes to Noctua, you get what you pay for.

Square vs Narrow ILM LGA 2011

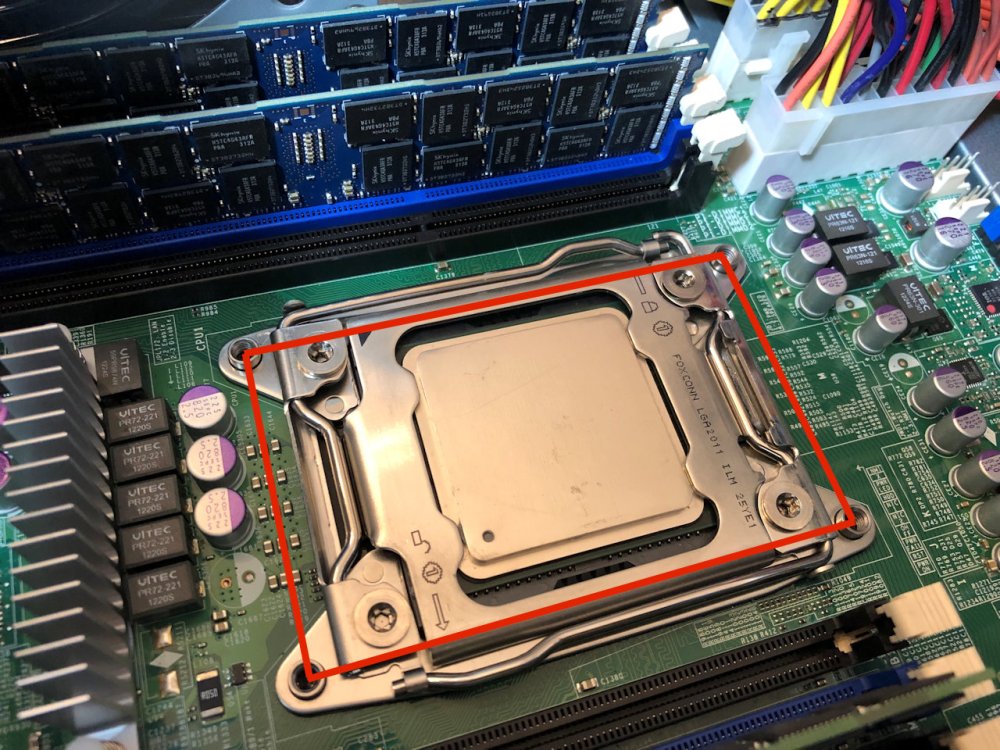
One of the challenges I had with my new/used Supermicro X9SRL-F boards is that they don’t use the common ‘square’ LGA2011 mounting pattern. Instead, they use what’s referred to as ‘Narrow ILM’ that allows the socket to be more rectangular in shape. This allows more real estate for memory slots and other components on the board. Because of this, I was severely limited in my heatsink choices. Most of what’s available out there for Narrow ILM are rack mount heatsinks similar to what I’m hoping to remove. The majority of the consumer-grade stuff for LGA2011 simply won’t fit.

noctuai4-24

Here you can see the Dynatron R13 narrow ILM heatsink mounted:

Continue reading “Noctua NH-U9DX i4 and NH-D9DX i4 3U Heatsink Review”

NSX-T Troubleshooting Scenario 1

Welcome to the first NSX-T troubleshooting scenario! My NSX-V troubleshooting scenarios have been well received, so I thought it was time to start a new series for NSX-T. If you’ve got an idea for a scenario, please let me know!

What I hope to do in these posts is share some of the common issues I run across from day to day. Each scenario will be a two-part post. The first will be an outline of the symptoms and problem statement along with bits of information from the environment. The second will be the solution, including the troubleshooting and investigation I did to get there.

The Scenario

As always, we’ll start with a brief problem statement:

“I removed NSX for vSphere from my lab environment and am trying to install NSX-T for a proof of concept. Unfortunately, I get an error message every time I try to install the NSX-T VIBs on my ESXi hosts! I’m running NSX-T 2.3.1, and ESXi 6.5 U2”

In the NSX-T UI, we’re greeted with a simple “NSX Install Failed” message for the host esx-a3:

nsxt-tshoot1a

Clicking on this error gives us a much more verbose error message:

nsxt-tshoot1a-5

The full text of the error message is as follows:

NSX components not installed successfully on compute-manager discovered node. Failed to install software on host. Failed to install software on host. esx-a3.vswitchzero.net : java.rmi.RemoteException: [DependencyError] File path of '/bin/net-vdl2' is claimed by multiple non-overlay VIBs: {'VMware_bootbank_esx-nsxv_6.5.0-0.0.8590012', 'VMware_bootbank_nsx-esx-datapath_2.3.1.0.0-6.5.11294337'} File path of '/bin/vsip_vm_list.sh' is claimed by multiple non-overlay VIBs: {'VMware_bootbank_esx-nsxv_6.5.0-0.0.8590012', 'VMware_bootbank_nsx-esx-datapath_2.3.1.0.0-6.5.11294337'} File path of '/etc/vmware/firewall/netCPRuleset.xml' is claimed by multiple non-overlay VIBs: {'VMware_bootbank_nsx-netcpa_2.3.1.0.0-6.5.11294485', 'VMware_bootbank_esx-nsxv_6.5.0-0.0.8590012'} File path of '/bin/vsipioctl' is claimed by multiple non-overlay VIBs: {'VMware_bootbank_esx-nsxv_6.5.0-0.0.8590012', 'VMware_bootbank_nsx-esx-datapath_2.3.1.0.0-6.5.11294337'} File path of '/usr/lib/vmware/vm-support/bin/dump-vdr-info.sh' is claimed by multiple non-overlay VIBs: {'VMware_bootbank_esx-nsxv_6.5.0-0.0.8590012', 'VMware_bootbank_nsx-esx-datapath_2.3.1.0.0-6.5.11294337'} File path of '/bin/net-vdr' is claimed by multiple non-overlay VIBs: {'VMware_bootbank_esx-nsxv_6.5.0-0.0.8590012', 'VMware_bootbank_nsx-esx-datapath_2.3.1.0.0-6.5.11294337'} File path of '/etc/vmsyslog.conf.d/dfwpktlogs.conf' is claimed by multiple non-overlay VIBs: {'VMware_bootbank_nsx-netcpa_2.3.1.0.0-6.5.11294485', 'VMware_bootbank_esx-nsxv_6.5.0-0.0.8590012'} File path of '/etc/init.d/netcpad' is claimed by multiple non-overlay VIBs: {'VMware_bootbank_nsx-netcpa_2.3.1.0.0-6.5.11294485', 'VMware_bootbank_esx-nsxv_6.5.0-0.0.8590012'} File path of '/usr/lib/vmware/netcpa/bin/netcpa' is claimed by multiple non-overlay VIBs: {'VMware_bootbank_nsx-netcpa_2.3.1.0.0-6.5.11294485', 'VMware_bootbank_esx-nsxv_6.5.0-0.0.8590012'} File path of '/bin/dfwpktlogs.sh' is claimed by multiple non-overlay VIBs: {'VMware_bootbank_nsx-netcpa_2.3.1.0.0-6.5.11294485', 'VMware_bootbank_esx-nsxv_6.5.0-0.0.8590012'} File path of '/etc/vmware/firewall/bfdRuleset.xml' is claimed by multiple non-overlay VIBs: {'VMware_bootbank_nsx-netcpa_2.3.1.0.0-6.5.11294485', 'VMware_bootbank_esx-nsxv_6.5.0-0.0.8590012'} File path of '/etc/vmware/vm-support/dfw.mfx' is claimed by multiple non-overlay VIBs: {'VMware_bootbank_esx-nsxv_6.5.0-0.0.8590012', 'VMware_bootbank_nsx-esx-datapath_2.3.1.0.0-6.5.11294337'} Please refer to the log file for more details.

Clicking on the RESOLVE button simply tries the install again, which fails.

Continue reading “NSX-T Troubleshooting Scenario 1”

NSX-T PCPU Requirements for Edges

New CPU requirements for NSX-T may leave older lab hardware out in the cold.

If you are running old hardware in your lab, you may have come across an unexpected failure while deploying your first NSX-T edge VM.

nsxt-aes-edge-1

The exact error message will be something similar to:

“[Fabric] Edge <uuid> is not ready for configuration error occurred, error detail is NSX Edge configuration has failed. The host does not support required cpu features: [‘aes’].”

The edge will be successfully deployed, but will remain ‘unconfigured’ and will not allow you to add it as a transport node.

The ‘aes’ feature being referred to is Intel’s AES-NI acceleration for cryptography. You can find out more about AES-NI here. In NSX-V, AES-NI was optionally supported for offloading cryptography for VPN related features. It seems that this has now become a hard requirement for NSX-T.

Unfortunately, like vSphere 6.7, NSX-T has minimum CPU requirements that can’t be worked around. If you have a browse through the NSX-T system requirements, you’ll find a note about CPU compatibility in the “NSX Edge VM and Bare-Metal NSX Edge CPU Requirements” section. Listed there is reference to:

  • Xeon 56xx (Westmere-EP)
  • Xeon E7-xxxx (Westmere-EX and later CPU generation)
  • Xeon E5-xxxx (Sandy Bridge and later CPU generation)

This means that anything released prior to 2011 is unlikely to work, with the exception of a few Westermere EP based Xeons, which seem to have spotty success. On the AMD front, it appears that even CPUs with AES instructions will fail similarly due to a CPU compatibility check that is done during edge deployment.

Update: Commenter Ben Kenobi figured out a workaround to get edges to deploy on modern AMD platforms! You can find his workaround discussed below in the comments as well as on his blog here.

My management host uses Xeon E5-2670s, which work fine, but my compute cluster uses very old Xeon X3440s that came out before AES-NI was introduced. Now that I can’t run vSphere 6.7 or an NSX-T edge on these hosts, I think it may finally be time to upgrade.

Unfortunately, it doesn’t appear that there is a workaround for this problem. If anyone does come across a way to avoid this, please let me know!

Deploying NSX-T Controllers Manually

Deploying an NSX-T control cluster manually for maximum control and flexibility.

One of the great things about NSX-T is its complete independence from vCenter Server. You can still link to vCenter Server if you’d like to automate certain tasks, but unlike NSX-V, you can accomplish many deployment tasks manually. One of the firsts things you’ll be doing in a new NSX-T setup is to deploy your control cluster.

Although automated deployment through vCenter and the UI is convenient, there are some additional benefits to manual controller deployment. Firstly, you can select a non-production ‘small’ sized form factor that isn’t selectable in the UI saving you a couple of vCPUs and about 8GB of RAM per appliance. Secondly, deploying manually also allows you to thin-provision your controller VMDKs off the bat. In a home lab, these are some desirable benefits. And of course, there is always the satisfaction you get from running through the process manually and better understanding what happens behind the scenes.

NSXT-controllerdeploy-2

As seen above, the automated controller deployment wizard does not allow the selection of a ‘Small’ form factor.

Deploying Controllers

To begin, you’ll need to download the NSX-T controller OVA. You’ll find it listed along with the other NSX-T deliverables on the download page.

NSXT-controllerdeploy-1

There are a few different ways that you can deploy the OVA including with ovftool. I’m just going to use the vSphere Client for this example. As you can see below, we can now select an unsupported ‘Small’ form-factor deployment:

NSXT-controllerdeploy-3

In addition to this, you’ll get the usual template customization options along with a few new ones you may not have seen listed under ‘Internal Properties’:

NSXT-controllerdeploy-4

As you probably have guessed these internal properties can be used to save some of the work needed to get it connected to the management plane and to the control cluster. I’m going to skip this entire section and run through the process manually from the CLI post-deployment.

Continue reading “Deploying NSX-T Controllers Manually”

NSX Troubleshooting Scenario 10

Welcome to the tenth installment of my NSX troubleshooting series – a milestone number for the one-year anniversary of vswitchzero.com. I wasn’t sure how many of these I’d write, but I’ve gotten lots of positive feedback so if I can keep thinking of scenarios, I’ll keep going!

What I hope to do in these posts is share some of the common issues I run across from day to day. Each scenario will be a two-part post. The first will be an outline of the symptoms and problem statement along with bits of information from the environment. The second will be the solution, including the troubleshooting and investigation I did to get there.

I’ll try to include some questions as well for educational purposes in each post.

The Scenario

As always, we’ll start with a brief problem statement:

“I’m using an ESG load balancer to send syslog traffic to a pool of two Linux servers. I can only seem to get UDP syslog traffic to arrive at the pool members. TCP based syslog traffic doesn’t work. I’m using a one-armed load balancer. If I do a packet capture, all I see is the UDP traffic but it’s not coming from the load balancer”

Using the NSX load balancer services for syslog purposes is not at all uncommon. We see this frequently with products like Splunk as well as others. Since syslog traffic can be very heavy, this is a good use case.

When it comes to troubleshooting NSX load balancer issues, triple checking the configuration is key. In speaking with the customer, this is his desired outcome:

  • One-armed load balancer in VLAN 15.
  • No routing done by the edge. Default gateway configuration only and a single interface for simplicity.
  • Transparency is not required – the source IP can be the load balancer as the required source information is in the syslog data transmitted.
  • A mix of both TCP and UDP port 514 traffic is to be load balanced.

Here is a basic, high-level topology provided by the customer:

tshoot10a-1

The one armed load balancer called esg-lb1 is sitting in VLAN 15. It’s default gateway is the SVI interface of the physical switch (172.16.15.1). There is only one hop between the ESXi hosts – the syslog clients – and the ESG in VLAN 15. Because this is a one-armed topology, the syslog-a1 and syslog-a2 servers are using the same switch SVI as their default gateway.

Continue reading “NSX Troubleshooting Scenario 10”

NSX 6.3.5 Now Available!

Late yesterday, VMware made available NSX 6.3.5 (Build Number 7119875) for download. This is a full maintenance release including over 32 documented bug fixes. As you may recall, 6.3.4 was a minor patch release with only a few fixes, which is why 6.3.5 has been released so soon afterward.

There are numerous fixes in this release that will be of interest to a lot of customers. Of special note are the fixes related to Guest Introspection – a feature leveraged by 3rd party AV and security products, as well as the IDFW. I was very happy to see that GI got front and center attention in 6.3.5. Along with some needed CPU utilization fixes, there is also a fix for issue number 1897878, outlined in VMware KB 2151235 that I’ve seen quite a bit of in the wild.

Another interesting behavior change is also quoted in the ‘What’s New in 6.3.5’ section:

“Guest Introspection service VM will now ignore network events sent by guest VMs unless Identify Firewall or Endpoint Monitoring is enabled”

This is a feature that we’ve sometimes manually disabled in older releases in very large deployments to improve 3rd party A/V scalability. The vast majority of customers don’t use ‘Network Introspection’ services, so it’s good to see that it’s now off by default unless needed.

Those using Guest Introspection should definitely consider upgrading to 6.3.5.

Another interesting statement that I’m sure many people are interested in is:

“Host prep now has troubleshooting enhancements, including additional information for “not ready” errors”

EAM generally hasn’t provided very descriptive statements in the ‘Not Ready’ dialogue, so this is also a very welcome change.

And of course, the controller disconnect issue and password expiry issues are also fixed in 6.3.5. This obviously brings up a good question – should you still patch with the re-released versions of 6.3.3/6.3.4, or go straight to 6.3.5? I see no reason why you would not go straight to 6.3.5.

Here is some of the relevant information:

NSX 6.3.5 Download Page
NSX 6.3.5 Release Notes

Definitely have a read through the release notes – there are some real gems in there. I hope to get this deployed in my home lab sometime in the next few days!

New NSX Controller Issue Identified in 6.3.3 and 6.3.4.

Having difficulty deploying NSX controllers in 6.3.3? You are not alone. VMware has just made public a newly discovered bug impacting NSX controllers based on the Photon OS platform. This includes NSX 6.3.3 and 6.3.4.  VMware KB 000051144 provides a detailed summary of the symptoms, but essentially:

  • New NSX 6.3.3 Controllers will fail to deploy after November 2nd, 2017.
  • New NSX 6.3.4 Controllers will fail to deploy after January 1st, 2018.
  • Controllers deployed before this date will be prompting for a new password on login attempt.

That said, if you attempted a fresh deployment of NSX 6.3.3 today, you would not be able to deploy a control cluster.

The issue appears to stem from root and admin account credentials expiring 90 days after the creation of the NSX build. This is not 90 days after it’s deployed, but rather 90 days after the build was created by VMware. This is why NSX 6.3.3 will begin having issues after November 2nd and 6.3.4 will be fine until January 1st 2018.

Some important points:

  • If you have already deployed NSX 6.3.3 or 6.3.4, don’t worry – your controllers will continue to function just fine. Having expired admin/root passwords will not break communication between NSX components.
  • This issue does not pose any kind of datapath impact. It will only pose issues if you attempt a fresh deployment, attempt to upgrade or delete and re-deploy controllers.
  • Until you’ve had a chance to implement the workaround in KB 000051144, you should obviously avoid any of the mentioned workflows.

It appears that VMware will be re-releasing new builds of the existing 6.3.3 and 6.3.4 downloads with the fix in place, along with a fix in 6.3.5 and future releases. They have already added the following text to the 6.3.3 and 6.3.4 release notes:

Important information about NSX 6.3.3: NSX for vSphere 6.3.3 has been repackaged to address the problems mentioned in VMware Knowledge Base articles 2151719 and 000051144. The originally released build 6276725 is replaced with build 7087283. Please refer to the Knowledge Base articles for more detail. See Upgrade Notes for upgrade information.

Old 6.3.3 Build Number: 6276725
New 6.3.3 Build Number: 7087283

Old 6.3.4 Build Number: 6845891
New 6.3.4 Build Number: 7087695

As an added bonus, VMware took advantage of this situation to include the fix for the NSX controller disconnect issue in 6.3.3 as well. This other issue is described in VMware KB 2151719. Despite what it says in the 6.3.4 release notes, only 6.3.3 was susceptable to the issue outlined in KB 2151719.

If you’ve already found yourself in this predicament, VMware has provided an API call that can be used as a workaround. The API call appears to correct the issue by setting the appropriate accounts to never expire. If the password has already expired, it’ll reset it. It’s then up to you to change the password. Detailed steps can be found in KB 000051144.

It’s unfortunate that another controller issue has surfaced after the controller disconnect issue discovered in 6.3.3. Whenever there is a major change like the introduction of a new underlying OS platform, these things can clearly be missed. Thankfully the impact to existing deployments is more of an inconvenience than a serious problem. Kudos to the VMware engineering team for working so quickly to get these fixes and workarounds released!


NSX 6.2.9 Now Available for Download!

Although NSX 6.3.x is getting more time in the spotlight, VMware continues to patch and maintain the 6.2.x release branch. On October 26th, VMware made NSX for vSphere 6.2.9 (Build Number 6926419) available for download.

Below are the relevant links:

This is a full patch release, not a minor maintenance release like 6.2.6 and 6.3.4 were. VMware documents a total of 26 fixed issues in the release notes. Some of these are pretty significant relating to everything from DFW to EAM and even some host PSOD fixes. Definitely have a look through the resolved issues section of the release notes for more detail.

On a personal note, I’m really happy to see NSX continue to mature and become more and more stable over time. Working in the support organization, I can confidently say that many of the problems we used to see often are just not around any more – especially with host preparation and the control plane. The pace in which patch releases for NSX come out is pretty quick and some may argue that it is difficult to keep up with. I think this is just something that must be expected when you are working with state of the art technology like NSX. That said, kudos to VMware Engineering for the quick turnaround on many of these identified issues!