NSX-T Troubleshooting Scenario 3 – Solution

Welcome to the third instalment of a new series of NSX-T troubleshooting scenarios. Thanks to everyone who took the time to comment on the first half of the scenario. Today I’ll be performing some troubleshooting and will show how I came to the solution.

Please see the first half for more detail on the problem symptoms and some scoping.

Getting Started

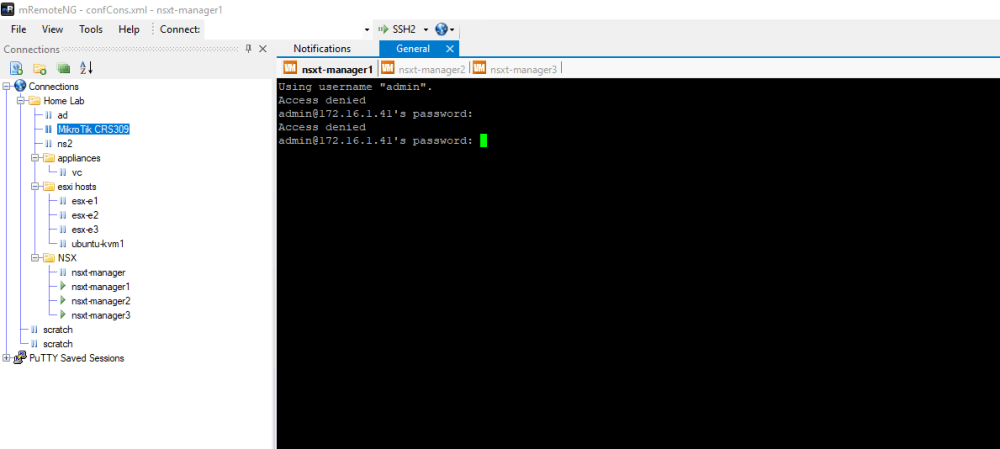
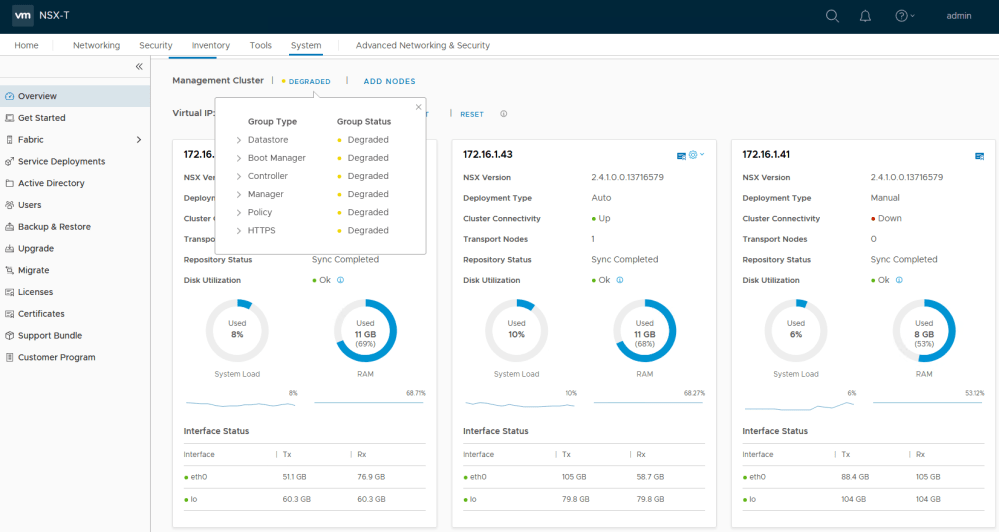
As we saw in the first half, the customer’s management cluster was in a degraded state. This was due to one manager – 172.16.1.41 – being in a wonky half-broken state. Although we could ping it, we could not login and all of the services it was contributing to the NSX management cluster were down.

nsxt-tshoot3a-1

What was most telling, however, was the screenshot of the VM’s console window.

nsxt-tshoot3a-4

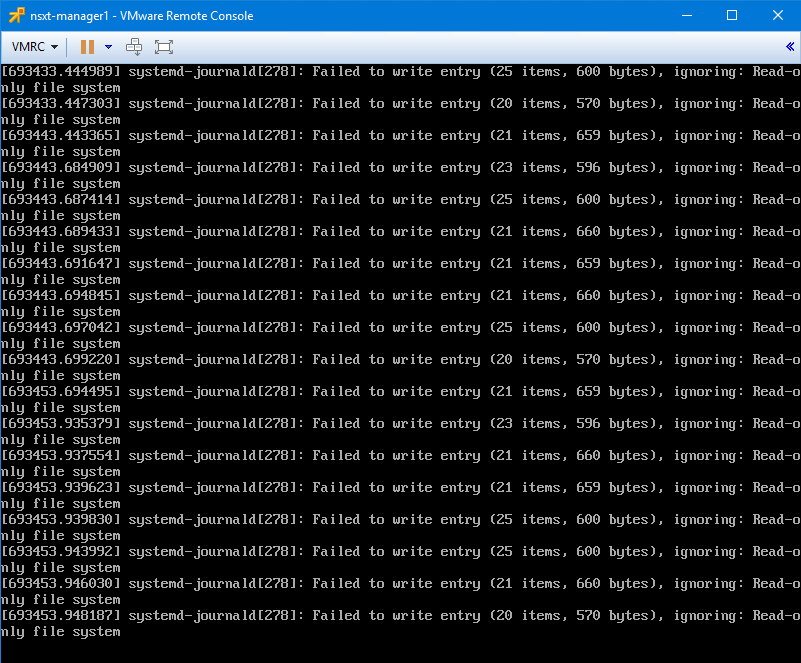
The most important keyword there was “Read-only file system”. As many readers had correctly guessed, this is a very common response to an underlying storage problem. Like most flavors of Linux, the Linux-based OS used in the NSX appliances will set their ext4 partitions to read-only in the event of a storage failure. This is a protective mechanism to prevent data corruption and further data loss.

When this happens, the guest may be partially functional, but anything that requires write access to the read-only partitions will obviously be in trouble. This is why we could ping the manager appliance, but all other functionality was broken. The manager cluster uses ZooKeeper for clustering services. ZooKeeper requires consistent and low-latency write access to disk. Because this wasn’t available to 172.16.1.41, it was marked as down in the cluster.

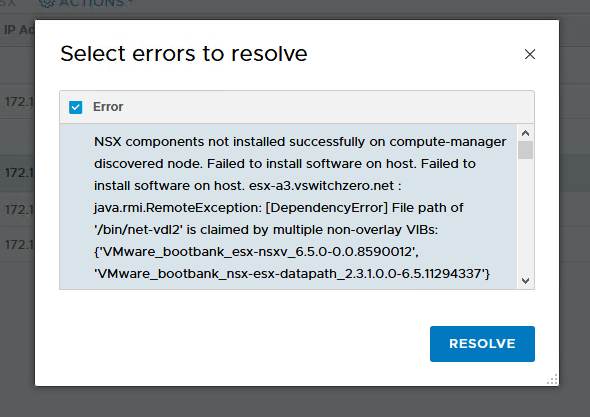
After discussing this with our fictional customer, we were able to confirm that an ESXi host esx-e3 experienced a total storage outage for a few minutes and that it had since been fixed. They had assumed it was not related because the appliance was on esx-e1, not esx-e3.

Continue reading “NSX-T Troubleshooting Scenario 3 – Solution”

NSX-T Troubleshooting Scenario 3

It’s been a while since I’ve posted anything, so what better way to get back into the swing of things than a troubleshooting scenario! These last few months I’ve been busy learning the ropes in my new role as an SRE supporting NSX and VMware Cloud on AWS. Hopefully I’ll be able to start releasing regular content again soon.

Welcome to the third NSX-T troubleshooting scenario! What I hope to do in these posts is share some of the common issues I run across from day to day. Each scenario will be a two-part post. The first will be an outline of the symptoms and problem statement along with bits of information from the environment. The second will be the solution, including the troubleshooting and investigation I did to get there.

The Scenario

As always, we’ll start with a fictional customer problem statement:

“I’m not experiencing any problems, but I noticed that my NSX-T 2.4.1 manager cluster is in a degraded state. One of the unified appliances appears to be down. I can ping it just fine, but I can’t seem to login to the appliance via SSH. I’m sure I’m putting in the right password, but it won’t let me in. I’m not sure what’s going on. Please help!”

From the NSX-T Overview page, we can see that one appliance is red.

nsxt-tshoot3a-2

Let’s have a look at the management cluster in the UI:

nsxt-tshoot3a-1

The problematic manager is 172.16.1.41. It’s reporting its cluster connectivity as ‘Down’ despite being reachable via ping. It appears that all of the services including controller related services are down for this appliance as well.

nsxt-tshoot3a-3

Strangely, it doesn’t appear to be accepting the admin or root passwords via SSH. We always get an ‘Access Denied’ response. We can login successfully to the other two appliances without issue using the same credentials.

Opening a console window to 172.16.1.41 greets us with the following:

nsxt-tshoot3a-4

Error messages appear to continually scroll by from system-journald mentioning “Failed to write entry”. Hitting enter gives us the login prompt, but we immediately get the same error messages and can’t login.

What’s Next

It seems pretty clear that there is something wrong with 172.16.1.41, but what may have caused this problem? How would you fix this and most importantly, how can you root cause this?

I’ll post the solution in the next day or two, but how would you handle this scenario? Let me know! Please feel free to leave a comment below or via Twitter (@vswitchzero).

NSX-T Troubleshooting Scenario 2 – Solution

Welcome to the second installment of a new series of NSX-T troubleshooting scenarios. Thanks to everyone who took the time to comment on the first half of the scenario. Today I’ll be performing some troubleshooting and will show how I came to the solution.

Please see the first half for more detail on the problem symptoms and some scoping.

Getting Started

As we saw in the first half, our fictional customer was having northbound communication problems because the physical core router was not getting any of the NSX advertised routes:

vyos@router-core:~$ sh ip route
Codes: K - kernel route, C - connected, S - static, R - RIP, O - OSPF,
B - BGP, > - selected route, * - FIB route

S>* 0.0.0.0/0 [1/0] via 172.16.1.12, eth0.1
C>* 10.99.99.0/27 is directly connected, eth0.2005
C>* 127.0.0.0/8 is directly connected, lo
C>* 172.16.1.0/24 is directly connected, eth0.1
C>* 172.16.11.0/24 is directly connected, eth0.11
C>* 172.16.76.0/24 is directly connected, eth0.76
C>* 172.16.98.0/24 is directly connected, eth0.98

Based on what we observed in the first half, we can make a few assertions:

  1. The T1 routers are advertising their routes just fine to the T0 (a total of 8 routes).
  2. The T0 router is peering with the core router successfully because we received BGP routes from the core router.
  3. The T0 router is configured for route redistribution of NSX connected and Static routes.

Let’s just run through a couple of quick tests to confirm point one above and make sure that the T0 can communicate with the core router. From VRF 2 (the T0 SR), we’ll check the interface IP first:

Continue reading “NSX-T Troubleshooting Scenario 2 – Solution”

NSX-T Troubleshooting Scenario 2

Welcome to the second NSX-T troubleshooting scenario! What I hope to do in these posts is share some of the common issues I run across from day to day. Each scenario will be a two-part post. The first will be an outline of the symptoms and problem statement along with bits of information from the environment. The second will be the solution, including the troubleshooting and investigation I did to get there.

The Scenario

As always, we’ll start with a fictional customer problem statement:

“I’ve just deployed a new NSX-T 2.3.1 environment with two tenants. The T1 routers (one per tenant) appear to be working fine. I have VM to VM connectivity on logical switches, but I can’t get to any northbound networks. The non-NSX core router isn’t getting any of the NSX routes!”

Taking a quick look at the environment, we can see that each tenant T1 router has several logical switches attached. Each is advertising four subnets as can be seen below:

nsxt-tshoot2a-2

You can also see that the ‘Advertise All NSX Connected Routes’ option is enabled, which should cause these routes to be advertised to the T0.

nsxt-tshoot2a-3

On the T0, we can  see that there are ‘Linked Ports’ to both T1 routers, as well as a VLAN-backed logical switch for northbound communication via edge-e1. Let’s start by ensuring that these routes are actually making it to the T0 SR.

From the edge CLI, I start by listing all logical router instances to determine the VRF for the T0 SR:

Continue reading “NSX-T Troubleshooting Scenario 2”

New Upgrade Issue in NSX 6.4.4

Be sure to check out VMware KB 67416 before upgrading to 6.4.4.

If you are planning to upgrade to NSX 6.4.4, be sure to have a look at VMware KB 67416 before you do. I’ve seen several customers hit this issue now, and a bit of pre-work before the upgrade can save you a lot of grief.

It appears that if you are using grouping objects, like security groups or IP sets in your ESG firewall rules, there is a chance that your ESG will become unmanageable after NSX Manager gets upgraded to 6.4.4. Most customers will notice this issue when they go to upgrade their ESGs as part of the upgrade process and the tasks fail. In addition to not being able to upgrade the edge, all configuration changes you attempt to make will also fail.

This issue lies in the message bus communication channel between NSX Manager and the ESG. These security groups and IP sets trigger a large number of messages and eventually the channel becomes blocked as a result. Unfortunately, there is no workaround aside from removing these groups and IP sets from the firewall before upgrading. This may not be a feasible workaround for the majority of customers out there.

Although not a common configuration, this issue can also be triggered if DFW rules are applied to ESGs and these rules contain grouping objects.

If you know your environment is configured with security groups and IP sets in the edge firewall, I’d recommend reaching out to VMware technical support prior to beginning your upgrade. Support can proactively install a “hot patch” so that you won’t hit this problem. If you have already hit this, the same hot patch can be applied to get you back up and running. In order for the patch to work, the ESG would have to be re-deployed leading to a brief outage. Obviously getting in front of this issue is a better plan than being reactive.

VMware will be updating the 6.4.4 release notes to reflect this.

NSX-T Troubleshooting Scenario 1 – Solution

Welcome to the first installment of a new series of NSX-T troubleshooting scenarios. Thanks to everyone who took the time to comment on the first half of the scenario. Today I’ll be performing some troubleshooting and will show how I came to the solution.

Please see the first half for more detail on the problem symptoms and some scoping.

Getting Started

As we saw in the first half, the installation of the NSX-T VIBs were failing with the following error:

nsxt-tshoot1a-5

At first glance, it looked as if the NSX-T VIBs, or an older version of them were already installed. Taking a closer look at the actual VIB names, however, was very telling. The ‘esx-nsxv’ in the name denotes that these belong to NSX for vSphere.

Logging in to host esx-a3 via SSH and checking for installed VIBs with ‘nsx’ in the name came back with the following:

[root@esx-a3:~] esxcli software vib list |grep nsx
esx-nsxv                       6.5.0-0.0.8590012                     VMware      VMwareCertified   2018-08-31

Indeed, the NSX-V VIBs are still installed. Having a look at the environment, we saw that all other traces of NSX-V were gone – the manager, controllers, vmkernel ports, portgroups and Web Client plugin were missing. Only these lingering VIBs were not removed from these three hosts for some reason. It’s important to properly remove NSX to prevent issues like this from occurring.

Removing the NSX-V VIBs

The first order of business was to put the host in maintenance mode. I didn’t have any running VMs created yet, so I just went ahead and put all three in maintenance mode:

nsxt-tshoot1b-2

Once that was done, I could remove the VIBs using the following esxcli software vib command:

Continue reading “NSX-T Troubleshooting Scenario 1 – Solution”

NSX-T Troubleshooting Scenario 1

Welcome to the first NSX-T troubleshooting scenario! My NSX-V troubleshooting scenarios have been well received, so I thought it was time to start a new series for NSX-T. If you’ve got an idea for a scenario, please let me know!

What I hope to do in these posts is share some of the common issues I run across from day to day. Each scenario will be a two-part post. The first will be an outline of the symptoms and problem statement along with bits of information from the environment. The second will be the solution, including the troubleshooting and investigation I did to get there.

The Scenario

As always, we’ll start with a brief problem statement:

“I removed NSX for vSphere from my lab environment and am trying to install NSX-T for a proof of concept. Unfortunately, I get an error message every time I try to install the NSX-T VIBs on my ESXi hosts! I’m running NSX-T 2.3.1, and ESXi 6.5 U2”

In the NSX-T UI, we’re greeted with a simple “NSX Install Failed” message for the host esx-a3:

nsxt-tshoot1a

Clicking on this error gives us a much more verbose error message:

nsxt-tshoot1a-5

The full text of the error message is as follows:

NSX components not installed successfully on compute-manager discovered node. Failed to install software on host. Failed to install software on host. esx-a3.vswitchzero.net : java.rmi.RemoteException: [DependencyError] File path of '/bin/net-vdl2' is claimed by multiple non-overlay VIBs: {'VMware_bootbank_esx-nsxv_6.5.0-0.0.8590012', 'VMware_bootbank_nsx-esx-datapath_2.3.1.0.0-6.5.11294337'} File path of '/bin/vsip_vm_list.sh' is claimed by multiple non-overlay VIBs: {'VMware_bootbank_esx-nsxv_6.5.0-0.0.8590012', 'VMware_bootbank_nsx-esx-datapath_2.3.1.0.0-6.5.11294337'} File path of '/etc/vmware/firewall/netCPRuleset.xml' is claimed by multiple non-overlay VIBs: {'VMware_bootbank_nsx-netcpa_2.3.1.0.0-6.5.11294485', 'VMware_bootbank_esx-nsxv_6.5.0-0.0.8590012'} File path of '/bin/vsipioctl' is claimed by multiple non-overlay VIBs: {'VMware_bootbank_esx-nsxv_6.5.0-0.0.8590012', 'VMware_bootbank_nsx-esx-datapath_2.3.1.0.0-6.5.11294337'} File path of '/usr/lib/vmware/vm-support/bin/dump-vdr-info.sh' is claimed by multiple non-overlay VIBs: {'VMware_bootbank_esx-nsxv_6.5.0-0.0.8590012', 'VMware_bootbank_nsx-esx-datapath_2.3.1.0.0-6.5.11294337'} File path of '/bin/net-vdr' is claimed by multiple non-overlay VIBs: {'VMware_bootbank_esx-nsxv_6.5.0-0.0.8590012', 'VMware_bootbank_nsx-esx-datapath_2.3.1.0.0-6.5.11294337'} File path of '/etc/vmsyslog.conf.d/dfwpktlogs.conf' is claimed by multiple non-overlay VIBs: {'VMware_bootbank_nsx-netcpa_2.3.1.0.0-6.5.11294485', 'VMware_bootbank_esx-nsxv_6.5.0-0.0.8590012'} File path of '/etc/init.d/netcpad' is claimed by multiple non-overlay VIBs: {'VMware_bootbank_nsx-netcpa_2.3.1.0.0-6.5.11294485', 'VMware_bootbank_esx-nsxv_6.5.0-0.0.8590012'} File path of '/usr/lib/vmware/netcpa/bin/netcpa' is claimed by multiple non-overlay VIBs: {'VMware_bootbank_nsx-netcpa_2.3.1.0.0-6.5.11294485', 'VMware_bootbank_esx-nsxv_6.5.0-0.0.8590012'} File path of '/bin/dfwpktlogs.sh' is claimed by multiple non-overlay VIBs: {'VMware_bootbank_nsx-netcpa_2.3.1.0.0-6.5.11294485', 'VMware_bootbank_esx-nsxv_6.5.0-0.0.8590012'} File path of '/etc/vmware/firewall/bfdRuleset.xml' is claimed by multiple non-overlay VIBs: {'VMware_bootbank_nsx-netcpa_2.3.1.0.0-6.5.11294485', 'VMware_bootbank_esx-nsxv_6.5.0-0.0.8590012'} File path of '/etc/vmware/vm-support/dfw.mfx' is claimed by multiple non-overlay VIBs: {'VMware_bootbank_esx-nsxv_6.5.0-0.0.8590012', 'VMware_bootbank_nsx-esx-datapath_2.3.1.0.0-6.5.11294337'} Please refer to the log file for more details.

Clicking on the RESOLVE button simply tries the install again, which fails.

Continue reading “NSX-T Troubleshooting Scenario 1”

Testing NSX VTEP Communication

An in-depth look at the VXLAN network stack and VTEP to VTEP communication testing.

Virtual Extensible LAN – or VXLAN – is the key overlay technology that makes a lot of what NSX does possible. It abstracts the underlying L2/L3 network and allows logical switches to span vast networks and datacenters. To achieve this, each ESXi hypervisor has one or more VTEP vmkernel ports bound the the host’s VXLAN network stack instance.

Your VTEPs are created during VXLAN preparation – normally after preparing your hosts with the NSX VIBs. Doing this in the UI is a straight forward process, but there are some important pre-requisites that must be fulfilled before VXLAN networking will work. Most important of these are:

  1. Your physical networking must be configured for an end-to-end MTU of 1600 bytes. In theory it’s 1550, but VMware usually recommends a minimum of 1600.
  2. You must ensure L2 and L3 connectivity between all VTEPs.
  3. You need to prepare for IP address assignment by either configuring DHCP scopes or IP pools.
  4. If your replication mode is hybrid, you’ll need to ensure IGMP snooping is configured on each VLAN used by VTEPs.
  5. Using full Multicast mode? You’ll need IGMP snooping in addition to PIM multicast routing.

This can sometimes be easier said than done – especially if you have hosts in multiple locations with numerous hops to traverse.

Testing VXLAN VTEP communication is a key troubleshooting skill that every NSX engineer should have in their toolbox. Without healthy VTEP communication and a properly configured underlay network, all bets are off.

I know this is a pretty well covered topic, but I wanted to dive into this a little bit deeper and provide more background around why we test the way we do, and how to draw conclusions from the results.

The VXLAN Network Stack

Multiple network stacks were first introduced in vSphere 6.0 for use with vMotion and other services. There are several benefits to isolating services based on network stacks, but the most practical is a completely independent routing table. This means you can have a different default gateway for vMotion – or in this case VXLAN traffic – than you would for all other management services.

Each vmkernel port that is created on an ESXi host must belong to one and only one network stack. When your cluster is VXLAN prepared, the created kernel ports are automatically assigned to the correct ‘vxlan’ network stack.

Using the esxcfg-vmknic -l command will list all kernel ports including their assigned network stack:

[root@esx-a1:~] esxcfg-vmknic -l
Interface  Port Group/DVPort/Opaque Network        IP Family IP Address                              Netmask         Broadcast       MAC Address       MTU     TSO MSS NetStack
vmk0       7                                       IPv4      172.16.1.21                             255.255.255.0   172.16.1.255    00:25:90:0b:1e:12 1500    65535   defaultTcpipStack
vmk1       13                                      IPv4      172.16.98.21                            255.255.255.0   172.16.98.255   00:50:56:65:59:a8 9000    65535   defaultTcpipStack
vmk2       22                                      IPv4      172.16.11.21                            255.255.255.0   172.16.11.255   00:50:56:63:d9:72 1500    65535   defaultTcpipStack
vmk4       vmservice-vmknic-pg                     IPv4      169.254.1.1                             255.255.255.0   169.254.1.255   00:50:56:61:7a:23 1500    65535   defaultTcpipStack
vmk3       52                                      IPv4      172.16.76.22                            255.255.255.0   172.16.76.255   00:50:56:6b:e4:94 1600    65535   vxlan

Notice that all kernel ports belong to the ‘defaultTcpipStack’ except for vmk3, which lists vxlan. You can view the netstacks currently enabled on your host using the esxcli network ip netstack list command:

[root@esx-a1:~] esxcli network ip netstack list
defaultTcpipStack
   Key: defaultTcpipStack
   Name: defaultTcpipStack
   State: 4660

vxlan
   Key: vxlan
   Name: vxlan
   State: 4660

Continue reading “Testing NSX VTEP Communication”

NSX Troubleshooting Scenario 14 – Solution

Welcome to the fourteenth installment of a new series of NSX troubleshooting scenarios. Thanks to everyone who took the time to comment on the first half of the scenario. Today I’ll be performing some troubleshooting and will show how I came to the solution.

Please see the first half for more detail on the problem symptoms and some scoping.

Getting Started

In the first half, our fictional customer was trying to prevent a specific summary route from being advertised to a DLR appliance using a BGP filter. Every time they added the filter, all connectivity to VMs downstream from that DLR was lost.

tshoot14a-4

The filter appears correct. The summary route is a /21 network that comprises all eight /24s that were assigned to logical switches. You can also see that GE and LE (greater than/less than) values were not specified, so the specific summary route should be matched exactly.

tshoot14a-5

After publishing the changes, we saw that all BGP routes were removed from the DLR. It’s almost as if the filter stopped ALL route prefixes from making it to the DLR rather than just the one specified. Wait, did it?

Let’s refer to the NSX documentation on BGP filters. Under the Configure BGP section, the relevant steps are the following:

Continue reading “NSX Troubleshooting Scenario 14 – Solution”

NSX Troubleshooting Scenario 14

Welcome to the fourteenth installment of my NSX troubleshooting series. What I hope to do in these posts is share some of the common issues I run across from day to day. Each scenario will be a two-part post. The first will be an outline of the symptoms and problem statement along with bits of information from the environment. The second will be the solution, including the troubleshooting and investigation I did to get there.

The Scenario

As always, we’ll start with a brief problem statement:

“I’m trying to prevent some specific BGP routes from being advertised to my DLR, but the route filters aren’t working properly. Every time I try to do this, I get an outage to everything behind the DLR!”

Let’s have a quick look at what this fictional customer is trying to do with BGP.

tshoot14a-0

The design is simple – a single ESG peered with a single DLR appliance. The /21 address space assigned to this environment has been split out into eight /24 networks.

tshoot14a-3

The mercury-esg1 appliance has two neighbors configured – the physical router (172.18.0.1) and the southbound DLR protocol address (172.18.8.4). Both the ESG and DLR are in the same AS (iBGP).

tshoot14a-1

As you can see, on mercury-esg1 a summary static route has been created with the DLR forwarding address as the next hop. This /21 summarizes all eight /24 subnets that will be assigned to the logical switches in this environment. Because the customer wants more specific /24 BGP routes to be advertised by the DLR, this is what is referred to as a floating static route. Because it’s less specific, it’ll only take effect as a backup should BGP peering go down. This is a common design consideration and provides a bit of extra insurance should the DLR appliance go down unexpectedly.

Continue reading “NSX Troubleshooting Scenario 14”