NSX was designed from the ground up to be very configurable via restful API calls. You can create, modify and remove objects and configuration using APIs. This also makes NSX very powerful with automation and other cloud management platforms and tools.
One of the most common questions I get from those getting started with API calls is on the unique identifiers – often referred to as ‘morefs’ or ‘managed object reference’ identifiers – used in these calls. The vCenter Server ‘Managed Object Browser’ is often used as the primary method to obtain these moref identifiers, but it can be a bit daunting to navigate for those unfamiliar with it. It also requires full administrative privileges to vCenter so may not always be an option for all users either. Another way to find them is to use PowerNSX – but again, you may not be comfortable with PowerCLI yet, or maybe it’s not deployed in the environment.
Not to worry – there are some surprisingly simple ways to obtain moref identifiers for all kinds of vCenter and NSX objects. In this post, I’ll show some of these tricks that I’ve picked up over time.
NSX Edges and DLRs
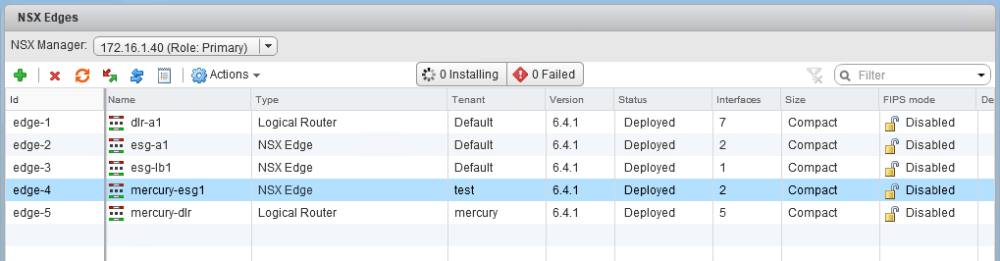
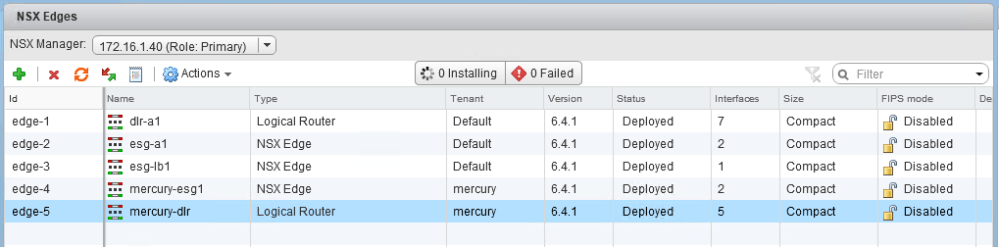
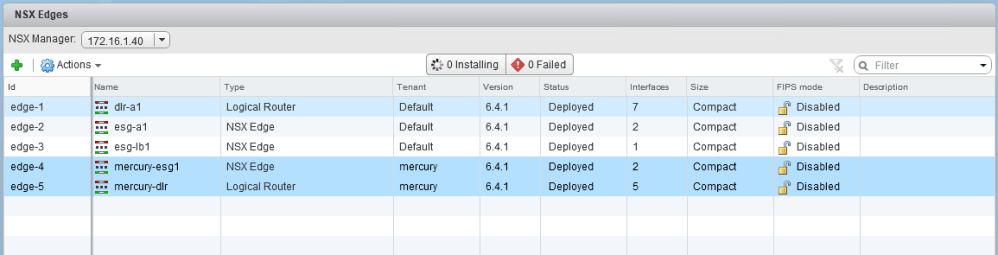
NSX edges and DLRs are the easiest objects to obtain morefs for. VMware very thoughtfully included a column in the vSphere Web Client NSX Edges view called ‘Id’.
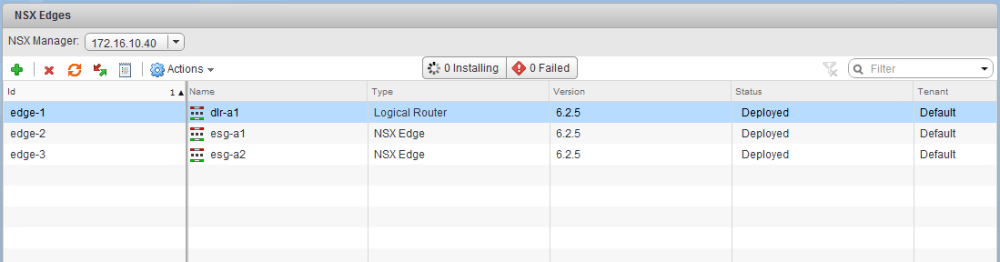
Above, you can see that edge ‘esg-a1’ has a unique identifier called ‘edge-2’. This ID is indeed the moref.
Another way to get this information would be to use the NSX Manager Central CLI feature. From the manager CLI, the following command will get you a similar output:
nsxmanager.lab.local> show edge all
NOTE: CLI commands for Edge ServiceGateway(ESG) start with 'show edge'
 CLI commands for Distributed Logical Router(DLR) Control VM start with 'show edge'
 CLI commands for Distributed Logical Router(DLR) start with 'show logical-router'
 Edges with version >= 6.2 support Central CLI and are listed here
Legend:
Edge Size: Compact - C, Large - L, X-Large - X, Quad-Large - Q
Edge ID Name Size Version Status
edge-1 dlr-a1 C 6.2.5 GREEN
edge-2 esg-a1 C 6.2.5 GREEN
edge-3 esg-a2 C 6.2.5 GREEN
Virtual Machines and Appliances
In the previous section, we looked at the NSX Edge moref identifiers, but these appliances also exist as unique virtual machines from a vCenter Server perspective. Every virtual machine in the vCenter inventory – including controllers, DLRs, ESGs etc – can also be referred to as virtual machines with a vm-X moref identifier. For example, my DLR called dlr-a1 is edge-1 from an NSX perspective but actually exists as two DLR appliances in high availability mode. Having virtual machine moref identifiers allows us to uniquely identify each appliance.
To find out a virtual machine’s moref identifier, an easy method to use is to look at the URL in the vSphere Web Client. For example, I’ve gone to the ‘Hosts and Clusters’ view in my lab and selected the first of two dlr-a1 appliances:
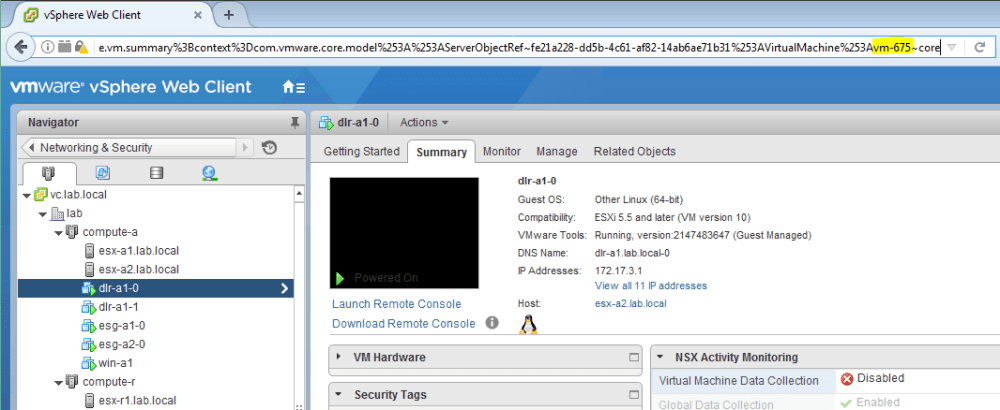
At the end of the URL string in the address bar, we can see that the moref identifier is included. It’s somewhat stuffed in there in and not always noticeable, but knowing that the virtual machine moref always begins with ‘vm-‘ followed by a numerical value, we are able to pick it out. In the above example, the DLR appliance known as dlr-a1-0 has a virtual machine moref value of vm-675.
Looking at the second of the two appliances in the same way – the standby in the HA pair – I get a different virtual machine moref value of vm-677.
NSX Controllers
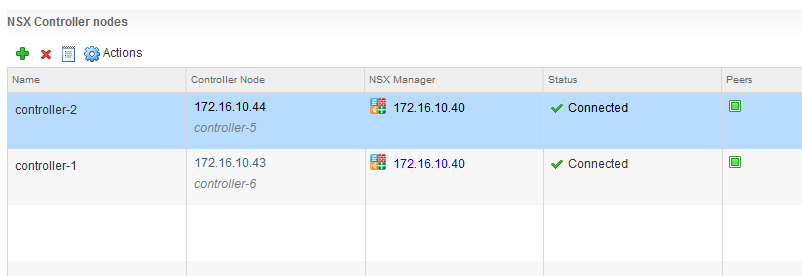
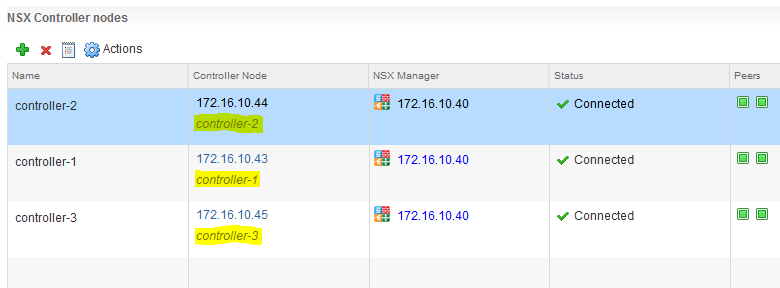
From an NSX perspective, NSX controllers also have a moref identifier prefixed by ‘controller-‘. Again, VMware thoughtfully included this information underneath the controller IP address in the ‘Controller Node’ column. This can be found in the Installation section of the NSX UI in the vSphere Web Client under the ‘Management’ tab.

One thing to be careful about is that the ‘Name’ column does not necessarily provide the moref identifier. VMware recently allowed the ability to name controllers with a friendly name in NSX 6.2. Just like ESGs and DLRs, NSX controllers also have virtual machine moref identifiers that are sometimes needed.
vSphere Clusters
As you have probably noticed, vSphere clusters are often the configuration delimiter for many things in NSX, including host preparation, firewall status etc. As such, many API calls will reference cluster objects. The cluster moref is not prefixed by ‘cluster-‘ as you might expect, but rather ‘domain-c‘. To determine the cluster moref, we can use the same trick that we used for finding the virtual machine IDs. As you’ll discover the URL address in the vSphere Web Client can tell us the moref for numerous objects.
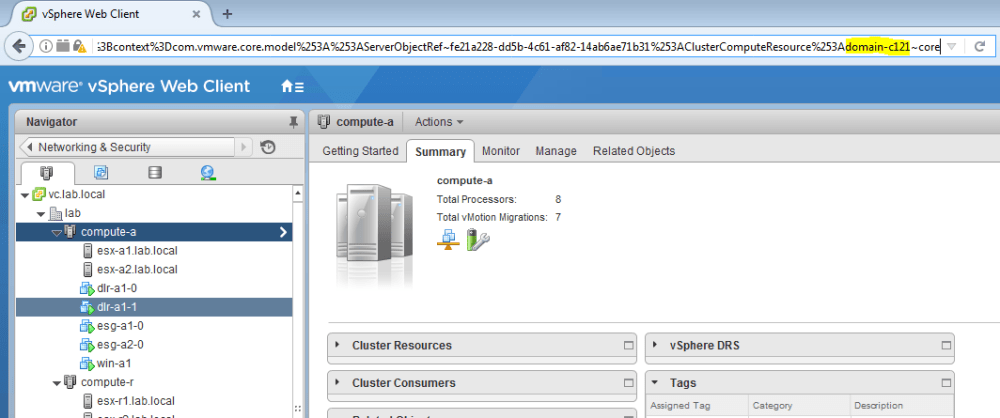
In my lab above, cluster compute-a is domain-c121.
You can also obtain a list of NSX prepared clusters and their moref IDs using the NSX Central CLI. From an NSX manager CLI prompt:
nsxmanager.lab.local> show cluster all
No. Cluster Name Cluster Id Datacenter Name Firewall Status
1 compute-r domain-c641 lab Enabled
2 compute-vcp domain-c705 lab Not Ready
3 compute-a domain-c121 lab Enabled
4 management domain-c205 lab Not Ready
ESXi Hosts
There are a couple of different ways that you can obtain the moref for an ESXi host. As you’d expect, the moref is always prefixed by ‘host-‘. Just like for clusters and virtual machines, you can select the object in the vSphere Web Client and get the host moref from the address bar. Alternatively, there is another easy way to get the host moref from any NSX prepared host from the CLI.
When ESXi hosts are prepared, NSX pushes numerous RabbitMQ configuration variables that instruct it how to to communicate with NSX manager. One of these RabbitMQ parameters called /UserVars/RmqHostId actually includes the host moref.
[root@esx-a1:~] esxcfg-advcfg -g /UserVars/RmqHostId
Value of RmqHostId is host-223
As you can see, host esx-a1 has a moref of host-223.
Another option is to use the NSX Central CLI for viewing the contents of a cluster. Once you have the cluster ID – domain-c121 in my example – the following command can be used to view the hosts in the cluster and get the moref identifiers:
nsxmanager.lab.local> show cluster domain-c121
Datacenter: lab
Cluster: compute-a
No. Host Name Host Id Installation Status
1 esx-a1.lab.local host-223 Enabled
2 esx-a2.lab.local host-225 Enabled
Transport Zones
The moref IDs for transport zones aren’t required often, but if you ever need to find one, the NSX Central CLI can get you this information.
The below output will list out all logical switches, but will also correlate the transport zone name with a moref prefixed by ‘vdnscope-‘. Logical switch UUID values can also be identified using this command:
nsxmanager.lab.local> show logical-switch list all
NAME UUID VNI Trans Zone Name Trans Zone ID
Transit VXLAN1 210b616b-691a-470f-ad1e-1cc24b485d0d 5000 Primary TZ vdnscope-1
Blue Network 7a068fb5-9b17-4779-9b3d-0d81a439189f 5001 Primary TZ vdnscope-1
Green Network 22f01e70-18ae-4d3e-a683-be08d244e919 5002 Primary TZ vdnscope-1
Yellow Network 8510eedb-e6a8-41a0-bae0-79f3af8630be 5003 Primary TZ vdnscope-1
Red Network 4996f8f1-68c9-43de-9207-fbe038543133 5004 Primary TZ vdnscope-1
Purple Network bdd16f8e-805f-45df-a5c7-00a0ce319cc9 5005 Primary TZ vdnscope-1
Test Network A 72597655-ad88-4e32-9baf-c724d49c9a7c 5006 Primary TZ vdnscope-1
As you can see above, I have only one transport zone called ‘Primary TZ’ with a moref of vdnscope-1.
Datastores
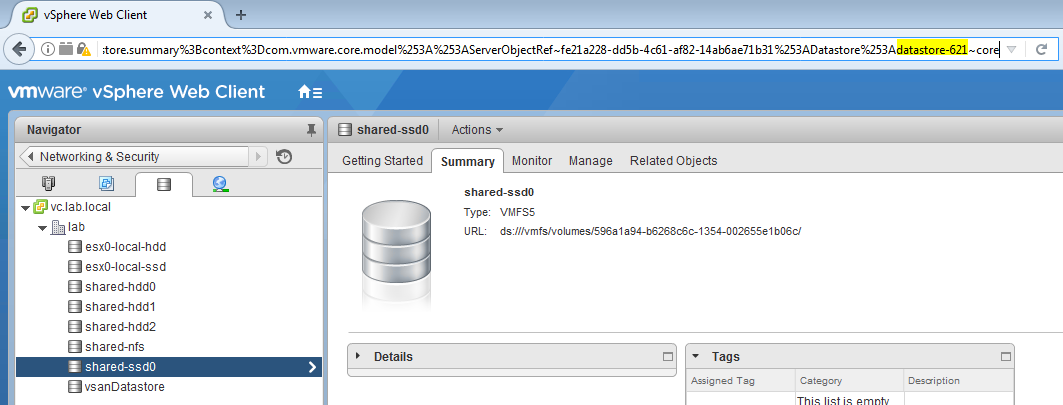
Some API calls expect input including the moref for a specific datastore. An example would be trying to deploy a new ESG or controller – NSX needs to know where to store the VM. Once again, going to the datastores view in the vSphere Web Client allows us to select the specific datastore and the ‘datastore-‘ prefixed moref is visible in the address bar.
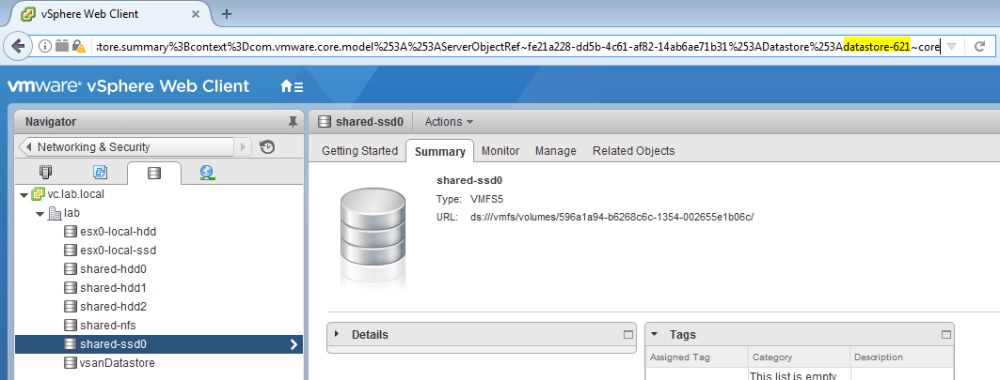
Above you can see my datastore called shared-ssd0 equates to moref datastore-621.
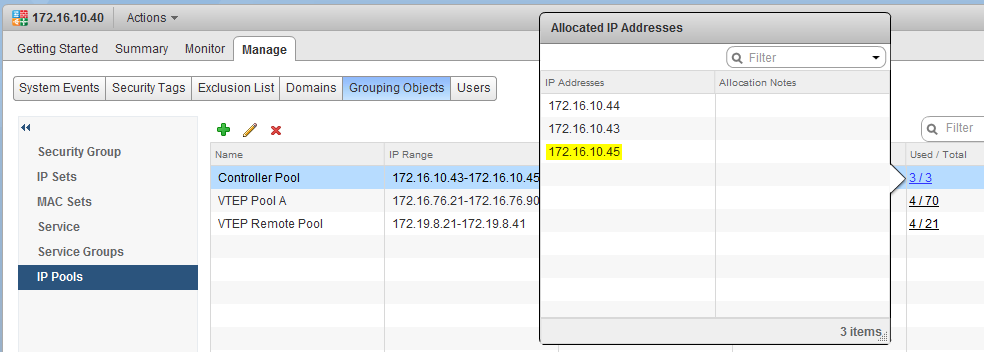
IP Pools
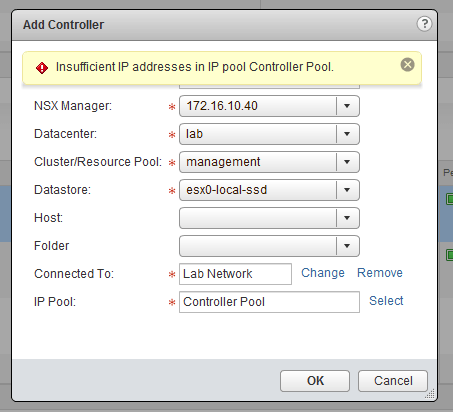
Some API calls involving the deployment of objects require the moref identifier of an IP address pool. Unfortunately, this moref can’t be found in the GUI, but with a couple of quick API calls can be obtained pretty easily.
First, we’ll use an API call to query all IP pools on the NSX manager. This will provide an output that will include the moref identifier of the pool in question:
GET https://NSX-Manager-IP-Address/api/2.0/services/ipam/pools/scope/scopeID
As you can see above, the ‘scope ID’ is also required to run this GET call. In every instance I’ve seen, using globalroot-0 as the scopeID works.
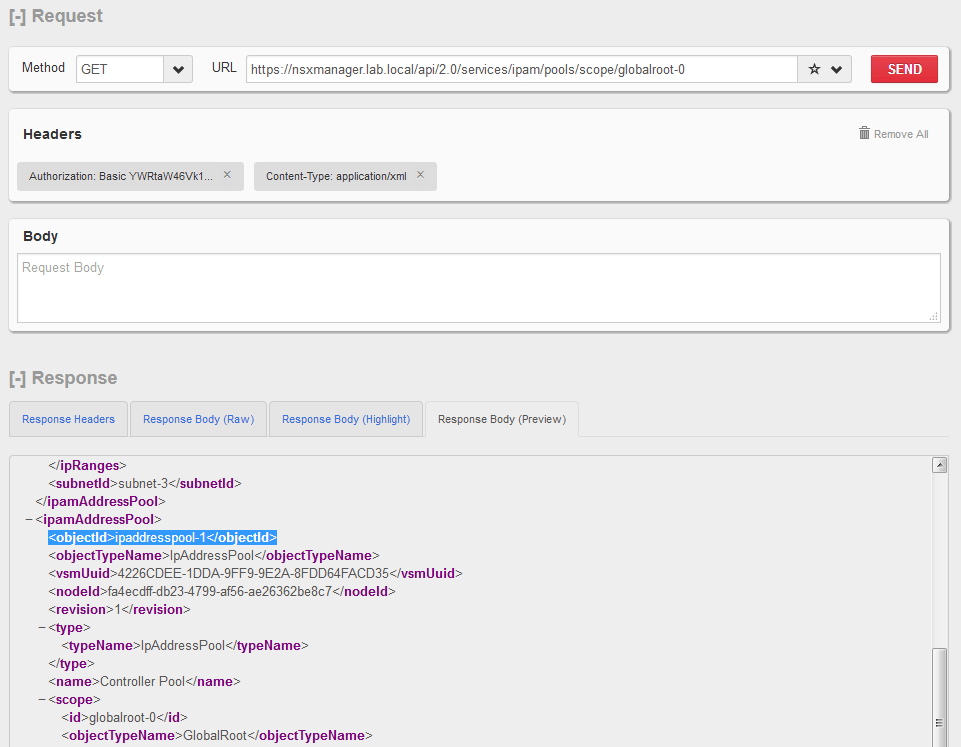
The various IP pools will be separated by <ipamAddressPool> XML tags. You’ll want to identify the correct pool based on the IP range listed or by the text in the <name> field. In my example, I want to find the moref for the Controller Pool, which is found in the section below:
<ipamAddressPool>
<objectId>ipaddresspool-1</objectId>
<objectTypeName>IpAddressPool</objectTypeName>
<vsmUuid>4226CDEE-1DDA-9FF9-9E2A-8FDD64FACD35</vsmUuid>
<nodeId>fa4ecdff-db23-4799-af56-ae26362be8c7</nodeId>
<revision>1</revision>
<type>
<typeName>IpAddressPool</typeName>
</type>
<name>Controller Pool</name>
<scope>
<id>globalroot-0</id>
<objectTypeName>GlobalRoot</objectTypeName>
<name>Global</name>
</scope>
...
<snip>
As you can see above, the IP pool is identified by the moref identifier ipaddresspool-1.
Conclusion
And there you have it. Much easier than navigating through the vCenter Managed Object Browser and doesn’t require full administrative privileges in vCenter. For the address bar trick, you’ll need to have a minimum of read-only privileges to the object you are trying to select, as well as read-only access to the NSX UI in order to view the Edge list and installation section. The NSX Central CLI commands do require that you log in to the NSX manager via CLI using an administrator account, but most individuals managing NSX would have this access.
If there are any other morefs or identifiers you are having difficulty locating, please leave a comment and I’d be happy to post some methods.