In my previous post on the Synology DS1621+, I configured storage pools and volumes. Now that our storage is ready for use, I’ll be configuring iSCSI in my VMware vSphere lab environment.
Network Configuration
A proper network setup is the foundation for a successful iSCSI deployment. I won’t go into too much detail about vSphere network configuration in this post, but here are some general recommendations when it comes to iSCSI:
- Use a dedicated VLAN for iSCSI. Do not use it for any other purpose.
- Use a dedicated subnet and ensure it is non-routable.
- Use a dedicated VMkernel port for iSCSI in the created subnet.
- If possible, ensure you have redundant NICs configured on your hosts and storage box.
- Use a 9000 MTU if possible (more on this later)
To begin, I’ll be configuring the interface settings on the DS1621+. There are many different ways this can be done, but I only have one spare 10Gbps port currently, so I’ll forgo a proper multipathing configuration and keep things simple. That said, I’ll still configure two interfaces – a single 1Gbps interface for management, and a single 10Gbps interface in a different VLAN for exclusive iSCSI use.
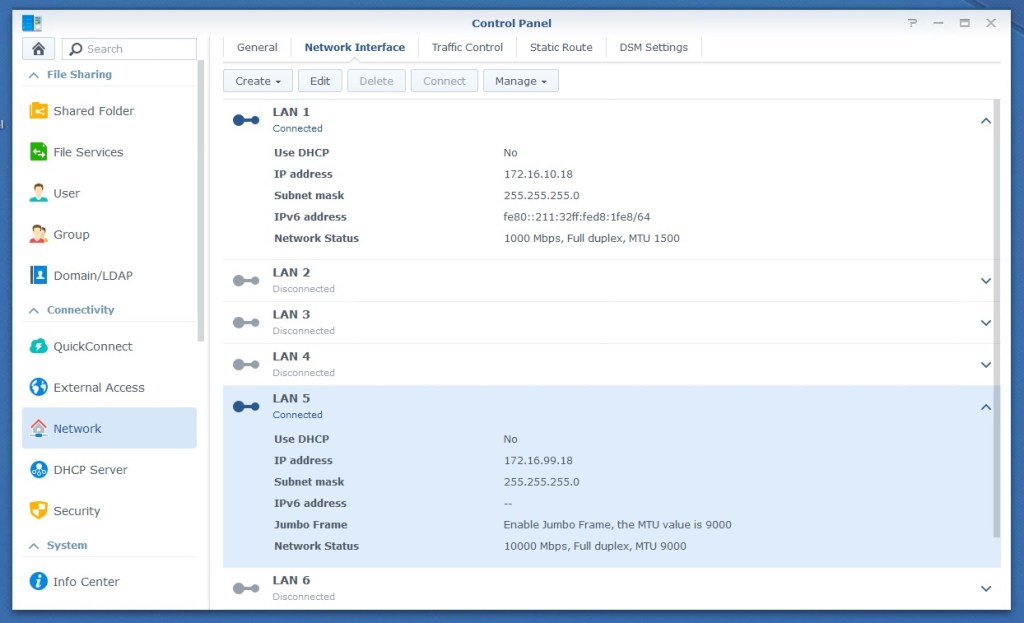
LAN 1 is a 1Gbps interface that I have in my management network (172.16.10.0/24). This interface will be used to access the Synology DSM interface and anything else that is non-iSCSI related. In my case, LAN5 and LAN6 are the 10Gbps ports on the DS1621+. The 172.16.99.0/24 network is my iSCSI network and is non-routable. Both interfaces are connected to “access” ports on my physical switch. Since there is no 802.1q VLAN tagging, VLANs are not specified on the DS1621+. I’ll show you how to restrict iSCSI to a specific interface when we configure iSCSI targets later on. Next, we’ll move on to the vSphere networking configuration.
Because I already have my TrueNAS box up and running in VLAN 99, my vSwitch and VMkernel ports are already configured correctly for iSCSI in this network. I won’t get too much into vSphere networking configuration today, but I’ll at least show you how I have things configured.
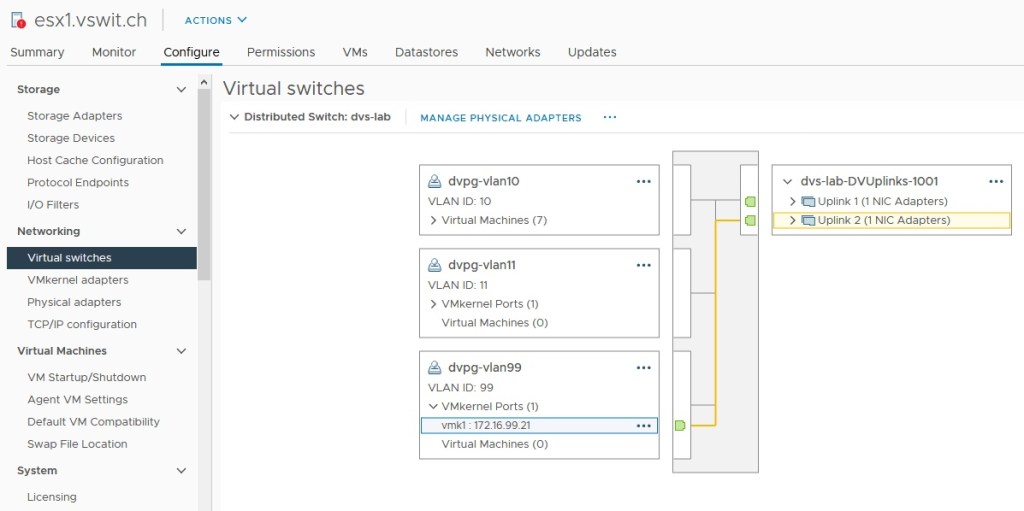
My distributed switch called “dvs-lab” has a dvPortgroup configured with a VLAN ID of 99 configured. Unlike the DS-1621+, each of the 10Gbps NICs here are connected to 802.1q VLAN tagged ports on my switch. I have the default “route based on originating port ID” teaming configured on all the dvPortgroups.
I also have a dedicated VMkernel port configured for iSCSI in the 172.16.99.0/24 network. In the example above, host esx1 uses 172.16.99.21. Note that I have not configured a gateway for this VMkernel interface because I want this network to remain non-routable. The same is true for my physical layer-3 switch – there are no VIFs attached to the VLAN.
Quick Note on Jumbo Frames
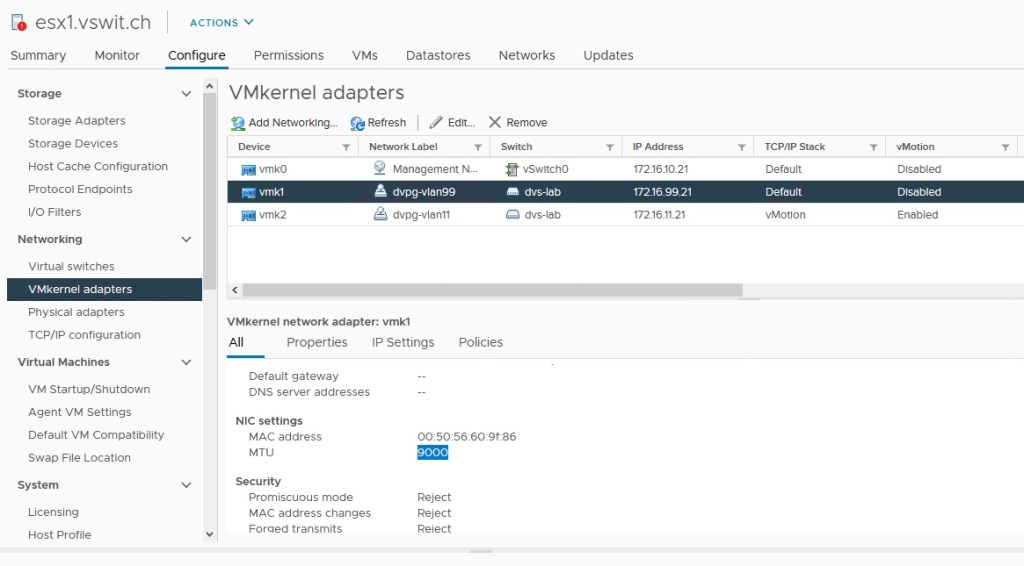
Although there are a lot of varying opinions on jumbo frames out there, I would encourage you to consider using a 9000 MTU for iSCSI. In a tightly controlled, non-routed VLAN like that used for iSCSI in a datacenter, most of the reasons to avoid large frames simply do not apply. Storage traffic tends to be very heavy and the number of frames your ESXi host will need to process with a 1500 MTU will be very high. There is overhead associated with this high packet rate. For example, with 10Gbps networking, a 1GB/s sustained transfer rate is not unreasonable. To put that into perspective, your host would have to process almost 700,000 frames and headers every second with a 1500MTU. With a 9000 MTU, that number would be a little over 100,000 – much easier to handle.
Configuring jumbo frames is outside of the scope of this post, but in my environment, I have jumbo frames configured in the following locations:
- Distributed Switch – set to 9000 MTU. This configuration passes to physical vmnics.
- VMkernel port for iSCSI – set to 9000 MTU.
- Physical switch – Jumbo frames enabled globally.
- Synology DS1621+ – Jumbo frames enabled on NET5 interface.
Testing Network Connectivity
Before proceeding with any iSCSI configuration, it would be prudent to ensure you have connectivity between your hosts and your storage box. Save yourself the grief and take a few moments to SSH into your hosts to check.
First, check your host’s routing table to make sure your iSCSI network is directly connected via the VMkernel interface you expect. In my case, it’s listed as a “Local Subnet” via vmk1.
[root@esx1:~] esxcfg-route -l
VMkernel Routes:
Network          Netmask          Gateway          Interface
172.16.10.0      255.255.255.0    Local Subnet     vmk0
172.16.99.0      255.255.255.0    Local Subnet     vmk1
default          0.0.0.0          172.16.10.1      vmk0
Next, ping your storage box with the maximum possible packet size. If you are using a 1500 MTU, use:
[root@esx1:~] ping 172.16.99.18 -s 1472 -d
PING 172.16.99.18 (172.16.99.18): 1472 data bytes
1480 bytes from 172.16.99.18: icmp_seq=0 ttl=64 time=0.891 ms
1480 bytes from 172.16.99.18: icmp_seq=1 ttl=64 time=0.645 ms
1480 bytes from 172.16.99.18: icmp_seq=2 ttl=64 time=0.653 ms
--- 172.16.99.18 ping statistics ---
3 packets transmitted, 3 packets received, 0% packet loss
round-trip min/avg/max = 0.645/0.730/0.891 ms
This test is especially important for a 9000 MTU as it will tell you if you have end-to-end jumbo frames configured correctly. You should use -s 8972 for a 9000 MTU:
[root@esx1:~] ping 172.16.99.18 -s 8972 -d
PING 172.16.99.18 (172.16.99.18): 8972 data bytes
8980 bytes from 172.16.99.18: icmp_seq=0 ttl=64 time=1.154 ms
8980 bytes from 172.16.99.18: icmp_seq=1 ttl=64 time=0.692 ms
8980 bytes from 172.16.99.18: icmp_seq=2 ttl=64 time=0.742 ms
--- 172.16.99.18 ping statistics ---
3 packets transmitted, 3 packets received, 0% packet loss
round-trip min/avg/max = 0.692/0.863/1.154 ms
The -d option ensures the “do not fragment” flag is set so that devices along the path don’t decide to chop up packets larger than the MTU.
Repeat this on all of your hosts. If they are good, you can continue with your iSCSI configuration.
iSCSI Target Creation in DSM
Now that our connectivity is good, we can move on to iSCSI configuration within DSM. Synology places a utility called iSCSI Manager in the main menu:

There is more than one way to do this, but the process goes something like this:
- Create an iSCSI Target.
- Set the correct advanced parameters of the target for VMware compatibility.
- Create one or more LUNs from volumes created earlier.
- Map your LUNs to your iSCSI Target.

The initial Target creation wizard is simplified, so not all options are available here. I won’t be using CHAP authentication for my lab, but you can set it here for extra security if you wish.
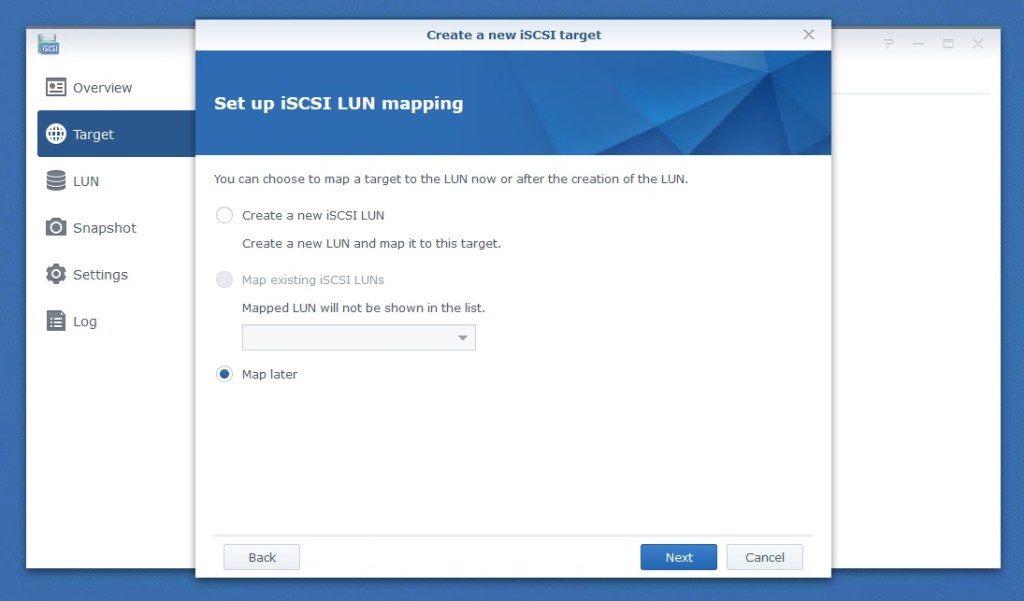
You have the option to create a new LUN during target creation, but we’ll map LUNs later as we want full control here.

So now we have a basic target configured with no LUNs mapped. Before proceeding, we’ll need to change some advanced parameters.

The most important feature you’ll need to enable to use this Target with a VMware vSphere environment is to enable “Allow multiple sessions”. VMware’s VMFS is a clustered file system with special locking mechanisms to allow multiple hosts to access shared LUNs. Without this option enabled, only one of your hosts (i.e. one iSCSI initiator) will be able to connect.
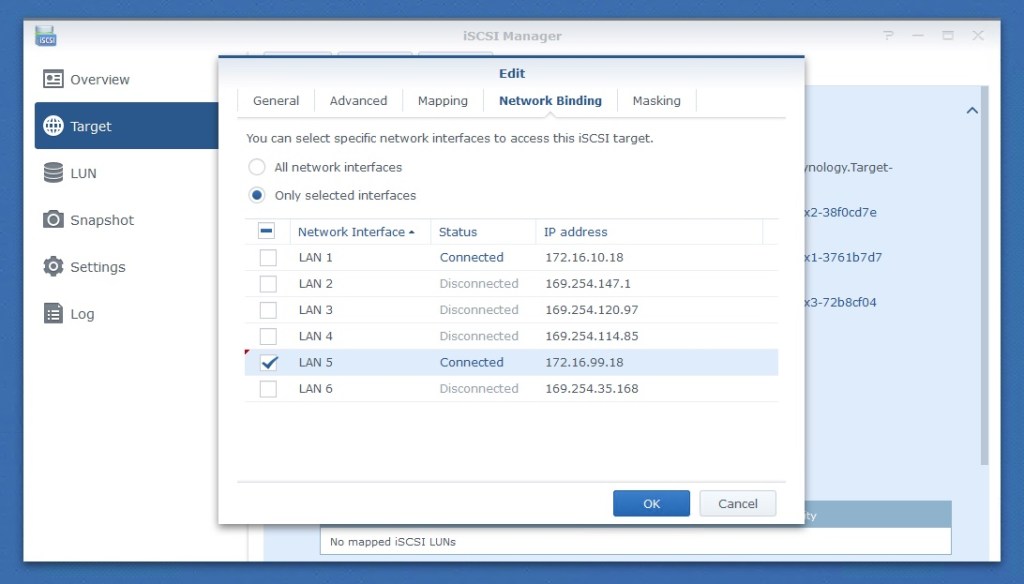
The next thing we’ll want to do is configure network binding for the target. By default, DSM binds iSCSI services to all connected adapters. As mentioned earlier, only the 10Gbps NIC (LAN 5) should be used for iSCSI in my situation. I deselected LAN 1 so that initiators won’t attempt to connect via the 1Gbps adapter. This is important because my ESXi hosts have access to the same management network and will discover paths via both networks and will attempt to “multi-path”. Selecting only LAN 5 forces iSCSI services on that adapter only. If you have multiple interfaces you want to use for iSCSI, you’d want to select them here.
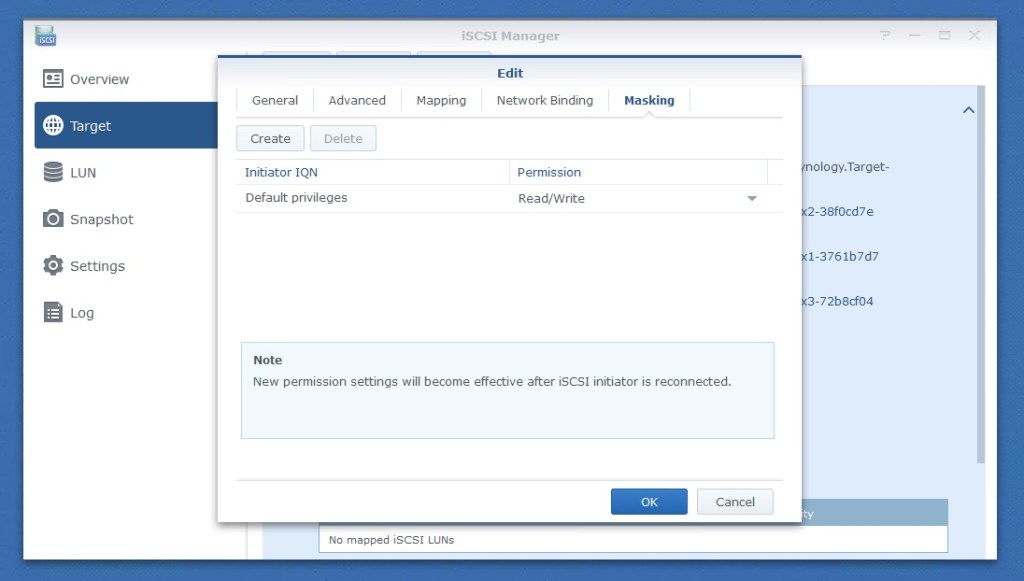
Another option you may wish to consider setting up is masking. Here you can grant access privileges to specific initiator IQN addresses. If you had multiple hosts/clusters but wanted to limit access to only some, you could define the initiators here. I want my entire lab that has access to VLAN 99 to have access to this target, so I will skip this step.
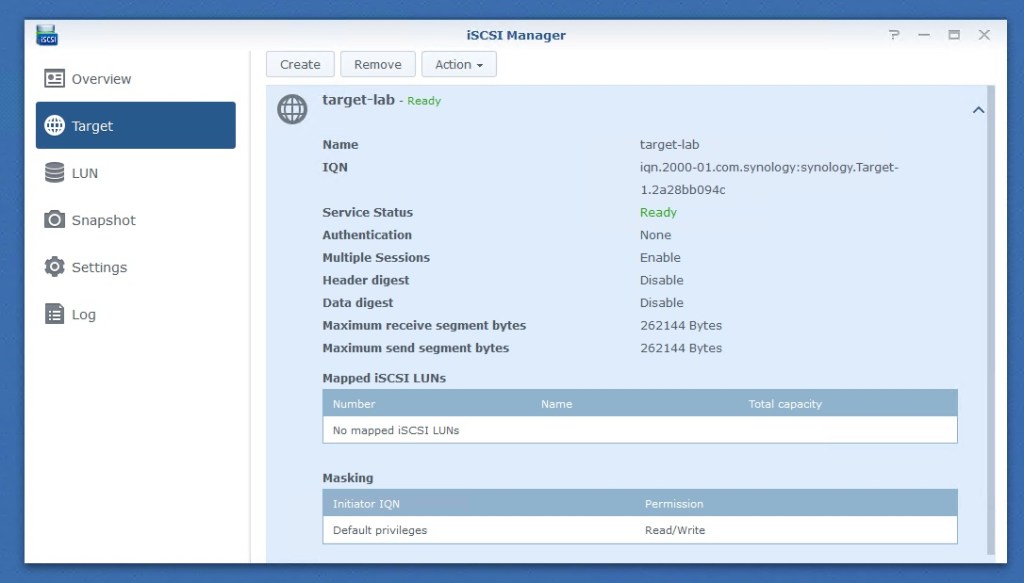
Now we have a multi-session capable iSCSI target that can be used with VMware vSphere and we can move on to LUN creation.
iSCSI LUN Creation in DSM
Synology makes LUN creation very easy. Simply give your LUN a name, select the volume you want it backed by and choose your total capacity.

Keep in mind that you can have multiple LUNs in a single volume, so you don’t have to allocate all available space. You also have the option to use thick or thin provisioning. Both provisioning options allow you to use Hardware Assisted zeroing and locking – two important features that make Synology LUNs VMware VAAI compliant.
Thin provisioning means that you can allocate more space to your LUNs than is available in the volume backing it. This gives you greater flexibility but can have some performance impact due to fragmentation. Obviously, there is also the risk that you may run out of space if your hosts think there is more storage available than there really is. Although thick provisioning may sound more appealing, there are certain advanced features like LUN snapshots that can’t be used with thick LUNs. Since I want access to all these features for my testing, I went with thin provisioning.

Since we have already created a target, we’ll just map this LUN to it. Keep in mind that you can have multiple LUNs mapped to a single target. This greatly simplifies things, so stick with a single target unless you really need more than one.

I went ahead and created two LUNs – one backed by the volume sitting on the SSD pool and a larger one backed by the volume sitting on the mechanical drive RAID-5 pool.
And that’s basically it. My two LUNs are green and ready for consumption.
vSphere iSCSI Configuration
Now that our LUNs are ready on the Synology DS1621+, it’s time to point our ESXi hosts at it.
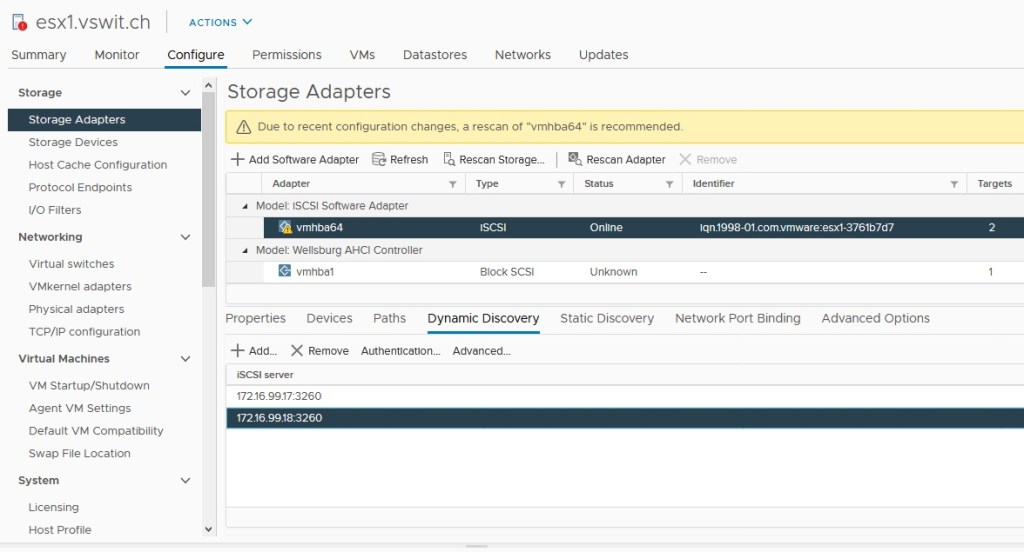
Under storage adapters, I will be adding a dynamic discovery target with the IP address of the DS1621’s LAN 5 interface IP. If you don’t have a Software iSCSI adapter in your storage adapters list, you can add one using the “Add Software Adapter” option above. Dynamic discovery is the easiest way to add an iSCSI target, otherwise you’ll have to add a static target, which requires inputting IQN identifiers.
Once you have added the dynamic discovery target, you should rescan your iSCSI adapter.
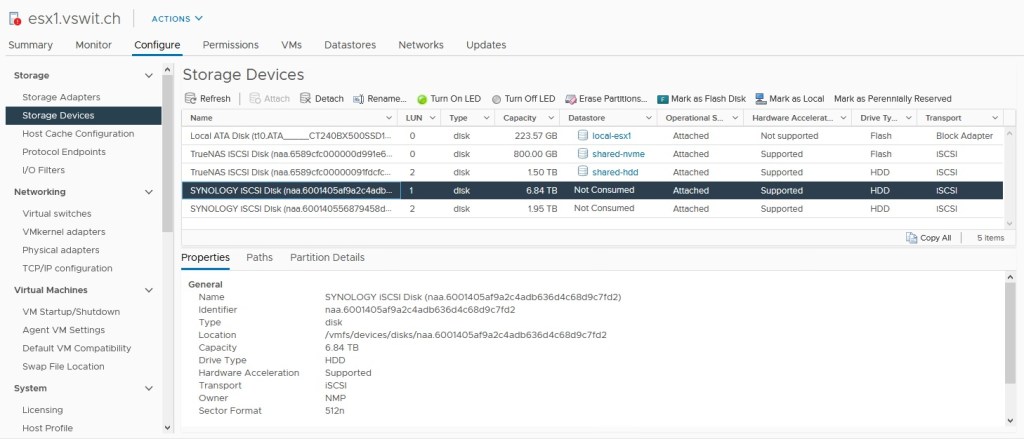
If everything is working as it should be, you will see your iSCSI LUNs appear in the Storage Devices section! Both LUN 1 and LUN 2 were discovered and VMware VAAI hardware acceleration is correctly listed as ‘supported’. The only minor issue I ran into is that my LUN backed by SSDs is listed as “HDD” for drive type. This can easily be remedied by marking it as a flash disk in the menu bar, but this drive type flag really has no bearing outside of vSAN as far as I know.

And as a last step, I created my VMFS6 datastores on the presented LUNs. They are now ready to be used by virtual machines in the environment.
Performance and Conclusion
I always like to run a quick ATTO disk benchmark to see the sort of read/write throughput I can achieve after configuring storage. ATTO disk benchmark really only tests sequential read/write throughput, so it’s not an exhaustive test by any means. None the less, it at least gives you a quick indication if things performing as expected. To do this, I added a virtual disk on each of the synology backed datastores in a windows VM and ran ATTO:
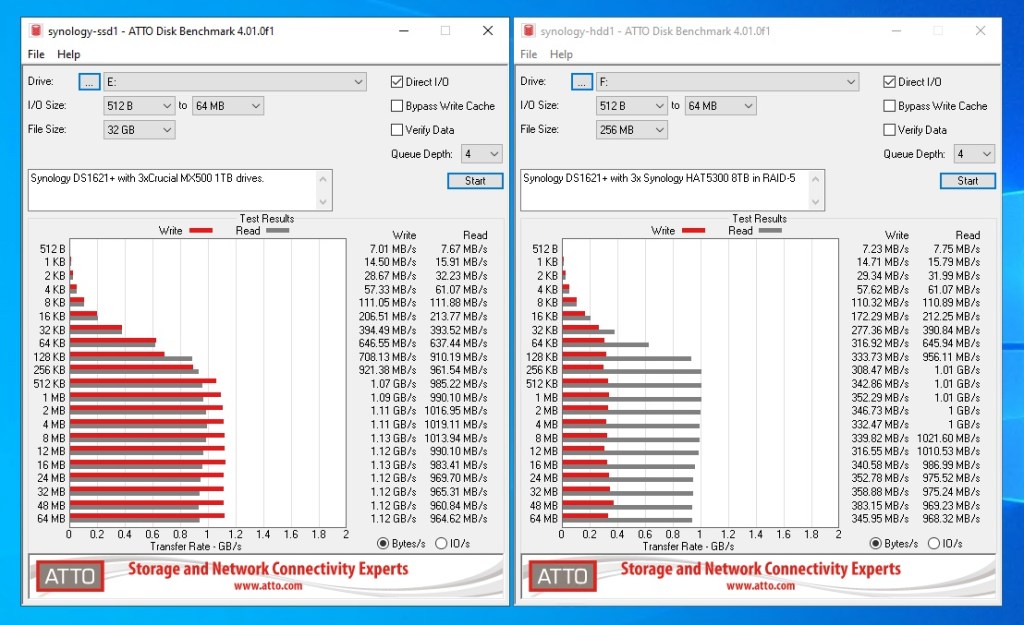
I must say, the Synology DS1621+ does not disappoint. At around 1.1GB/s, the Ryzen powered DS1621+ and the E10G21-F2 NIC are a potent combination. That is practically line-speed if you account for overhead. The SSD backed datastore does >1GB/s for both reads and writes, which is awesome. The RAID-5 pool backed storage doesn’t do as well with writes due to the parity calculation required, but this is expected in that RAID configuration. None the less, even with the mechanical drives we’re getting reads in excess of 1GB/s.

Well, that’s it for now. Up next, I’ll be taking a look at Synology’s “Storage Console” plugin for VMware vSphere that allows you to creation datastores and LUNs, resize them and more without having to leave the vSphere client.
