I’ve had this question come up a lot lately and there seems to be some confusion around whether or not NSX controllers need to be redeployed after upgrading them. The short answer to this question is really “it depends”. There are actually three different scenarios where you may want or need to delete and re-deploy NSX controllers as part of the upgrade process. Today, I’ll walk through these situations and the proper process to delete and re-deploy your controller nodes.
The Normal Upgrade Process
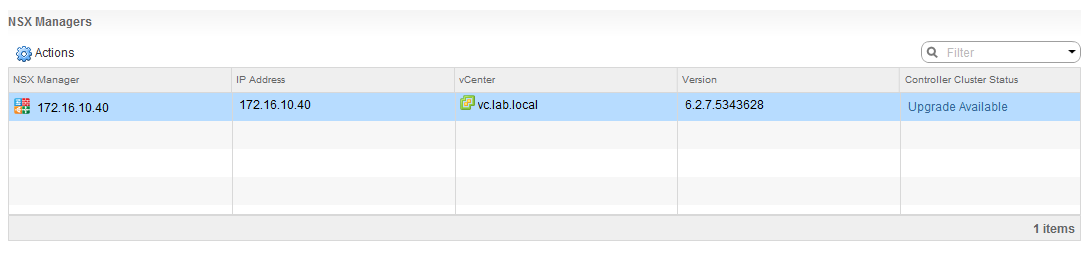
Upgrading the NSX Control Cluster is a very straight-forward process. After clicking the upgrade link, an automated process begins to upgrade the controller code, and reboot each cluster member sequentially.
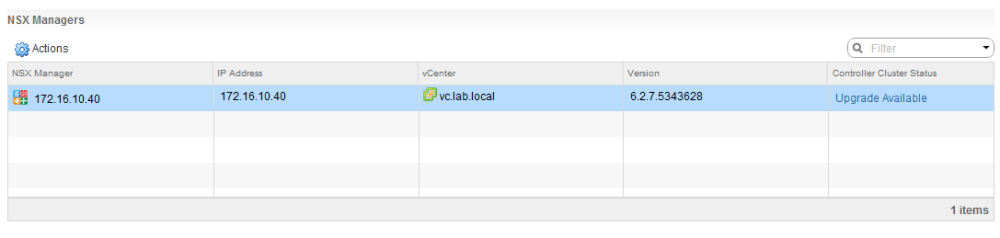
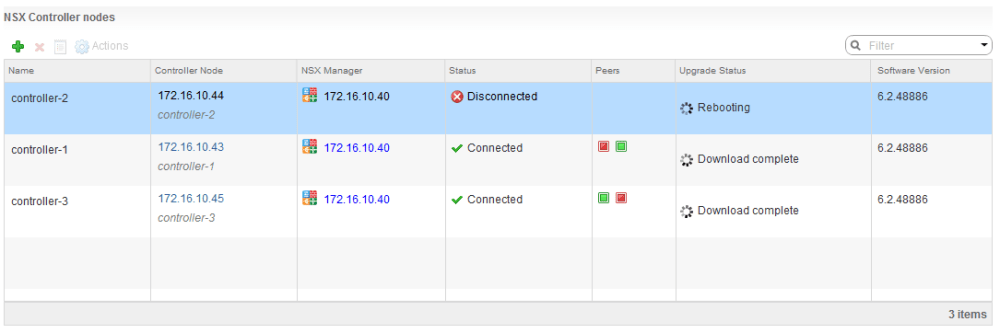
Once the ‘Upgrade Available’ link is clicked, you’ll see each of the three controllers download the upgrade bundle, upgrade and then reboot before NSX moves on to the next one.
Once NSX goes through its paces, it’s usually a good idea to ensure that the control-cluster join status is ‘Join complete’ and that all three controllers agree on the Cluster UUID.
nsx-controller # show control-cluster status
Type Status Since
--------------------------------------------------------------------------------
Join status: Join complete 07/24 13:38:32
Majority status: Connected to cluster majority 07/24 13:38:19
Restart status: This controller can be safely restarted 07/24 13:38:48
Cluster ID: f2849ee2-7fb6-4aca-abf4-2ca176337956
Node UUID: f2849ee2-7fb6-4aca-abf4-2ca176337956

Role Configured status Active status
--------------------------------------------------------------------------------
api_provider enabled activated
persistence_server enabled activated
switch_manager enabled activated
logical_manager enabled activated
directory_server enabled activated
Because the underling structure of the VM itself doesn’t change, this sort of in-place code upgrade and reboot is sufficient and has minimal impact.
Scenario 1 – E1000 vNIC Replacement
The first scenario where you may want to redeploy the controllers involves a virtual hardware change that was introduced in NSX 6.1.5. NSX controllers deployed in 6.1.5 use the VMXNET3 vNIC adapter, whereas older versions had legacy Intel E1000 emulated vNICs. This change wasn’t well publicized and surprisingly it isn’t even found in the NSX 6.1.5 release notes.
I’ve seen quite a few customers go through upgrade cycles from 6.0 or 6.1 all the way to more recent 6.2.x or 6.3.x releases while retaining E1000 vNICs on their controllers. Although the E1000 vNIC adapter is generally pretty stable, there is at least one documented issue where the adapter driver suffers a hang and the controller is no longer able to transmit or receive. This problem is described in VMware KB 2150747.
That said, I personally would not wait for a problem to occur and would recommend checking to ensure your controllers are using VMXNET3, and if not, go through the redeployment procedure I’ll outline later in this post. Aside from preventing the E1000 hang problem, you’ll also benefit from the other improvements VMXNET3 has to offer like better offloading and lower CPU utilization.
Unfortunately, finding out if your controllers have E1000 or VMXNET3 adapters can be a tad tricky. You’ll find that your controllers are locked down and can’t be edited in the vSphere Web Client or the legacy vSphere Client.
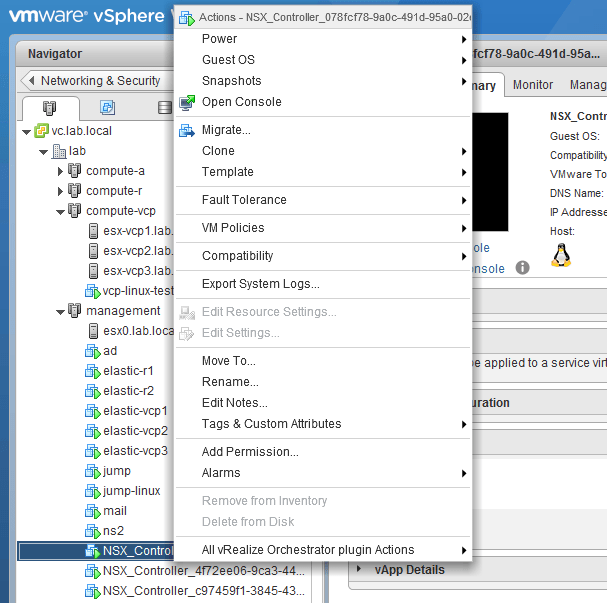
As seen above, the ‘Edit Settings’ option is greyed out.
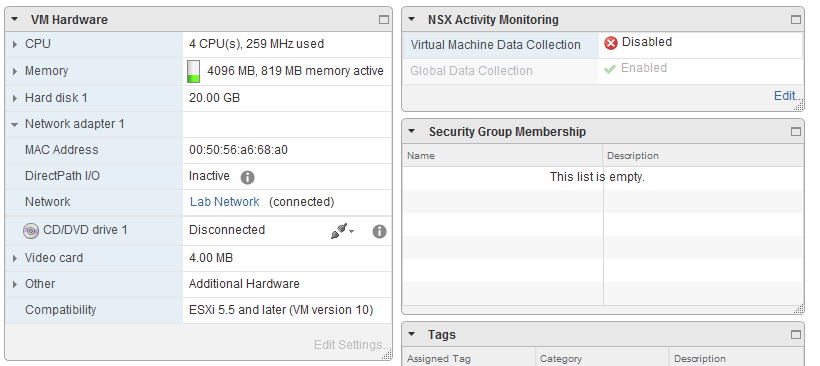
The summary page also doesn’t tell us much, so the easiest way to get the adapter type is to check from the ESXi command line.
First, let’s SSH into a host where one of the controllers live and then find the full path to the VMX file:
[root@esx0:~] cd /vmfs/volumes
[root@esx0:/vmfs/volumes] find ./ -name NSX_Controller*.vmx
./58f77a6f-30961726-ac7e-002655e1b06c/NSX_Controller_078fcf78-9a0c-491d-95a0-02e8b5175935/NSX_Controller_078fcf78-9a0c-491d-95a0-02e8b5175935.vmx
Next, I will look for the relevant vNIC adapter settings in the VMX file using the full path obtained in the previous command output:
[root@esx0:/vmfs/volumes] cat ./58f77a6f-30961726-ac7e-002655e1b06c/NSX_Controller_c97459f1-3845-436f-8e03-60ad3cbed9e4/NSX_Controller_c97459f1-3845-436f-8e03-60ad3cbed9e4.vmx |grep -i ethernet0.virtualDev
ethernet0.virtualDev = "vmxnet3"
The key setting in the VMX that we are interested in is ethernet0.virtualDev. As seen above, the type is vmxnet3 on my controllers as they were created from a freshly deployed 6.2.5 environment. If you see e1000 here, your controllers were deployed from a 6.1.4 or older setup and have never been re-deployed.
Scenario 2 – Updating the Disk Partitioning Layout
The second scenario would be if your controllers were initially deployed in a version of NSX prior to 6.2.3. Since 6.2.3 was pulled shortly after release, 6.2.4 would be more relevant starting point.
A statement you’ll find in the NSX 6.2.4 release notes summarizes this change well:
“…New installations of NSX 6.2.3 or later will deploy NSX Controller appliances with updated disk partitions to provide extra cluster resiliency. In previous releases, log overflow on the controller disk might impact controller stability. In addition to adding log management enhancements to prevent overflows, the NSX Controller appliance has separate disk partitions for data and logs to safeguard against these events. If you upgrade to NSX 6.2.3 or later, the NSX Controller appliances will retain their original disk layout.”
Again, it’s possible you may never run into a problem due to the old partitioning layout, but it’s always wise to take advantage of ‘optional’ resiliency enhancements like this. This is especially true for such a critical component of the NSX control-plane.
Although there isn’t a supported way to enter the root shell on a controller appliance, the ‘show status’ command will provide you with the partitioning layout. Here is the layout on a newer 6.2.5 controller with the newer partitioning:
nsx-controller # show status
Version: 4.0.6 (Build 48886)

Current Time: Fri, 25 Aug 2017 15:01:17 +0000
Uptime: 32 days 1 hour 23 minutes 16 seconds

Load Average: 0.10, 0.10, 0.13
Memory Usage: 3926484 kB (Total), 267752 kB (Free)
Disk Usage:
Filesystem                      1K-blocks    Used Available Use% Mounted on
/dev/sda1                         6596784 1181520   5057120  19% /
udev                              1953420       4   1953416   1% /dev
/dev/mapper/nvp-var               6593712 2349576   3886148  38% /var
/dev/mapper/nvp-var+cloudnet+data 3776568  147908   3417104   5% /var/cloudnet/data
Essentially, there are now three separate partitions for data instead of just one. Files for everything were just lumped together along with the Linux OS in a single partition previously. If some runaway log files filled the partition, key services would be impacted. By separating everything out, the key controller services like the zookeeper clustering service will still be able to write to disk.
I don’t have access to a pre-6.2.3 setup at the moment, but you can tell if your controller still uses the old partitioning layout by the absence of two partitions in the ‘show status output’. Both /dev/mapper/nvp-var and /dev/mapper/nvp-var+cloudnet+data only exist on controllers using the new partitioning layout.
Because disk partitioning is a pretty low-level, there was really no way to incorporate this into the automated upgrade process. To get the new layout, you’ll need to delete and re-deploy the controller appliances.
Scenario 3 – Upgrading to NSX 6.3.3
NSX 6.3.3 introduces a major change to the NSX controllers, replacing the underlying Linux OS with VMware’s new distribution dubbed Photon OS. The virtual hardware also changes slightly in 6.3.3 as the Photon OS based controllers require larger VMDK disks. Because this changes the entire foundation of the VM and is mandatory – unlike the vNIC and partitioning changes mentioned earlier – there is no way to perform in-place code upgrades. Each of the controllers needs to be deleted and re-deployed.
Thankfully, because of the mandatory nature of this change, VMware modified the upgrade process in 6.3.3 to automatically delete and re-deploy controllers for you.
From the NSX 6.3.3 release notes:
“In NSX 6.3.3, the underlying operating system of the NSX Controller changes. This means that when you upgrade to NSX 6.3.3, instead of an in-place software upgrade, the existing controllers are deleted one at a time, and new Photon OS based controllers are deployed using the same IP addresses.”
That said, no manual intervention is required when upgrading to 6.3.3. Controllers will be deleted and re-deployed automatically as part of the upgrade process. For more information, see the NSX public docs on the subject.
Some Warnings and Cautions
Before I go through the process of destroying and re-creating controller nodes, I really want to preface by saying that this process is potentially risky and should only be done during a maintenance window. It’s also very important that the process be done correctly to ensure you don’t run into any major problems. Below are some common pitfalls and other recommendations:
- Never just delete or remove the controller appliances from the vCenter inventory. NSX keeps track of the controllers in its database and doesn’t react well to having appliances yanked from under it. They must be deleted properly.
- Never deploy more than three controllers thinking you can just do a ‘cut over’. I.e. Don’t deploy six controllers and then delete the three old ones. A one to one replacement must be done and we never want fewer than two functional controllers in the cluster, and never more than three.
- If a controller fails to delete using the normal supported method, there is a reason. Don’t force the deletion without speaking to VMware technical support first. A common reason I’ve seen for this is a mismatched moref identifier for the appliance VM. If the NSX database thinks a controller is vm-73, but the actual VM is vm-75, the delete will fail. Removing controllers from the vCenter Inventory and re-adding them will cause this type of mismatch.
- It’s very important to validate that the control cluster health is good before proceeding to the next controller for deletion/re-deployment. Do not skip these checks and be patient with this process. Unless you have two fully functional controllers up and running in the cluster, you won’t have full control-plane functionality and a risk data-plane outage.
- If something goes wrong, you’ll still be okay if you have two controllers working in the cluster. Don’t just proceed in the interest of ‘moving forward’ because there is a good chance the other two will behave similarly. Contact VMware support if there is every any doubt.
A Quick Note on Force Deletion
While trying to delete a controller, you’ll be greeted by a ‘Forcefully Delete’ option. When selected, this option nukes everything related to the controller from the NSX database and NSX doesn’t care whether the VM appliance is successfully removed or not. This option should never used unless advised by VMware support for repairing specific cluster problems. As mentioned in the previous section, if a regular delete fails, there is always a specific reason. Using ‘Forcefully Delete’ to work around these problems can leave remnants behind and potentially cause problems with the cluster.
The warning presented by the NSX UI when you try to Force Delete a cluster node:
“Forcefully deleting a controller may result into NSX Controller cluster going down and the rest of the controllers may get disconnected, thereby resulting in problems like no majority and data inconsistency. Many operations like adding logical components will not be possible. If you still choose to delete the controller, it is recommended to also delete the rest of the controllers and recreate them.”
It’s also worth mentioning that the only time you’d need to forcefully delete a controller in a normal workflow is when deleting the last of three controllers. NSX will only delete the very last controller using the force option. Because we’re only removing one at a time, this should not apply here.
Controller Re-deployment Process
Again, you won’t need to use this process if you are upgrading to NSX 6.3.3 or later because the deletion and re-creation of appliances is handled in an automated manner. If you’d like to take advantage of a VMXNET3 adapter and/or the new partitioning layout in newer versions of NSX, please read on.
The overall goal here is to replace the NSX control cluster members one at a time, keeping in mind that as long as two controller nodes are online and healthy, the control-plane continues to function. In theory, you shouldn’t suffer any kind of control-plane or data-plane outage using this process.
**Edit 11/15/2017: As you may be aware, there have been a few new bugs discovered, including one that impacts the deployment/re-deployment of NSX controllers in 6.3.3 and 6.3.4. Please be sure to have a look at my post on the subject as well as the VMware KB before proceeding. If you are running 6.3.3, do not delete your controllers until you’ve implemented the workaround or patched. If you still have the old 6.3.3 upgrade bundle, you may not be able to upgrade.
Step 1 – Data collection and preparation
Before proceeding, we’ll need to collect some information about our current controller deployment. In order to deploy a controller, the following information is required:
- The vSphere Cluster that your controllers will live in.
- The datastore you want to use for your controllers.
- The network portgroup (standard or distributed) that your controllers are in.
- If you used a specific naming convention for your controllers, be sure to note it down.
- And finally, the IP address pool that’s used for the controllers. Note that when deleting controllers using this method, an IP will be freed up from the pool so even with just three IPs in a pool, this process should work.
Be sure to get the above information from the vSphere Web Client before proceeding so that you don’t have to go looking for it during the process.
Step 2 – Validate the control-cluster health
Before you begin the process, it’s very important to ensure you have a functional control cluster with all nodes connected to the cluster majority. As tempting as it may be, do not skip this check.
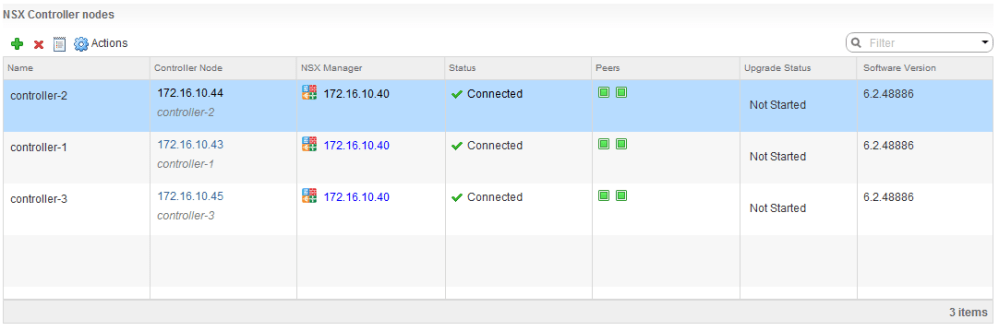
Checking in the UI is a good first place to look for obvious signs of trouble, but I would not rely on this method alone. If everything is green in the UI, log into each of the three controllers via SSH and run the show control-cluster status command:
nsx-controller # show control-cluster status
Type Status Since
--------------------------------------------------------------------------------
Join status: Join complete 08/25 15:26:19
Majority status: Connected to cluster majority 08/25 15:30:45
Restart status: This controller can be safely restarted 08/25 15:31:09
Cluster ID: f2849ee2-7fb6-4aca-abf4-2ca176337956
Node UUID: 309611b3-2441-4a1a-a12b-a5537e999c23

Role Configured status Active status
--------------------------------------------------------------------------------
api_provider enabled activated
persistence_server enabled activated
switch_manager enabled activated
logical_manager enabled activated
directory_server enabled activated
There are several key things you’ll want to validate before proceeding.
- The Join status must read ‘Join complete’. No other status is acceptable.
- The Majority status must read ‘Connected to cluster majority’
- The Restart status must read ‘This controller can be safely restarted’.
- Each controller node must have the same ‘Cluster ID’.
If all three controllers look good, you can proceed.
Step 3 – Delete the first controller
Once we’ve confirmed the control cluster health is good, we can delete the first controller from the NSX UI. It doesn’t matter which one you do first, but in my example, I’ll start with controller-3 and work my way backwards.
To delete, simply select the ‘Management’ tab of the Installation section in the NSX UI and click the little red ‘X’ icon above.

As mentioned earlier, we want to use the normal ‘Delete’ option. Do NOT use ‘Forcefully Delete’.
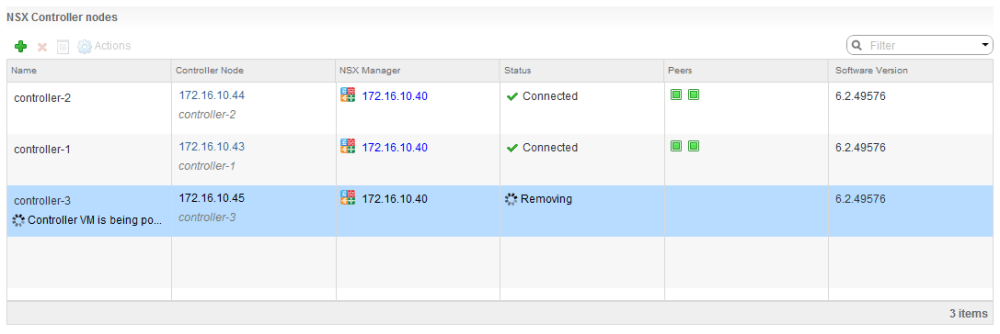
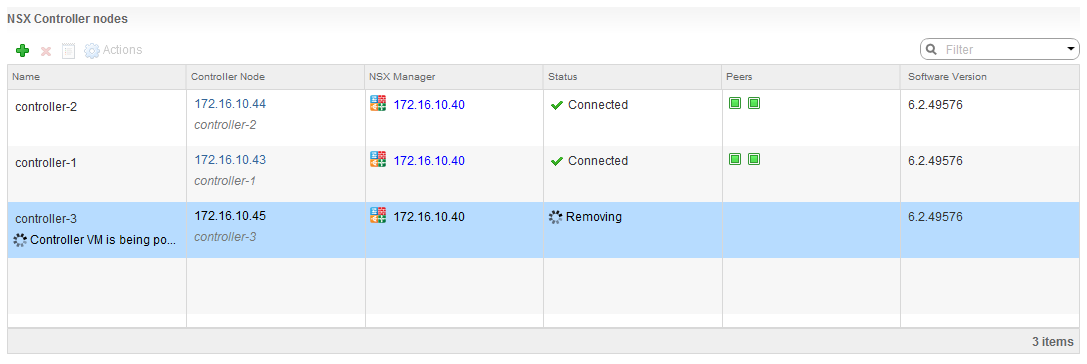
NSX will execute several tasks related to the controller VM. First, it will power off the VM appliance, it will then delete it and remove all references of the controller in the database. It’s not unusual for this process to take 10 minutes or longer.
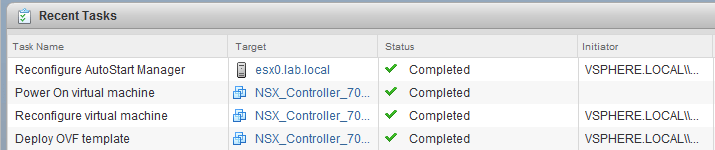
Once the controller has disappeared from the NSX ‘Management’ tab, it’s very important to check that the appliance itself was actually deleted from the vCenter inventory.
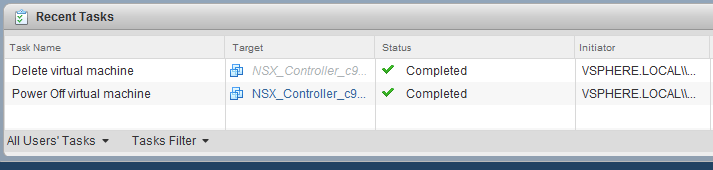
Check for both the successful power off and deletion tasks in the recent tasks pane and also confirm the VM is no longer present in the inventory.
Finally, we’ll want to check the cluster health from the other two surviving nodes using the same show control-cluster status command we used earlier. Ensure that both controllers look healthy.
I’d also recommend ensuring that the cluster is now only comprised of two nodes from the NSX controller node’s perspective. Just because NSX manager says there are two doesn’t necessarily guarantee the other controllers do. You can check this using the show control-cluster startup-nodes command:
nsx-controller # show control-cluster startup-nodes
172.16.10.43, 172.16.10.44
As seen above, my control cluster confirms only two members.
Step 4 – Replace the Deleted Controller.
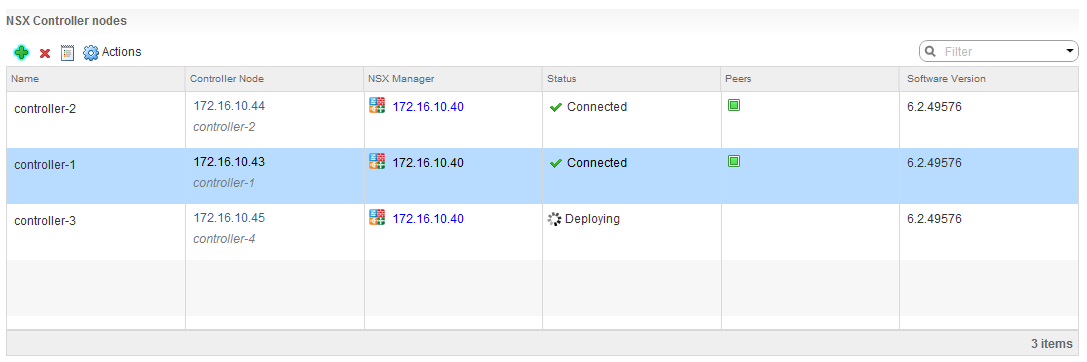
Once the first controller has been deleted successfully and we’ve confirmed the health of the control cluster, we can go ahead and deploy a new one.
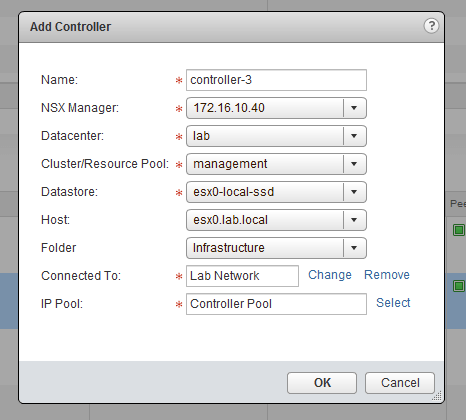
The process should be very straight forward and is the same as what was done during the initial deployment of NSX. Keep in mind that the name you specify is simply a label and that the moref identifier of the new controller will change.

NSX will report the new controller in the ‘Deploying’ status for some time, but you can monitor the tasks and events from the vSphere Web Client:
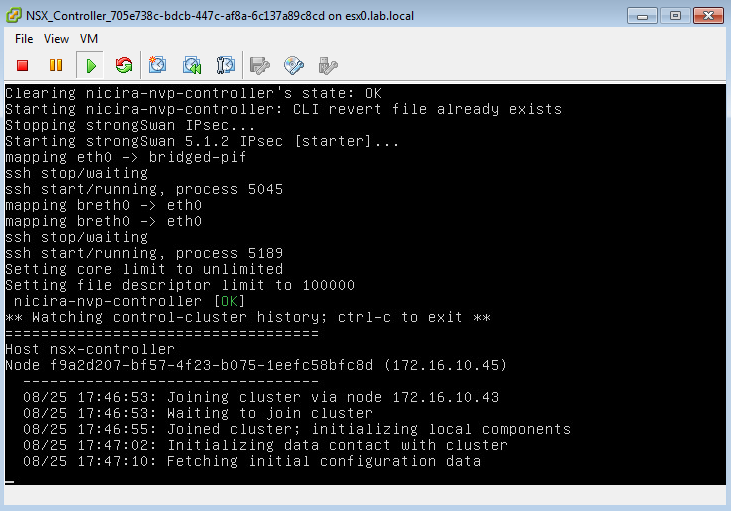
You can also watch the console of the new controller to confirm that it’s finished joining the cluster and ready for logins. It will usually be sitting a ‘Fetching initial configuration data’ for some time before it’s ready:

Once it’s powered up and ready, you can log-in via CLI and ensure that the ‘show control-cluster status’ output looks healthy as described earlier and that there are three startup-nodes again:
nsx-controller # show control-cluster status
Type Status Since
--------------------------------------------------------------------------------
Join status: Join complete 08/25 17:47:16
Majority status: Connected to cluster majority 08/25 17:47:13
Restart status: This controller can be safely restarted 08/25 17:47:14
Cluster ID: f2849ee2-7fb6-4aca-abf4-2ca176337956
Node UUID: f9a2d207-bf57-4f23-b075-1eefc58bfc8d

Role Configured status Active status
--------------------------------------------------------------------------------
api_provider enabled activated
persistence_server enabled activated
switch_manager enabled activated
logical_manager enabled activated
directory_server enabled activated

nsx-controller # show control-cluster startup-nodes
172.16.10.43, 172.16.10.44, 172.16.10.45
As seen above, my new controller is online and healthy. Most importantly it agrees with the other two controllers on the ID of the cluster and number of startup nodes.
You could also do a ‘show status’ on the controller to confirm that it has the new partitioning layout at this time as discussed earlier.
Step 5 – Rinse and Repeat.
It’s extremely important to verify the cluster health before proceeding with the deletion of the next cluster node. Aside from the checks in the previous section, this would also be a good time to do some basic connectivity tests. Make sure your distributed routers are functional and that your guests connected to logical switches are working normally.
If you delete the next controller while the cluster is in a bad state, there is a good chance you’ll be down to a single node and will be operating in a ‘read-only’ state. In this condition, any VTEP, ARP or MAC table changes in the environment – like those triggered by vMotions, etc – would fail to propagate. This is definitely not a situation you’d want to be in.
Once you are sure it’s safe to proceed, simply repeat steps 3 and 4 above for the remaining two controllers.
Conclusion
So there you have it. The process can be a bit of a nail-biting experience in a production environment, but if you take the appropriate precautions everything should work without a hitch. The reward for your patience will be a more resilient control cluster with virtual hardware configured as VMware intended.
Thanks for reading! If you have any questions, please feel free to post below.