Having a backup for your Windows Active Directory DNS services is always a good idea. Larger organizations would probably have a backup domain controller providing secondary DNS duties, but this may not be feasible for small shops or home labs. Windows server licenses aren’t cheap so why not pair your AD domain controller with a Linux BIND9 secondary instead?
I ran a home lab with a single DNS server for years, but I got into a few situations where it became problematic. To conserve power, I shut down the majority of my home lab, including the hosts that run my Active Directory VM. I wanted to maintain DNS functionality for the limited number of VMs that stay powered up 24/7. Having a functional secondary was the answer.
What is a DNS Secondary?
A DNS secondary is a DNS server containing read-only copies of DNS zones received from a DNS primary. All of your “A”, “MX” and other records are configured in the zones of the primary and then are sent to the secondary using “zone transfers”. In practice, the secondary zones should always be identical to that of the primary. If the primary goes down, clients will still be able to resolve DNS queries via the secondary. Obviously, in order for this to work, all of your client devices and VMs will need to have both DNS servers defined in their TCP/IP configuration.
Configuring Your Windows DNS Server
Before you can do zone transfers to your new secondary, some configuration will be required on your Active Directory DNS server. I’m using Windows Sever 2018, but this should be the same for 2012/2016 and even 2008 if I’m not mistaken.
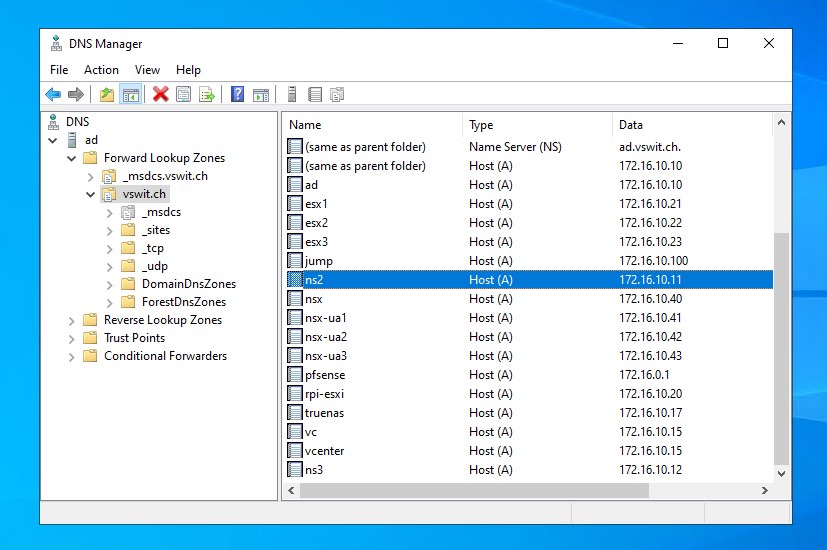
Before changing any configuration, you’ll need to create a standard “A” record for your secondary DNS server in your forward lookup zone. In my case, it is ns2.vswit.ch with an IP of 172.16.10.11:
Next, from the DNS snap-in, right click on your DNS server and go to Properties and click the Advanced tab.
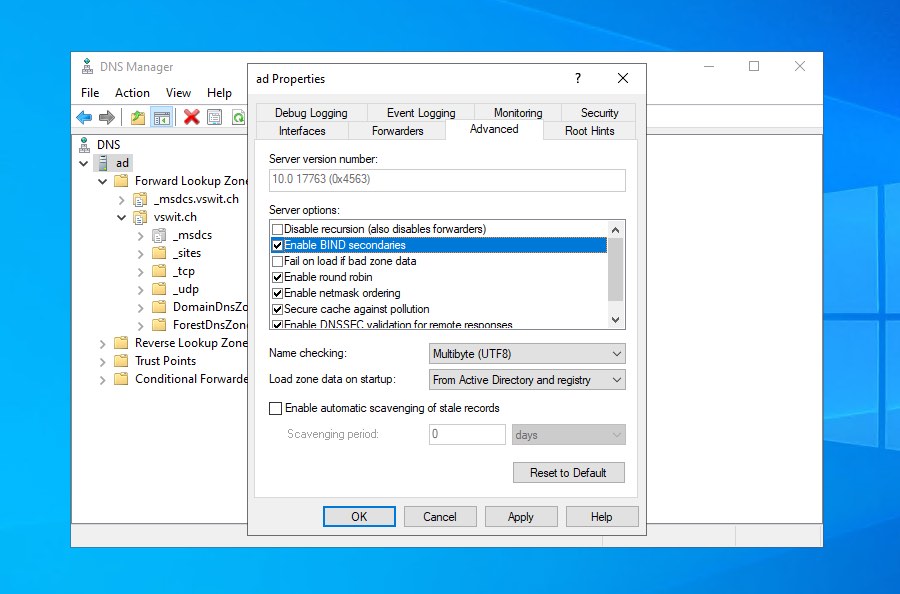
Check “Enable BIND secondaries”. Click Apply.
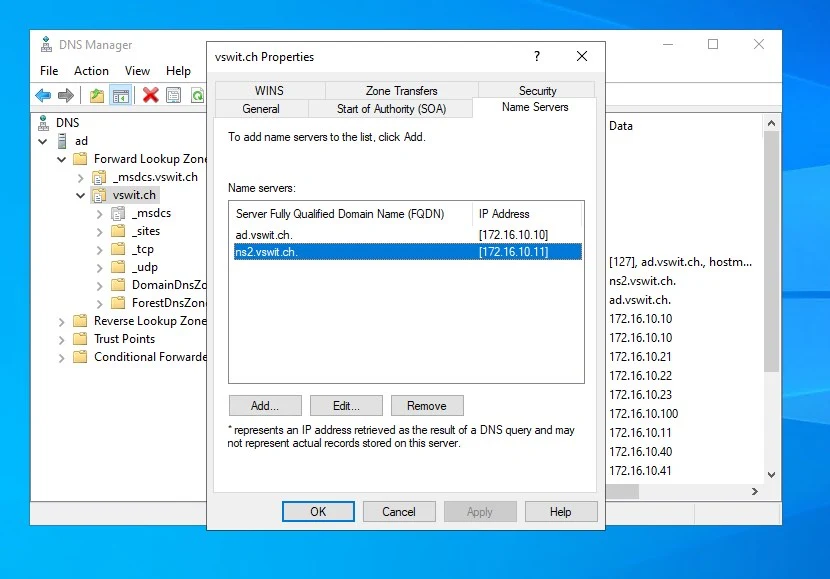
Next, right click on your first forward lookup zone and click properties. In my case it is vswit.ch. Go to the Name Servers tab. Here, you’ll want to add your secondary. Don’t worry if the validation process fails at this point. As long as you see the DNS secondary in the list, you are good.
Next, click the “Zone Transfers” tab.
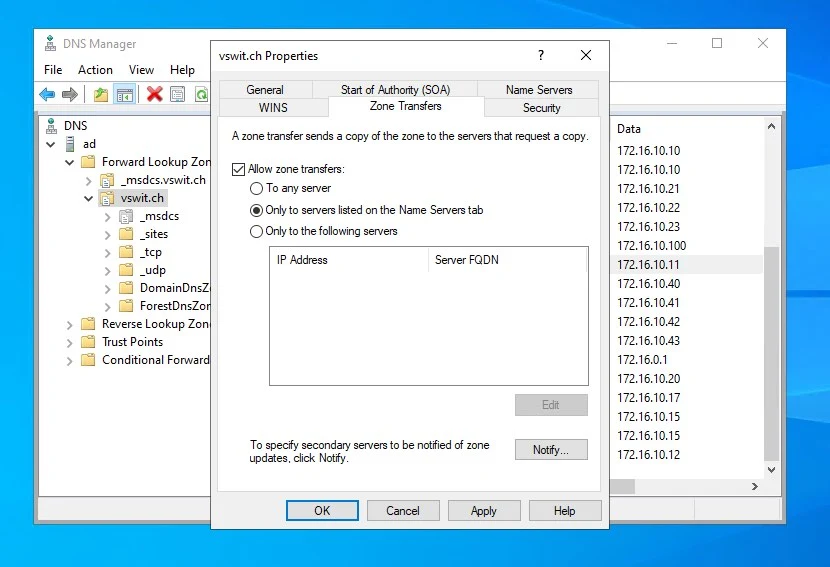
Here, you want to check “Allow zone transfers” and select the “Only to servers listed on the Name Servers tab”. Next, click Notify.
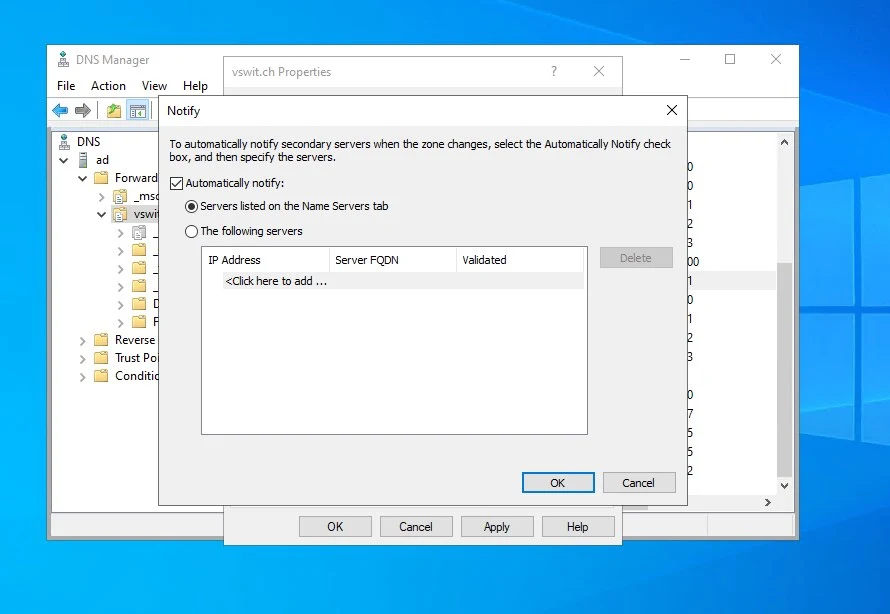
In the Notify dialog, you want to check “Automatically notify” and again, select “Servers listed on the Name Servers tab”. Click OK, and OK again.
You’ll then want to repeat the same above steps for all other zones you have (both forward and reverse lookup zones). I don’t think it’s necessary, but I did the default _msdcs forward lookup zone created by active directory as well just for good measure. Be sure to get a list of your zone names with exact spelling and case sensitivity as you’ll need them when configuring your secondary.
Installing BIND9
For this deployment, I’ll be using a very small Debian 10 VM with only 512MB of RAM and no UI. Unless you have a large environment, this is plenty. Before you begin, be sure to give your machine a static IP address. This is out of the scope of this post, so please refer to your distribution’s documentation if necessary.
Note: If you are logged in as root, you can just remove sudo from the beginning of each command.
First, let’s install the required BIND9 packages:
sudo apt-get update
sudo apt-get install bind9 bind9utils bind9-doc dnsutils -y
The dnsutils package is optional, but it includes useful tools for troubleshooting including nslookup and dig.
Next, let’s backup all of the default BIND9 configuration files, which is good practice in case something goes wrong, and you need to revert.
sudo cp /etc/bind/named.conf.local /etc/bind/named.conf.local.old
sudo cp /etc/bind/named.conf.options /etc/bind/named.conf.options.old
sudo cp /etc/bind/named.conf /etc/bind/named.conf.old
All of your zone configuration will go into the /etc/bind/named.conf.local configuration file. There are really only four lines per zone required. Below is a sample:
zone "<domain-name>" IN {
     type slave;
     file "/var/cache/bind/<filename>";
     masters { <master-server-ip>; };
};
The zone’s domain name would be either a forward-lookup zone FQDN or a reverse lookup zone name. You should make them match exactly with your zone names in your Windows DNS server. You can optionally include the default _msdcs forward lookup zone that Active Directory creates. I don’t believe it is necessary but I did it anyway.
Since this is a Secondary DNS server, the the zone type should always be "type slave" for each of your zones in this configuration.
For file, this is the location of the zone cache and DB files. Be sure to pick a filename that seems logical and describes the zone. Although you can get creative with the filename, don’t just pick any arbitrary directory. The file should be stored in the directory specified for cache in the named.conf.options file. In my Debian machine, this is /var/cache/bind. If you don’t, you may run into permissions issues. Double check by using this command:
cat /etc/bind/named.conf.options |grep directory
        directory "/var/cache/bind";
Lastly, you need to specify the IP address of the primary DNS server. This automatically implies it will receive zone transfers from that DNS server for the zone in question.
Here are my four zones for reference. Simply add them to the bottom of /etc/bind/named.conf.local:
zone "vswit.ch" IN {
     type slave;
     file "/var/cache/bind/forward.vswit.ch.db";
     masters { 172.16.10.10; };
};
zone "_msdcs.vswit.ch" IN {
     type slave;
     file "/var/cache/bind/forward._msdcs.vswit.ch.db";
     masters { 172.16.10.10; };
};
zone "0.16.172.in-addr.arpa" IN {
     type slave;
     file "/var/cache/bind/reverse.vswit.ch.0.16.172.db";
     masters { 172.16.10.10; };
};
zone "10.16.172.in-addr.arpa" IN {
     type slave;
     file "/var/cache/bind/reverse.vswit.ch.10.16.172.db";
     masters { 172.16.10.10; };
};
DNS Forwarding
By default, bind will always use root hints to resolve external DNS names that don’t exist within the configured zones. This makes things simple as you don’t need an upstream DNS server setup for forwarding but may not be ideal in some situations. For example, you may want to use a specific upstream DNS server for security reasons (OpenDNS for instance). In this case, you should add the desired forwarders into the /etc/bind/named.conf.options file similar to the following:
forwarders {
                208.67.222.222;
        };
If you want your secondary DNS server to resolve only internal names and avoid the use of root hints, you’ll need to disable recursion. It is enabled by default if not specified in the configuration options. This can be done by adding the following line to the /etc/bind/named.conf.options file:
recursion no;
Testing Name Resolution
Before you begin, you’ll want to check /var/log/syslog to ensure your DNS zones were loaded and transferred successfully.
You’ll see where bind starts after this line:
Feb 24 11:04:48 ns2 named[615]: starting BIND 9.11.5-P4-5.1+deb10u3-Debian (Extended Support Version) <id:998753c>q
You should see successful zone transfer messages for each of your configured domains similar to this:
Feb 24 10:51:53 ns2 named[752]: transfer of '0.16.172.in-addr.arpa/IN' from 172.16.10.10#53: connected using 172.16.10.11#44163
Feb 24 10:51:53 ns2 named[752]: transfer of '0.16.172.in-addr.arpa/IN' from 172.16.10.10#53: Transfer status: success
Feb 24 10:51:53 ns2 named[752]: transfer of '0.16.172.in-addr.arpa/IN' from 172.16.10.10#53: Transfer completed: 6 messages, 6 records, 477 bytes, 0.001 secs (477000 bytes/sec)
Feb 24 10:51:54 ns2 named[752]: transfer of '10.16.172.in-addr.arpa/IN' from 172.16.10.10#53: connected using 172.16.10.11#49573
Feb 24 10:51:54 ns2 named[752]: transfer of 'vswit.ch/IN' from 172.16.10.10#53: connected using 172.16.10.11#57609
Feb 24 10:51:54 ns2 named[752]: transfer of '10.16.172.in-addr.arpa/IN' from 172.16.10.10#53: Transfer status: success
Feb 24 10:51:54 ns2 named[752]: transfer of '10.16.172.in-addr.arpa/IN' from 172.16.10.10#53: Transfer completed: 19 messages, 19 records, 1405 bytes, 0.002 secs (702500 bytes/sec)
Feb 24 10:51:54 ns2 named[752]: transfer of '_msdcs.vswit.ch/IN' from 172.16.10.10#53: connected using 172.16.10.11#40635
Feb 24 10:51:54 ns2 named[752]: transfer of 'vswit.ch/IN' from 172.16.10.10#53: Transfer status: success
Feb 24 10:51:54 ns2 named[752]: transfer of 'vswit.ch/IN' from 172.16.10.10#53: Transfer completed: 36 messages, 36 records, 2279 bytes, 0.004 secs (569750 bytes/sec)
Feb 24 10:51:54 ns2 named[752]: transfer of '_msdcs.vswit.ch/IN' from 172.16.10.10#53: Transfer status: success
Feb 24 10:51:54 ns2 named[752]: transfer of '_msdcs.vswit.ch/IN' from 172.16.10.10#53: Transfer completed: 15 messages, 15 records, 1291 bytes, 0.004 secs (322750 bytes/sec)
(END) Feb 24 10:51:54 ns2 named[752]: transfer of '_msdcs.vswit.ch/IN' from 172.16.10.10#53: Transfer status: success
Once we know the zone transfers worked, we can test resolution. This can most easily be done by specifying the local host address 127.0.0.1 when using nslookup. Try both an internal and external FQDN:
root@ns2:~# nslookup ad.vswit.ch 127.0.0.1
Server:         127.0.0.1
Address:        127.0.0.1#53
Name:   ad.vswit.ch
Address: 172.16.10.10

root@ns2:~# nslookup google.com 127.0.0.1
Server:         127.0.0.1
Address:        127.0.0.1#53
Non-authoritative answer:
Name:   google.com
Address: 172.217.165.14
Name:   google.com
Address: 2607:f8b0:400b:802::200e
Viewing Your DNS Records
Your DNS records received from the primary server are stored in so-called “masterfile” database files. In newer versions of bind, the DB files are in a raw binary format. This is done for performance reasons, not security as it is still mostly viewable if you open it in a text editor. Unless you have a really massive DNS database and performance is important to you, you can add the following to your /etc/bind/named.conf.options file:
masterfile-format text;
Once added, restart bind:
systemctl restart bind
Now your DB files are plain text and you can see all of your “A” and other records:
root@ns2:~# cat /var/cache/bind/forward.vswit.ch.db |grep A
                        A       172.16.10.10
ad                      A       172.16.10.10
DomainDnsZones          A       172.16.10.10
esx1                    A       172.16.10.21
esx2                    A       172.16.10.22
esx3                    A       172.16.10.23
ForestDnsZones          A       172.16.10.10
jump                    A       172.16.10.100
ns2                     A       172.16.10.11
nsx                     A       172.16.10.40
nsx-ua1                 A       172.16.10.41
nsx-ua2                 A       172.16.10.42
nsx-ua3                 A       172.16.10.43
pfsense                 A       172.16.0.1
rpi-esxi                A       172.16.10.20
truenas                 A       172.16.10.17
vc                      A       172.16.10.15
vcenter                 A       172.16.10.15
BIND Caching
BIND will operate as a DNS cache by default without any special configuration. It will cache all DNS query responses for a period of time so that it can respond to clients more quickly. If you’d like to view this cache, you can use the rndc utility. You first dump the cache to a file and then can open it in a text editor:
rndc dumpdb -cache
cat /var/cache/bind/named_dump.db
In my case the file created is /var/cache/bind/named_dump.db by default. In some distributions or BIND versions it may be /var/named/data/cache_dump.db. If you can’t find yours, you can always force BIND to use a specific file location in /etc/bind/named.conf.options:
dump-file "/tmp/named_dump.db";
Don’t forget to restart BIND after doing this.
If your DNS secondary has cached a problematic record – i.e. an IP changed recently – you can flush the cache. This is done with:
rndc flush
For good measure, restart BIND afterward:
systemctl restart bind9
Conclusion
Bind9 is an extremely powerful DNS service and I’ve only scratched the surface of what is possible. With just a small amount of config, you can have a functional DNS secondary paired with your Active Directory domain controller in no time. I hope you found this helpful.

Many many thanks. I’d researched this previously but trying to actually implement it today the zone transfers were refused. Not only did your post remind me of the need to allow bind zone transfers but if I’d found your post first I’d have been done in a fraction of the time as it has exactly the right amount of detail for a ‘can just about find my way round Linux’ user like myself, no more, no less.
Thanks for the kind words, JJ! Glad the post helped you!
Your post is really amazing and help me a lot. Thank you Mike
Your suggestion to move my zone files to ‘/var/cache/bind’ helped tons.
I recently DNSSEC-signed all my active directory zones, and all the standard records, and RRSIG records transfer just fine, but the DS records in my parent zones don’t seem to be included in zone transfers to the BIND server. Are there any changes to Server 2016 or BIND that can help the records transfer as expected?
Hello! This is great.
I have got this to work on Red Hat-compatible distros– there is some subtle differences between Debian and Red Hat. I posted my instructions at https://xadammr.au/blog/bind-secondary-rhel.
Thanks for your great work and the inspiration to get this working on RHEL!