Synology’s Active Backup for Business is a powerful, license-free backup tool included with many of their higher end “plus” and rackmount NAS units. Here is my latest video taking a look at its integration with VMware vSphere and ESXi. I walk through installation, setup, backup and restore.
In short, it is an excellent tool that provides features you’d expect to see from enterprise “paid” backup solutions. For those with home labs or smaller environments, it makes the value proposition of buying a Synology NAS much more enticing!
Can’t get into the vCenter VAMI via the root account? The 90-day password expiry policy is likely to blame. Here’s how to reset your password.
A few years back, VMware implemented a password expiry policy of 90 days for the root account on the vCenter Server appliance. Although this account isn’t used much once vCenter is up and running, you do require it for VAMI access or to login via SSH. Administrators frequently use the VAMI for vCenter upgrades, so you will inevitably run into this problem sooner or later.
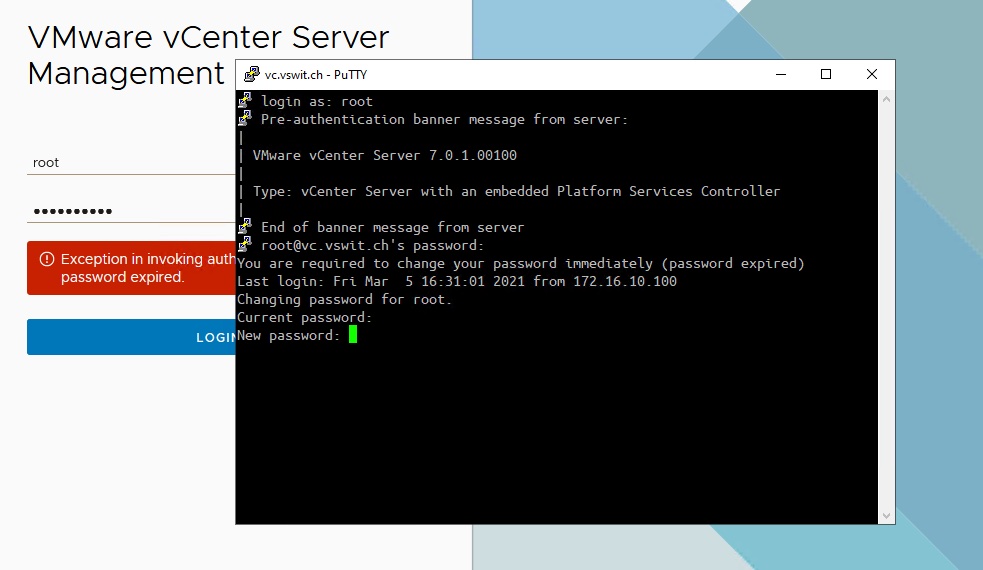
Access denied. The VMware vCenter Server Management Interface – AKA the VAMI.
In vCenter Server 7.x the error message you receive will be:
Exception in invoking authentication handler User password expired.
For those not familiar with the CLI access options in vCenter Server, you may head over to the “Users and Groups” section in the vSphere client to look at “localos” domain accounts where root is located. You won’t be able to manipulate this account from the vSphere Client and the account will not be listed as “locked” or “disabled”.
Thankfully, resetting your password is a piece of cake via CLI. SSH should be enabled by default for your vCenter Server. Simply login using your favorite SSH client and you’ll be greeted by a password change prompt:
After loging in with the root account via SSH, you will be prompted to change the password.
Changing your password may be an exercise in frustration as this prompt will prevent you from using similar passwords and enforce some complexity requirements (see how to get around this below). Once you’ve changed the password, you’ll be able to login to the vCenter Management Interface (VAMI) again.
If this is an isolated lab environment – don’t do this in production – and you don’t want to change your password, you can set a temporary password and then change it back via the root shell as follows:
Command> shell
Shell access is granted to root
root@vc [ ~ ]# passwd
New password:
Retype new password:
passwd: password updated successfully
root@vc [ ~ ]#
Verify how long you’ve got till your password expires again by using the chage command:
root@vc [ ~ ]# chage -l root
Last password change                                    : Mar 05, 2021
Password expires                                        : Jun 03, 2021
Password inactive                                       : never
Account expires                                         : never
Minimum number of days between password change          : 0
Maximum number of days between password change          : 90
Number of days of warning before password expires       : 7
And there you have it. Hopefully you found this helpful.
The utility “cron” is a job scheduler in Linux/Unix based operating systems. It is very useful for scheduling scripts or specific commands to run on a defined schedule – daily, weekly, monthly and everything in between. Thankfully, ESXi includes an implementation of the cron utility that can be accessed from the root shell. Normally, you wouldn’t need to use cron, but there are some situations where scheduling CLI commands can be useful.
A few use cases where I’ve personally done this over the years include:
To collect switchport statistics at certain times overnight to troubleshoot packet loss or performance issues.
Restarting a specific service every 24 hours to prevent a memory leak from getting out of hand.
Executing a python or shell script to collect various data from the CLI.
ESXi’s implementation of cron is similar to that of most linux distributions, but it is not exactly the same. The popular ‘crontab’ command isn’t included and can’t be used to easily add jobs. In addition, any cron changes you make won’t take effect until the crond service is restarted.
Preparation
Before changing the cron configuration, you’ll want to test the command or script you plan to schedule. In my case, I’m going to simply run an esxcli command every two minutes that will add a mark entry into the system log files:
 [root@esx1:~] esxcli system syslog mark --message="My cron job just ran!"

 [root@esx1:~] cat /var/log/vmkernel.log |grep "mark:"
 2021-02-17T17:39:00Z esxcfg-syslog[2102126]: mark: My cron job just ran!
As you can see above, this is a great way to test out cron because every time it runs you’ll get proof in the logging along with a date/time stamp.
Tip: If you are adding a script to your host, avoid the /tmp location as it is not persistent across reboots. I like to use /opt in older releases, or the OSData partition in ESXi 7.0.
Also, if you are not familiar with crontab formatting, I’d recommend reading up on the subject to make sure your jobs run as expected. There are a number of good resources online that will show you the various scheduling options. I have included a few examples at the end of this post as well.
Adding a Cron Job
You’ll first need to SSH into your ESXi host. Once there, you can see the current crontab file at /var/spool/cron/crontabs/root. In ESXi 7.0, the file contains:
As you can see, ESXi already uses cron to schedule several internal housekeeping routines. Before changing the file, be sure to back it up just in case:
You can modify the file using ‘vi’. For those not familiar with Linux, there is a bit of a learning curve to vi so I’d recommend reading up on how to navigate around in it. There are quite a few good turorials available online.
[root@esx1:~] vi /var/spool/cron/crontabs/root
Note: When using :wq to save your changes, you’ll likely get a warning that the file is read only. You don’t need to fiddle with the permissions. Simply use :wq! and the file will be written successfully.
I have added a single line at the bottom of the file. Here is the updated root crontab file:
Note: As mentioned previously, if you are not familiar with the min/hour/day/mon/dow formatting that cron uses, there are a number of good resources online that can help.
Despite updating the file, your changes will not take effect until the crond service is restarted on the host. First, get the crond PID (process identifier) by running the following command:
[root@esx1:~] cat /var/run/crond.pid
2098663
Next, kill the crond PID. Be sure to change the PID number to what you obtained in the previous step.
[root@esx1:~] kill 2098663
Once the process is stopped, you can use BusyBox to launch it again:
You’ll know it was restarted successfully if you have a new PID now:
[root@esx1:~] cat /var/run/crond.pid
2103414
After leaving the host idle for a few minutes, you can see the command has been running every two minutes as desired:
[root@esx1:~] cat /var/log/vmkernel.log |grep -i mark:
2021-02-17T17:39:00Z esxcfg-syslog[2102126]: mark: My cron job just ran!
2021-02-17T20:16:00Z esxcfg-syslog[2103370]: mark: My cron job just ran!
2021-02-17T20:18:00Z esxcfg-syslog[2103382]: mark: My cron job just ran!
2021-02-17T20:20:00Z esxcfg-syslog[2103396]: mark: My cron job just ran!
As you can imagine, the possibilities are endless here. I will share some of the scripts I have used to collect some performance metrics via cron in a future post.
Crontab Examples
Run a command every two minutes:
#min hour day mon dow command
*/2    *    *   *   *   esxcli system syslog mark --message="My cron job just ran!"
Run a command every hour:
#min hour day mon dow command
*    */1    *   *   *   esxcli system syslog mark --message="My cron job just ran!"
Run a command at midnight every night:
#min hour day mon dow command
00    0    *   *   *   esxcli system syslog mark --message="My cron job just ran!"
Run a command at 3:30PM every Thursday:
#min hour day mon dow command
30    15    *   *   5   esxcli system syslog mark --message="My cron job just ran!"
Run a command at midnight and at noon every day:
#min hour day mon dow command
00    0,12    *   *   *   esxcli system syslog mark --message="My cron job just ran!"
If you are attempting to upgrade your vCenter Server and are getting stuck in stage one while connecting to the source appliance, a simple password change may get you going again. In my case, I was upgrading from vCenter 6.7 U2 to 7.0 but this could certainly occur with other upgrade paths as well. I got the following error:
“A problem occurred while getting data from the source vCenter Server.”
The error message is pretty non-descript, but we do get the option to download some logging. In the log file downloaded, it seems pretty clear that this is an authentication problem:
2020-04-12T20:13:55.435Z - info: VM Identifier for Source VC: vm-16
2020-04-12T20:13:55.568Z - debug: initiateFileTransferFromGuest error: ServerFaultCode: Failed to authenticate with the guest operating system using the supplied credentials.
2020-04-12T20:13:55.568Z - debug: Failed to get fileTransferInfo:ServerFaultCode: Failed to authenticate with the guest operating system using the supplied credentials.
2020-04-12T20:13:55.568Z - debug: Failed to get url of file in guest vm:ServerFaultCode: Failed to authenticate with the guest operating system using the supplied credentials.
<snip>
2020-04-12T20:13:55.569Z - error: Failed to read the nodetype, Error: Failed to authenticate with the guest operating system using the supplied credentials.
2020-04-12T20:13:55.569Z - info: Checking if password expired
<snip>
2020-04-12T20:13:58.915Z - info: Stream :: close
2020-04-12T20:13:58.915Z - info: Password not expired
2020-04-12T20:13:58.917Z - error: sourcePrecheck: error in getting source Info: ServerFaultCode: Failed to authenticate with the guest operating system using the supplied credentials.
Despite double checking that my credentials were correct, the logging insisted that there was something wrong with them. The logging also states that the password was not expired. Despite this, I decided to check anyway:
root@vc [ ~ ]# chage -l root
You are required to change your password immediately (root enforced)
chage: PAM: Authentication token is no longer valid; new one required
Well, that’ll do it. Looks like the root password was expired after all. I found it odd that it allowed me to login via SSH without any kind of password expiry warning. I changed the password using the ‘passwd’ root shell command.
root@vc [ ~ ]# passwd
New password:
BAD PASSWORD: it is based on a dictionary word
Retype new password:
passwd: password updated successfully
root@vc [ ~ ]# chage -l root
Last password change                                    : Apr 12, 2020
Password expires                                        : Jul 11, 2020
Password inactive                                       : never
Account expires                                         : never
Minimum number of days between password change          : 0
Maximum number of days between password change          : 90
Number of days of warning before password expires       : 7
After changing the password from the CLI, the upgrade progressed normally! Hopefully this tip may help others that get stuck on this step as well.
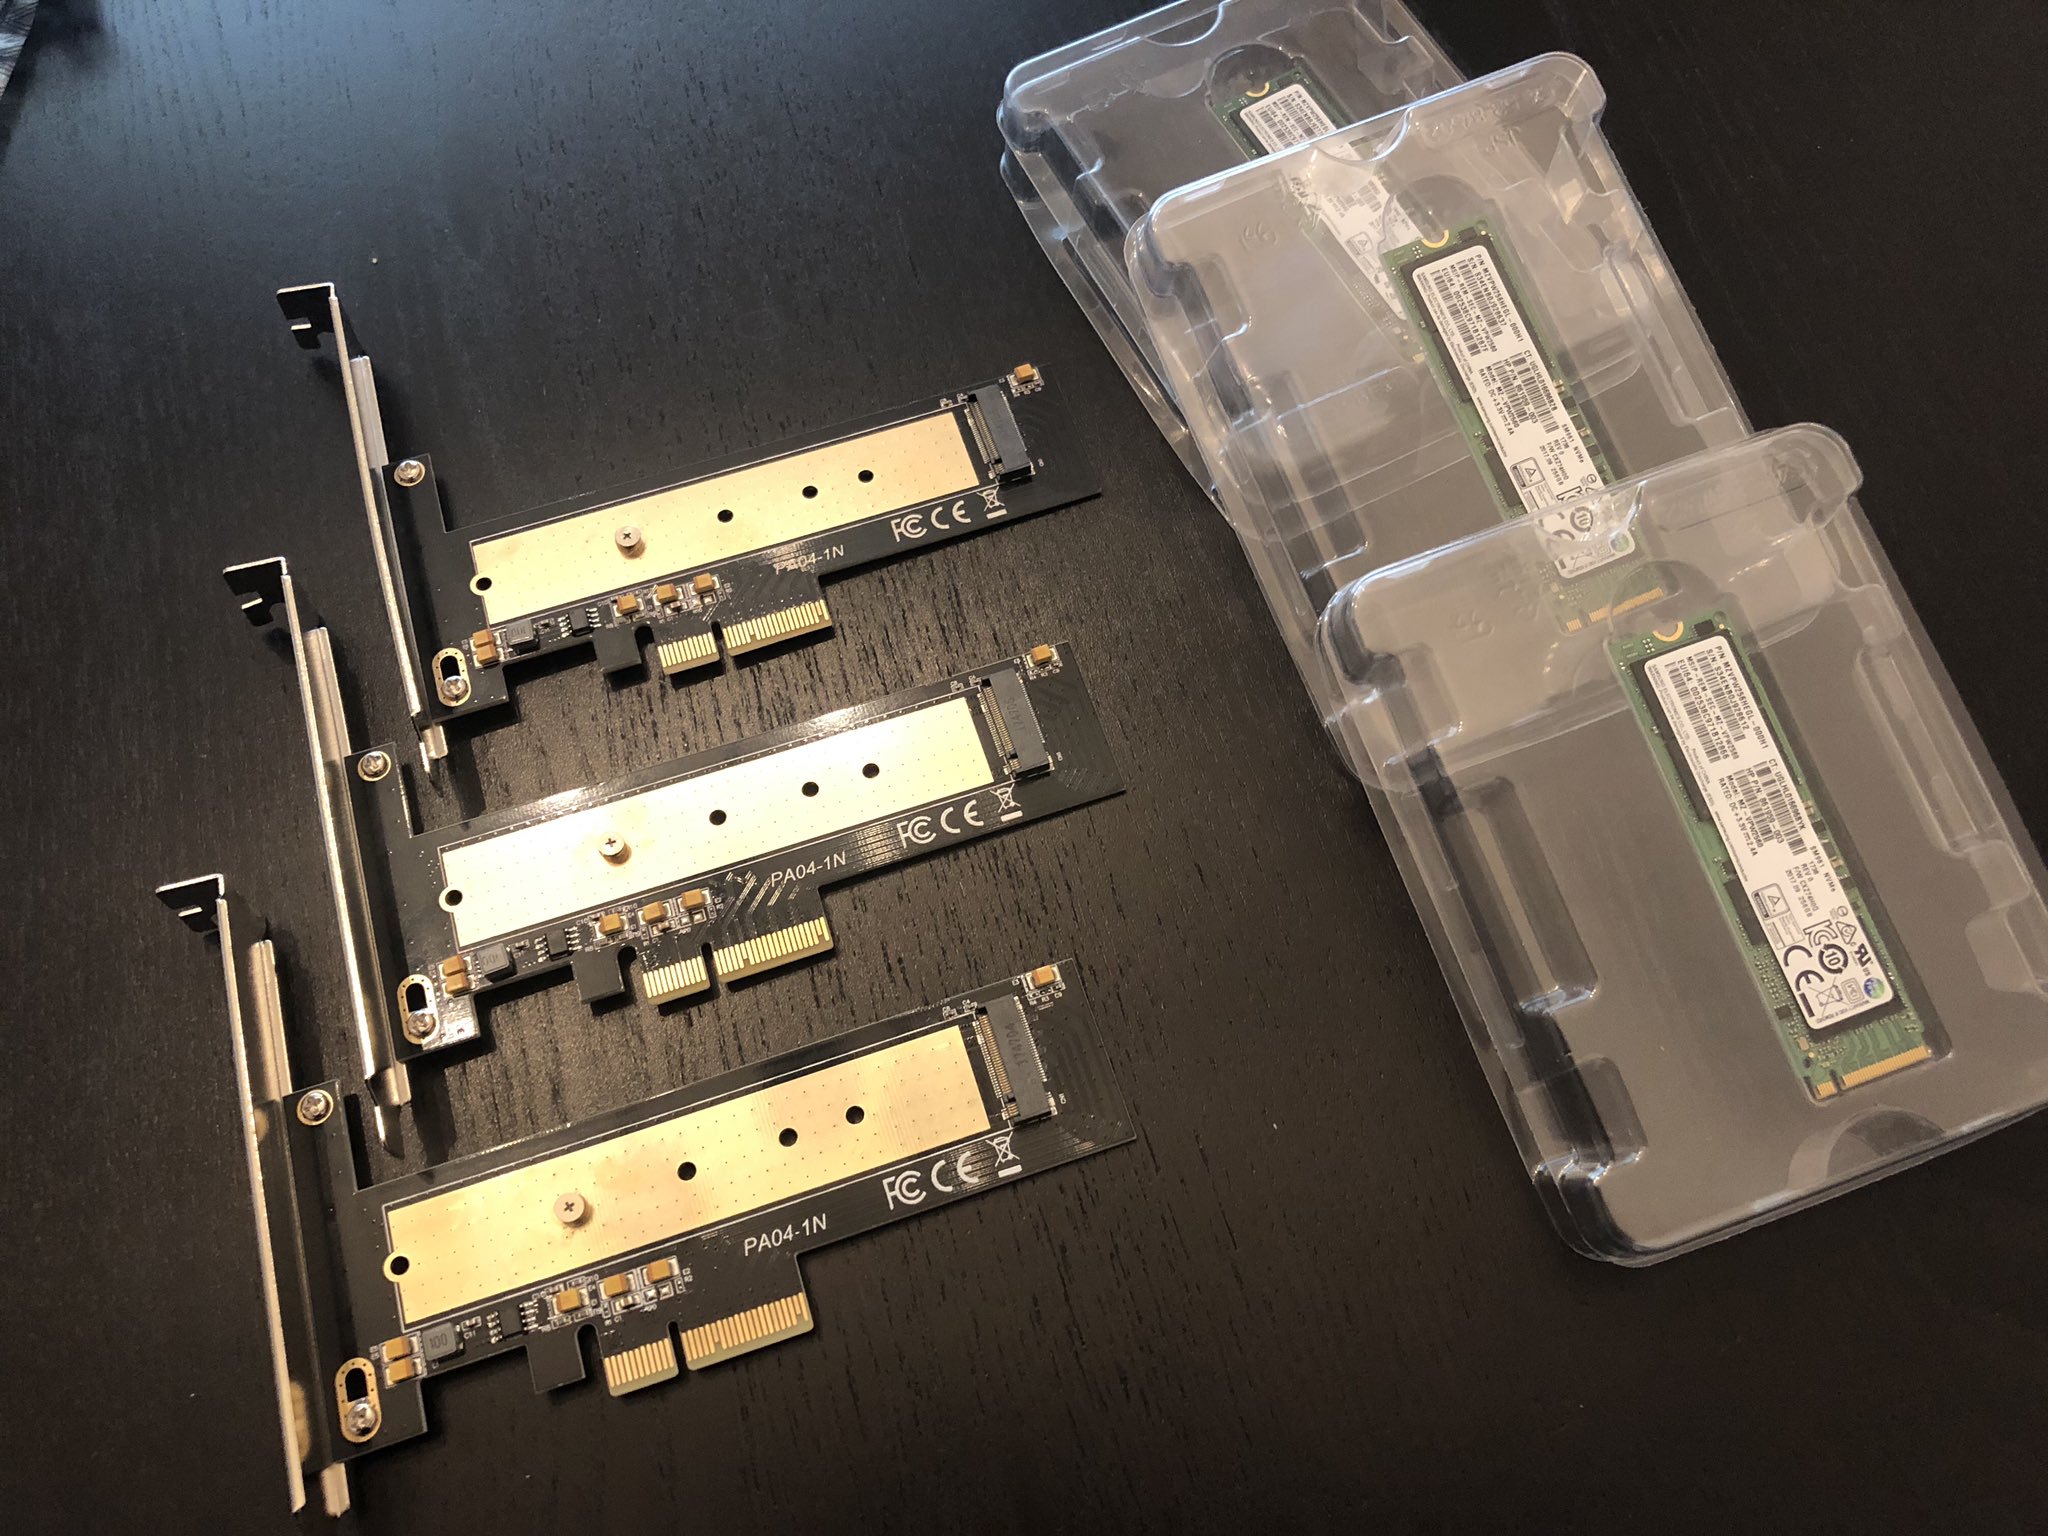
I recently deployed an all-NVMe based vSAN configuration in my home lab. I’ll be posting more information on my setup soon, but I decided to use OEM Samsung based SSDs. I’ve got 256GB SM961 MLC based drives for my cache tier, and larger 1TB enterprise-grade PM953s for capacity. These drives are plenty quick for vSAN and can be had for great prices on eBay if you know where to look.
The Samsung Polaris based SM961 is similar to the 960 Pro and well suited for vSAN caching.
Being OEM drives, they don’t have any heatsinks and are pretty bare. As I started running some performance tests using synthetic tools like Crystal Disk Mark and ATTO, I began to see instability. My guest running the test would completely hang after a few minutes of testing and I’d be forced to reboot the ESXi host to recover.
Looking through the logs, it became clear what had happened:
2019-08-16T15:43:26.083Z cpu0:2341677)nvme:AsyncEventReportComplete:3050:Smart health event: Temperature above threshold
2019-08-16T15:43:26.087Z cpu9:2097671)nvme:NvmeExc_ExceptionHandlerTask:317:Critical warnings detected in smart log [2], failing controller
2019-08-16T15:43:26.087Z cpu9:2097671)nvme:NvmeExc_RegisterForEvents:370:Async event registration requested while controller is in Health Degraded state.
One of my nvme drives had overheated! The second time I tried the test, I watched more closely.
Sure enough, it wasn’t the older PM953s overheating, but the newer Polaris based SM961 cache drives. As soon as the heavy writes started, the drive’s temperature steadily increased until it approached 70’C. The moment it hit 70, the guest hung. Looking more closely in ESXi, I could see that the drive completely disappeared. I.e. it was no longer listed as a NVMe device or HBA in the system. It appears that this is safety measure to stop the controller from cooking itself to the point of permanent damage. Since I had no idea it was running so hot, I’d say I’m thankful for this feature – but none the less, I’d have to figure out some way to keep these drives cooler.
ESXi has a limited implementation of SMART monitoring and can pull a few specific metrics. Thankfully, drive temperature is one of them. First, I needed to get the t10 identifier for my nvme drives:
[root@esx-e1:~] esxcli storage core device list |grep SAMSUNG
t10.NVMe____SAMSUNG_MZVPW256HEGL2D000H1______________6628B171C9382499
Display Name: Local NVMe Disk (t10.NVMe____SAMSUNG_MZVPW256HEGL2D000H1______________6628B171C9382499)
Devfs Path: /vmfs/devices/disks/t10.NVMe____SAMSUNG_MZVPW256HEGL2D000H1______________6628B171C9382499
Model: SAMSUNG MZVPW256
t10.NVMe____SAMSUNG_MZ1LV960HCJH2D000MU______________1505216B24382888
Display Name: Local NVMe Disk (t10.NVMe____SAMSUNG_MZ1LV960HCJH2D000MU______________1505216B24382888)
Devfs Path: /vmfs/devices/disks/t10.NVMe____SAMSUNG_MZ1LV960HCJH2D000MU______________1505216B24382888
Model: SAMSUNG MZ1LV960
Running a four second refresh interval using ‘watch’ is a useful way to monitor the drive under stress.
[root@esx-e1:~] watch -n 4 "esxcli storage core device smart get -d t10.NVMe____SAMSUNG_MZVPW256HEGL2D000H1______________6628B171C9382499"
Parameter Value Threshold Worst
---------------------------- ----- --------- -----
Health Status OK N/A N/A
Media Wearout Indicator N/A N/A N/A
Write Error Count N/A N/A N/A
Read Error Count N/A N/A N/A
Power-on Hours 974 N/A N/A
Power Cycle Count 62 N/A N/A
Reallocated Sector Count 0 95 N/A
Raw Read Error Rate N/A N/A N/A
Drive Temperature 35 70 N/A
Driver Rated Max Temperature N/A N/A N/A
Write Sectors TOT Count N/A N/A N/A
Read Sectors TOT Count N/A N/A N/A
Initial Bad Block Count N/A N/A N/A
As you can see, the maximum temperature is listed as 70’C. This isn’t a suggestion as I’ve come to learn the hard way.
To get things cooler I decided to move my fans around in my Antec VSK4000 cases. My lab is geared toward silence more than cooling so the airflow near the PCIe slots is pretty poor. I’ve now got a 120mm fan on the side-panel cooling the slots directly. This benefits my Solarflare 10Gbps NICs as well, which can get quite toasty. This helped significantly, but if I leave a synthetic test running long enough, it will eventually get to 70’C again. Clearly, I’ll need to add passive heatsinks to the SM961s if I want to keep them cool in these systems.
Realistically, it’s only synthetic and very heavy write tests that seem to get the temperature climbing to those levels. It’s unlikely that day-to-day use would cause a problem. None the less, I’m going to look into heatsinks for the drives. They can be had for $5-10 on Amazon, so it seems like a small investment for some extra peace of mind.
The morale of the story – keep an eye on your NVMe controller temps!
Run ipmitool directly from the ESXi command line instead of having to boot to Linux.
I just created a packaged vib that includes ipmitool 1.8.11 that can be run directly from the ESXi CLI. I needed to be able to modify fan thresholds to keep my slow-spinning fans from triggering critical alarms on my hosts. These fan thresholds aren’t exposed in the web UI and I have to modify them using ipmitool. Normally, to do this I’d have to shut down the host, and boot it up using an install of Debian on a USB stick – a bit of a pain. Why not just run ipmitool from directly within ESXi instead?
You can find the vib download, some background, installation instructions and example uses on the static page here.
SR-IOV or “Single Root I/O Virtualization” is a very interesting feature that can provide virtual machines shared access to physical network cards installed in the hypervisor. This may sound a lot like what a virtual NIC and a vSwitch does, but the feature works very similarly to PCI passthrough, granting a VM direct access to the NIC hardware. In order to understand SR-IOV, it helps to understand how PCI passthrough works. Here is a quote from a post I did a few years ago:
“PCI Passthrough – or VMDirectPath I/O as VMware calls it – is not at all a new feature. It was originally introduced back in vSphere 4.0 after Intel and AMD introduced the necessary IOMMU processor extensions to make this possible. For passthrough to work, you’ll need an Intel processor supporting VT-d or an AMD processor supporting AMD-Vi as well as a motherboard that can support this feature.
In a nutshell, PCI passthrough allows you to give a virtual machine direct access to a PCI device on the host. And when I say direct, I mean direct – the guest OS communicates with the PCI device via IOMMU and the hypervisor completely ignores the card.”
SR-IOV takes PCI passthrough to the next level. Rather than granting exclusive use of the device to a single virtual machine, the device is shared or ‘partitioned’. It can be shared between multiple virtual machines, or even shared between virtual machines and the hypervisor itself. For example, a single 10Gbps NIC could be ‘passed through’ to a couple of virtual machines for direct access, and at the same time it could be attached to a vSwitch being used by other VMs with virtual NICs and vmkernel ports too. Think shared PCI passthrough.
Manually patching standalone ESXi hosts without access to vCenter or Update Manager using offline bundles and the CLI.
There are many different reasons you may want to patch your ESXi host. VMware regularly releases bug fixes and security patches, or perhaps you need a newer build for compatibility with another application or third-party tool.
Update 3/15/2021: See my video tutorial on how to update your ESXi 7.x host from the CLI:
In my situation, the ESXi 6.7 U1 ESXi hosts (build 10302608) are not compatible with NSX-T 2.4.0, so I need to get them patched to at least 6.7 EP06 (build 11675023).
Before you get started, you’ll want to figure out which patch release you want to update to. There is quite often some confusion surrounding the naming of VMware patch releases. In some cases, a build number is referenced, for example, 10302608. In other cases, a friendly name is referenced – something like 6.7 EP06 or 6.5 P03. The EP in the name denotes an ‘Express Patch’ with a limited number of fixes released outside of the regular patch cadence, where as a ‘P’ release is a standard patch. In addition to this, major update releases are referred to as ‘U’, for example, 6.7 U1. And to make things more confusing, a special ‘Release Name’ is quite often referenced in security bulletins and other documents. Release names generally contain the release date in them. For example, ESXi670-201903001 for ESXi 6.7 EP07.
The best place to start is VMware KB 1014508, which provides links to numerous KB articles that can be used for cross referencing build numbers with friendly versions names. The KB we’re interested in for ESXi is KB 2143832.
Using VUM and DRS to make quick work of driver updates in larger environments.
In my last video, I showed you how to update ESXi NIC drivers from the command line. This method is great for one-off updates, or for small environments, but it really isn’t scalable. Thankfully, VMware Update Manager can make quick work out of driver updates. By taking advantage of fully-automated DRS, VUM can make the entire process seamless and orchestrate everything from host evacuation, driver installation and even the host reboots.
In today’s video, I walk you through how to upload a custom patch into VUM and create a baseline that can be used to update a driver.
Remember, some server vendors require specific or minimum firmware levels to go along with their drivers. The firmware version listed in the compatibility guide is only the version used to test/qualify the driver. It’s not necessarily the best or only choice. VMware always recommends reaching out to your hardware vendor for the final word on driver/firmware interoperability.
I hope you found this video helpful. For more instructional videos, please head over to my YouTube channel. Please feel free to leave any comments below, or on YouTube.
A video walk-through on updating your NIC drivers from the command line for maximum control.
There are a number of reasons you may want to update your NIC drivers and firmware. Maybe it’s just a best practice recommendation from the vendor, or perhaps you’ve run into a bug or performance problem that warrants this. Whatever the reason, keeping your NIC drivers up to date is always a good idea.
There are several ways to go about updating your drivers, but the tried and tested ‘esxcli’ method works well for small environments. It’s also a good choice to ensure you have maximum control over the process. The below video will walk you through the update process:
Remember that finding the correct NIC on the VMware Compatibility Guide is one of the most important steps in the driver update process. For help on narrowing down your exact NIC make/model based on PCI identifiers, be sure to check out this video.
Another important point to remember is that some server vendors require specific or minimum firmware levels to go along with their drivers. The firmware version listed in the compatibility guide is only the version used to test/qualify the driver. It’s not necessarily the best or only choice. VMware always recommends reaching out to your hardware vendor for the final word on driver/firmware interoperability.
Stay tuned for another video on using VMware Update Manager to create a baseline for automating the driver update process!
I hope you found this video helpful. For more instructional videos, please head over to my YouTube channel. Please feel free to leave any comments below, or on YouTube.