NSX uses the concept of IP pools for IP address assignment for several components including controllers, VTEPs and Guest Introspection. These are normally configured during the initial deployment of NSX and it’s always a good idea to ensure you’ve got some headroom in the pool for future growth.
NSX usually does a good job of keeping track of IP Pool address allocation, but in some situations, stale entries may be wasting IPs. There are a few ways you could get yourself into this situation – most commonly this is due to the improper removal of objects. For example, if an ESXi host is removed from the vCenter inventory while still in an NSX prepared cluster, its VTEP IP address allocation will remain. NSX can’t release the allocation, because the VIBs were never uninstalled and it has no idea what the fate of the host was. If the allocation was released and someone deployed a new host while the old one was still powered on, you’d likely get IP conflicts.
Just this past week, I assisted two separate customers who ran into similar situations – one had a stale IP in their controller pool, and the other had stale IPs in their VTEP pool. Both had removed controllers or ESXi hosts using a non-standard method.
If you have a look in the NSX UI, you’ll notice that there is no way to add, modify or remove allocated IPs. You can only modify or expand the pool. Thankfully, there is a way to remove allocated IPs from a pool using an NSX REST API call.
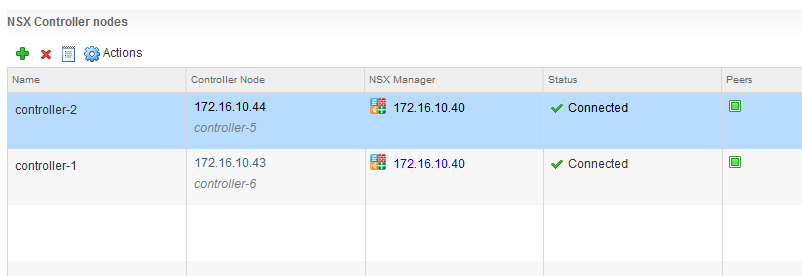
To simulate a scenario where this can happen, I went ahead and improperly removed one of the NSX controllers and did some manual cleanup afterward. As you can see below, the third controller appears to have been removed successfully.
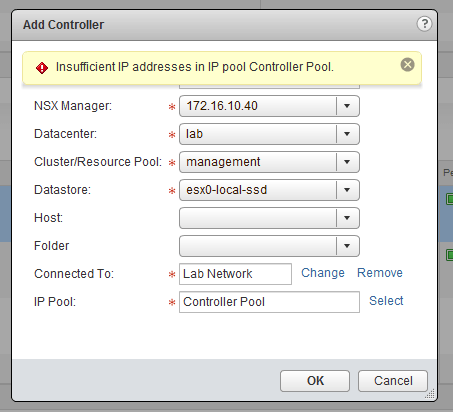
When I try to deploy the third controller again, I’m unable to because of a shortage of IPs in the pool:
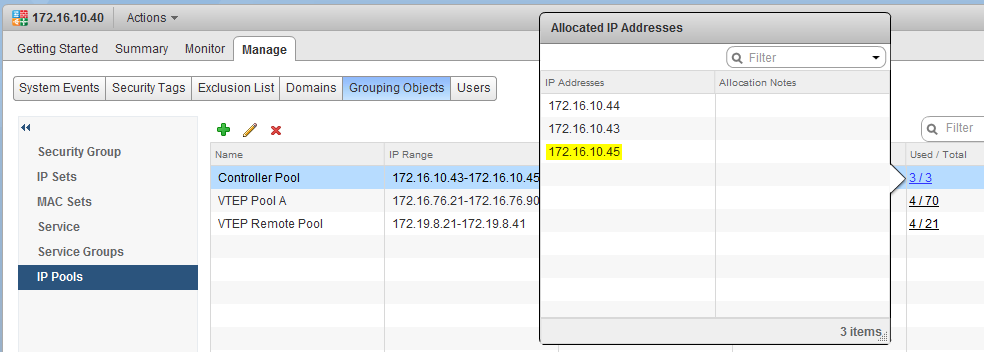
If I look at the IP Pool called ‘Controller Pool’ in the grouping objects, I can see that there are only three IPs available and one of them belongs to the old controller than no longer exists:
So in order to get my third controller re-deployed, I’ll need to either remove the stale 172.16.10.45 entry or expand my pool to have a total of four or more addresses. If this were a production environment, expanding the pool may be a suitable workaround to get things running again quickly. If you are at all like me, simply having this remnant left behind would bother me and I’d want to get it cleaned up.
Releasing IPs Using REST API Calls
Now that we’ve confirmed the IP address we want to nuke from the pool, we can use some API calls to gather the required information and release the address. The API calls we are interested in can be found in the NSX 6.2 and 6.3 API guides. My lab is currently running 6.2.7, so I’ll be using calls found on page 110-114 in the NSX 6.2 API guide.
Before we begin, there are two key pieces of information we’ll need to do this successfully:
- The IP address that needs to be released.
- The moref identifier of the IP pool in question.
First, we’ll use an API call to query all IP pools on the NSX manager. This will provide an output that will include the moref identifier of the pool in question:
GET https://NSX-Manager-IP-Address/api/2.0/services/ipam/pools/scope/scopeID
As you can see above, the ‘scope ID’ is also required to run this GET call. In every instance I’ve seen, using globalroot-0 as the scopeID works just fine here.

The various IP pools will be separated by <ipamAddressPool> XML tags. You’ll want to identify the correct pool based on the IP range listed or by the text in the <name> field. The relevant controller pool was identified by the following section in the output in my example:
<ipamAddressPool>
<objectId>ipaddresspool-1</objectId>
<objectTypeName>IpAddressPool</objectTypeName>
<vsmUuid>4226CDEE-1DDA-9FF9-9E2A-8FDD64FACD35</vsmUuid>
<nodeId>fa4ecdff-db23-4799-af56-ae26362be8c7</nodeId>
<revision>1</revision>
<type>
<typeName>IpAddressPool</typeName>
</type>
<name>Controller Pool</name>
<scope>
<id>globalroot-0</id>
<objectTypeName>GlobalRoot</objectTypeName>
<name>Global</name>
</scope>
<clientHandle/>
<extendedAttributes/>
<isUniversal>false</isUniversal>
<universalRevision>0</universalRevision>
<totalAddressCount>3</totalAddressCount>
<usedAddressCount>3</usedAddressCount>
<usedPercentage>100</usedPercentage>
<prefixLength>24</prefixLength>
<gateway>172.16.10.1</gateway>
<dnsSuffix>lab.local</dnsSuffix>
<dnsServer1>172.16.10.10</dnsServer1>
<dnsServer2>172.16.10.11</dnsServer2>
<ipPoolType>ipv4</ipPoolType>
<ipRanges>
<ipRangeDto>
<id>iprange-1</id>
<startAddress>172.16.10.43</startAddress>
<endAddress>172.16.10.45</endAddress>
</ipRangeDto>
</ipRanges>
<subnetId>subnet-1</subnetId>
</ipamAddressPool>
As you can see above, the IP pool is identified by the moref identifier ipaddresspool-1.
As an optional next step, you may wish to view the IP addresses allocated within this pool. The following API call will obtain this information:
GET https://NSX-Manager-IP-Address/api/2.0/services/ipam/pools/poolId/ipaddresses
In my example, I used the following call:
GET https://nsxmanager.lab.local/api/2.0/services/ipam/pools/ipaddresspool-1/ipaddresses
Below is the output I received:
<allocatedIpAddresses>
<allocatedIpAddress>
<id>13</id>
<ipAddress>172.16.10.44</ipAddress>
<gateway>172.16.10.1</gateway>
<prefixLength>24</prefixLength>
<dnsServer1>172.16.10.10</dnsServer1>
<dnsServer2>172.16.10.11</dnsServer2>
<dnsSuffix>lab.local</dnsSuffix>
<subnetId>subnet-1</subnetId>
</allocatedIpAddress>
<allocatedIpAddress>
<id>14</id>
<ipAddress>172.16.10.43</ipAddress>
<gateway>172.16.10.1</gateway>
<prefixLength>24</prefixLength>
<dnsServer1>172.16.10.10</dnsServer1>
<dnsServer2>172.16.10.11</dnsServer2>
<dnsSuffix>lab.local</dnsSuffix>
<subnetId>subnet-1</subnetId>
</allocatedIpAddress>
<allocatedIpAddress>
<id>15</id>
<ipAddress>172.16.10.45</ipAddress>
<gateway>172.16.10.1</gateway>
<prefixLength>24</prefixLength>
<dnsServer1>172.16.10.10</dnsServer1>
<dnsServer2>172.16.10.11</dnsServer2>
<dnsSuffix>lab.local</dnsSuffix>
<subnetId>subnet-1</subnetId>
</allocatedIpAddress>
</allocatedIpAddresses>
Each allocated address in the pool will have its own <id> tag. I can see that 172.16.10.45 is indeed still there. Now let’s remove it using the following API call:
DELETE https://NSX-Manager-IP-Address/api/2.0/services/ipam/pools/poolId/ipaddresses/allocated-ip-address
In my example, the exact call would be:
DELETE https://nsxmanager.lab.local/api/2.0/services/ipam/pools/ipaddresspool-1/ipaddresses/172.16.10.45

If the call was successful, you should see a Boolean value of ‘true’ returned. Next you can validate again using the previous API call. In my case I used:
GET https://nsxmanager.lab.local/api/2.0/services/ipam/pools/ipaddresspool-1/ipaddresses
And got the following output:
<allocatedIpAddresses>
<allocatedIpAddress>
<id>13</id>
<ipAddress>172.16.10.44</ipAddress>
<gateway>172.16.10.1</gateway>
<prefixLength>24</prefixLength>
<dnsServer1>172.16.10.10</dnsServer1>
<dnsServer2>172.16.10.11</dnsServer2>
<dnsSuffix>lab.local</dnsSuffix>
<subnetId>subnet-1</subnetId>
</allocatedIpAddress>
<allocatedIpAddress>
<id>14</id>
<ipAddress>172.16.10.43</ipAddress>
<gateway>172.16.10.1</gateway>
<prefixLength>24</prefixLength>
<dnsServer1>172.16.10.10</dnsServer1>
<dnsServer2>172.16.10.11</dnsServer2>
<dnsSuffix>lab.local</dnsSuffix>
<subnetId>subnet-1</subnetId>
</allocatedIpAddress>
</allocatedIpAddresses>
As you can see above, the IP with an <id> tag of 15 has been removed. Next, I’ll confirm in the UI that the IP has indeed been released:

After a refresh of the vSphere Web Client view, the total used decreased to 2 for the Controller Pool and I could deploy my third controller successfully.
Although this process is straight forward if you are familiar with running NSX API calls, I do have to provide a word of caution. NSX will not stop you from releasing an IP if it is genuinely being used. Therefore, it’s important to make 100% sure that whatever object was using the stale IP is indeed off the network. Some basic ping tests are a good idea before proceeding.
Thanks for reading! If you have any questions, please feel free to leave a comment below.
