As you’ve probably noticed, VMware is regularly releasing new NSX versions and updates to introduce new features and to improve stability and scalability. Eventually, you’ll find yourself in a situation where you’ll either want or need to upgrade. Maybe you want to take advantage of some new features, encountered a problem or your version isn’t supported any more. Whatever the reason, and whatever the version, here are ten tips that will help to ensure your upgrade is successful!
Tip 1 – Check The Compatibility Matrix
Before getting started, you’ll want to thoroughly check the compatibility of your target NSX version. That doesn’t just mean checking if you can upgrade from version X to version Y, but rather to check everything that interacts with NSX in the environment.
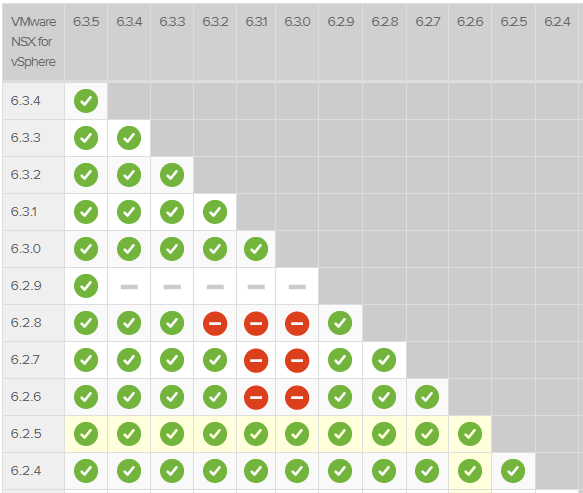
Start with the NSX Upgrade Path found at the VMware Interoperability Matrices page. There you may be surprised to find that there are several versions of NSX that are not a feasible upgrade path. For example, you can’t upgrade from NSX 6.2.8 to 6.3.2, nor can you upgrade from 6.2.6 to 6.3.1.
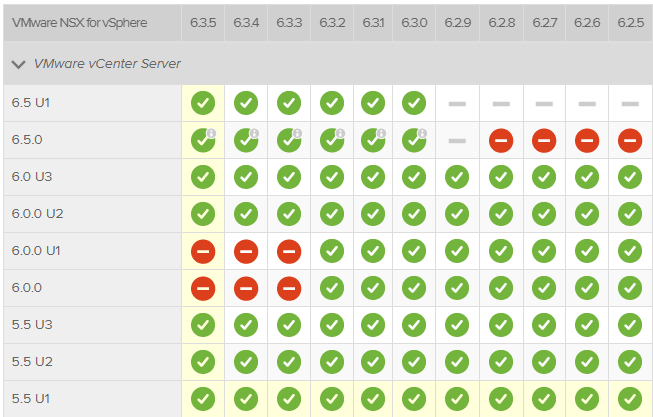
Once you’ve confirmed that your target version is supported in the upgrade path, you’ll want to look at the Interoperability Matrix to ensure products like vSphere and Cloud Director are compatible. Again, there are several incompatible releases that you may not expect. For example, NSX 6.3.3 and later releases aren’t compatible with vCenter Server 6.0 U1 and older, but are compatible with all releases of 5.5. Another example is the initial release of vSphere 6.5. Only 6.5a or later can be used with any version of NSX 6.3.x.
Once you’ve confirmed compatibility with VMware products, you’ll want to ensure your third-party products that interact with NSX are compatible. Most vendors, like Trend Micro, McAfee and Palo Alto Networks maintain their own online compatibility matrix. If there is every any doubt, you should reach out to the vendor for clarification and confirmation. Always better safe than sorry.
Tip 2 – Read the Release Notes
The second step that I can’t recommend strongly enough is to review the release notes for the version of NSX you want to upgrade to. This is the single most important document that you’ll want to review. VMware will often post important information here, including changes to the upgrade process, compatibility snares and a long list of both fixed and known issues.
For example, in the NSX 6.3.5 release notes, it’s clearly stated that you shouldn’t upgrade from NSX 6.2.2 or older without first doing a workaround step. From the release notes:
Important: If you are upgrading NSX 6.2.0, 6.2.1, or 6.2.2 to NSX 6.3.5, you must complete a workaround before starting the upgrade. See VMware Knowledge Base article 000051624 for details.
If you missed this, you would have had a failed manager upgrade and would have no choice but to roll back. Definitely not fun – especially during a limited weekend change window.
Tip 3 – Let VMware Know
VMware obviously wants your upgrade to go smoothly just as much as you do, and are willing to help in any way they can. I’d encourage you to discuss your upgrade plans with your TAM, and/or your sales team. If you need help doing the actual upgrade process itself, VMware consultants from the Professional Services (PSO) can be brought in to help.
At the very least, it’s a good idea to let VMware Support know that you plan to upgrade. The NSX support team encourages customers to open what we call a ‘proactive support request’. This is basically an SR stating that you’ll be upgrading at a certain date/time and would like VMware to be standing by in case of any problems.
VMware will ensure that the proactive SR is added to a special weekend or after-hours watch list and the case will be owned by a support engineer who is actually in-seat. When that engineer’s shift is over, it’ll be moved to the next center for around the clock monitoring. If something does go wrong, VMware can respond more quickly.
When you open your proactive SR, be sure to give VMware at least a few days’ notice and include any upgrade plans you have in the case.
Tip 4 – Perform a Health Check
With any NSX upgrade, your likelihood of success will be much greater if the environment is in a healthy state before starting. Some examples of things you’ll want to ensure:
- The environment is working as it should be. I.e. VMs have connectivity and routing is functional.
- The NSX Control Cluster is green and none of the nodes are disconnected.
- All of the ESGs and DLRs are up and running and not reporting any errors.
- Your ‘host preparation’ tab is not reporting any VXLAN errors or clusters/hosts in ‘Not Ready’ state. This is especially important as you can’t upgrade a cluster in a ‘Not Ready’ state.
- The last firewall rule publish was successful.
- NSX Manager is successfully registered to both VC and SSO and inventory sync status is up-to-date.
- In a cross-VC environment, your secondary managers are not reporting any synchronization problems.
- Ensure your NSX Manager and controller’s disks aren’t getting full. If they are creeping above 90% utilization you may need to free up some space.
If there are any clear signs of trouble in the environment, it would be a good idea to get them sorted before attempting your upgrade.
There may be some exceptions to this, especially if you are upgrading because of a problem of some kind that is fixed in a newer release. In that situation, I’d encourage you to get guidance from VMware Support on whether you should proceed with the upgrade or if it is safe to do so.
Tip 5 – Take a Backup
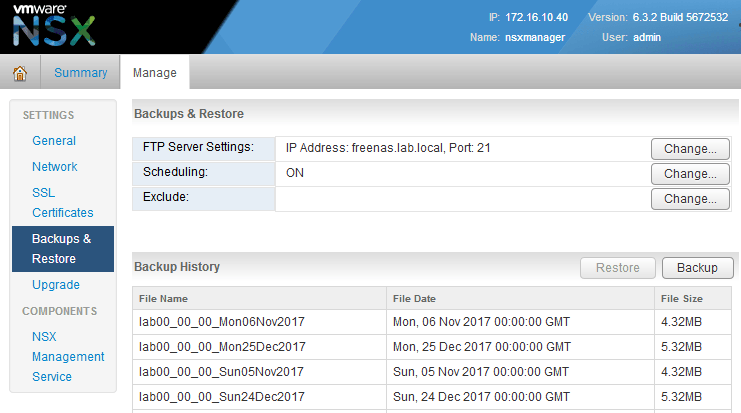
This may seem like an obvious suggestion, but you’d be surprised how many times I’ve come across NSX deployments without backups configured or with a backup configuration that is no longer working. Using NSX FTP/SFTP backups is the only officially supported way to roll back NSX Manager if you run into problems during an upgrade. That said, you should never proceed with an upgrade before you’ve confirmed that a successful backup has been taken via FTP/SFTP.
Because all the NSX configuration – including firewall rules, edges, logical switches – are contained in the NSX Manager database, this is the single most critical data source that needs to be preserved. Even if every NSX component was wiped out, you could still rebuild your environment with nothing more than a good NSX Manager backup.
For more information on configuring NSX backups, please see page 18 of the NSX 6.3 Upgrade Guide.
Another smart move is to have the OVA appliance of your previous NSX version downloaded and ready to go if need be. There is nothing worse than making a roll back decision in a change window only to find out it’s going to take an hour to download a 2GB OVA file. Do yourself a favor and have it downloaded and ready to deploy should the need arise.
Tip 6 – Backup Some More!
I say this again because I just can’t express how important having a good backup is. I’d recommend not relying solely on NSX FTP/SFTP backups, but to use a second method as well. There are two reasons for this. First, I’ve seen restores fail due to corrupted backups – it doesn’t happen often, but it can happen. And second, restoring from backups can be a slower process than some alternative methods. For these reasons, I always recommend using a second backup method in addition to the usual FTP backup. Either of these two are good options:
- Powered Off Snapshot of the NSX Manager Appliance
- Cold clone of the NSX Manager Appliance.
You probably noticed that both options are cold and not done with the appliance powered on. This is important because the NSX Manager doesn’t support quiesced snapshots and there can be consistency problems with the Postgres SQL database if a powered-on snapshot is taken or restored.
To take a powered off snapshot, simply shut down the NSX Manager appliance, and once off, take a snapshot. You can then power it back on and begin the upgrade process. Once the upgrade is finished and everything confirmed working, don’t forget to ‘Delete All’ from Snapshot Manager.
I personally prefer doing a full cold-clone of the NSX manager for roll back purposes. The benefit of this is that you can easily roll back while preserving the broken appliance that failed to upgrade. In some cases, VMware may request this broken appliance for analysis. The clone just makes this process easier.
To take a cold clone:
- Power off the NSX manager appliance. Do not attempt to do a hot-clone while the manager is powered on.
- Clone the appliance to a VM with a different name. I recommend calling it something that ensures it’s not powered on by mistake. I.e. ‘NSX Manager Backup – DO NOT POWER ON’
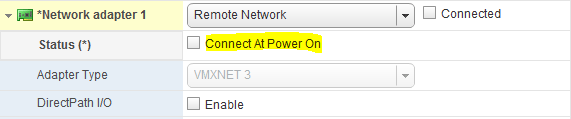
- Once the clone is finished, edit the settings of the cloned VM and ensure the network adapter option ‘Connect at power on’ is NOT checked. This helps to ensure if someone accidentally powers it on that it won’t have network connectivity. This step is important. Don’t skip it.
- Power back on the original Manager appliance and proceed with the upgrade.
The only risk with this approach is that you must make 100% sure that the two appliances don’t get powered up and put on the network simultaneously. This will result in bad things happening – including an IP conflict and two different versions of NSX trying to manage your vCenter inventory. Once you are confident that the upgrade was successful, delete the clone to avoid any confusion.
Again, this should only be done in addition to the usual FTP/SFTP backups. Never rely on only a snapshot or a clone.
Tip 7 – Give Yourself Plenty of Time
Although some NSX components, like the NSX Manager and control cluster can be upgraded with no datapath impact, you should always upgrade during a proper maintenance window. You need the flexibility and time to be able to troubleshoot and deal with unforeseen problems.
Upgrading some of the datapath components, like ESGs will usually result in brief dataplane outages and need to be planned for accordingly. Ensure your application owners are aware that there may be brief dataplane outages when these components are done.
Equally important is to leave yourself enough time for the upgrade. You’ll find that NSX Manager and the control cluster can usually be done in less than an hour, but it’s the hosts that take the most time. In NSX 6.3, it’s no longer necessary to reboot hosts after upgrading the NSX VIBs, which saves a lot of time, but hosts still need to be put in maintenance mode. This means that a lot of vMotions need to happen, which can take time.
If you start running out of time during your maintenance window, there is the risk that you’ll get stuck half way though the upgrade of a cluster. Don’t leave hosts in the same cluster at different NSX VIB versions. VMs migrating between hosts may exhibit problems – especially if there is a big version delta.
If possible, try to orchestrate the upgrade in manageable chunks. If you do start running out of time, it’s better to just finish the cluster you are working on, and then leave other entire clusters at the old version until the next upgrade opportunity.
Tip 8 – Follow The Upgrade Guide
As always, read the official 6.2 or 6.3 NSX Upgrade Guide. A lot of the upgrade process is quite simple, but this is an important activity and you definitely want to get it right. Don’t just read this like a manual once the upgrade has started – have a look through well in advance so that you are prepared for what needs to happen.
Be sure to pay particular attention to the order in which things need to be upgraded. For example, in a cross-VC setup, you must upgrade the primary NSX manager first, followed by ALL secondary managers before moving on to any other components in the environment. The order in which things are upgraded is critical.
Tip 9 – Thoroughly Test and Clean Up
I’d always recommend having a test plan prepared for when the upgrade is completed. In some environments, you may not have access to the workload VMs so this may mean coordinating with your application owners.
I’d also recommend that you have a few test VMs in the environment that are managed by the vSphere and NSX administrators that can be used to perform basic ping and traceroute tests. That way, even if application owners aren’t around, you can ensure your VXLAN networking and routing works as it should after the upgrade is completed.
Once the upgrade is completed, be sure to thoroughly test. Don’t just assume that because everything completed and looks green in the NSX UI that everything is functioning the way it should be. Go through your test plan and be sure your application owners sign off as well.
Once you are ready to declare success, VMware recommends taking a fresh FTP backup to mark the occasion. After a day or two, you should be good to delete the cold clone or snapshot taken on the manager appliance.
Tip 10 – Know When to Stop and Get Help
Finally, if problems do occur during the upgrade, engage VMware Support sooner rather than later. Your time in the maintenance window is limited, and you want to make best use of it.
If time permits, it’s often a good idea to let VMware troubleshoot and try to get you back on track rather than declaring a failure and rolling back the upgrade. Many NSX components are completely disposable and can simply be re-deployed at a newer version if the upgrade fails. An example would be a controller node that fails to upgrade. Quite often, you can simply delete the node and re-deploy it rather than having to stop the upgrade.
If the issue is more complex and can’t be resolved in a timely manner, rolling back may be your only option. Your VMware support engineer can help you make this determination and guide you through what needs to be done. Remember, as long as you have good backups, you have options!
Having a proactive SR opened with VMware Support as described in tip number 3 helps to ensure that VMware can react quickly should you run into any sorts of problems.
Conclusion
And there you have it. Keeping these tips in mind will help to ensure your NSX upgrade is a success. I think the key message here is to not rush. Take your time to prepare for the upgrade. Read the docs, take backups and know the process well.
Have any upgrade questions? Please feel free to leave a comment below or reach out to me on Twitter (@vswitchzero).
