Welcome to the seventh installment of a new series of NSX troubleshooting scenarios. Thanks to everyone who took the time to comment on the first half of scenario seven. Today I’ll be performing some troubleshooting and will show how I came to the solution.
Please see the first half for more detail on the problem symptoms and some scoping.
Getting Started
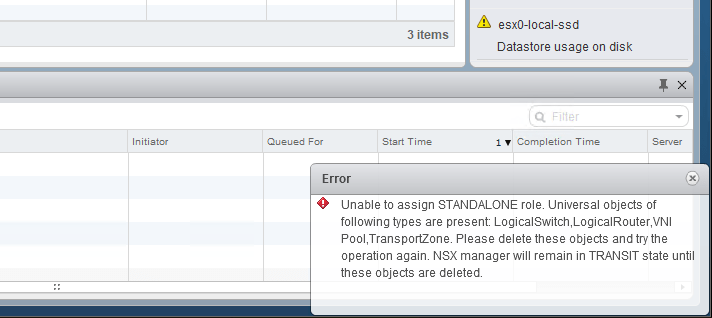
In the first half of this scenario, we saw that our fictional customer was hitting an exception every time they tried to convert their secondary – now a transit – NSX Manager to the standalone role. The error message seemed to imply that numerous universal objects were still in the environment.
Our quick spot checks didn’t show any lingering universal objects, but looking at the NSX Manager logging can tell us a bit more about what still exists:
2018-03-26 22:27:21.779 GMT  INFO http-nio-127.0.0.1-7441-exec-1 ReplicationConfigurationServiceImpl:152 - - [nsxv@6876 comp="nsx-manager" subcomp="manager"] Role validation successful
2018-03-26 22:27:21.792 GMT  INFO http-nio-127.0.0.1-7441-exec-1 DefaultUniversalSyncListener:61 - - [nsxv@6876 comp="nsx-manager" subcomp="manager"] 1 universal objects exists for type VdnScope
2018-03-26 22:27:21.793 GMT  INFO http-nio-127.0.0.1-7441-exec-1 DefaultUniversalSyncListener:66 - - [nsxv@6876 comp="nsx-manager" subcomp="manager"] Some objects are (printing maximum 5 names): Universal TZ
2018-03-26 22:27:21.794 GMT  INFO http-nio-127.0.0.1-7441-exec-1 DefaultUniversalSyncListener:61 - - [nsxv@6876 comp="nsx-manager" subcomp="manager"] 1 universal objects exists for type Edge
2018-03-26 22:27:21.797 GMT  INFO http-nio-127.0.0.1-7441-exec-1 DefaultUniversalSyncListener:66 - - [nsxv@6876 comp="nsx-manager" subcomp="manager"] Some objects are (printing maximum 5 names): dlr-universal
2018-03-26 22:27:21.798 GMT  INFO http-nio-127.0.0.1-7441-exec-1 DefaultUniversalSyncListener:61 - - [nsxv@6876 comp="nsx-manager" subcomp="manager"] 5 universal objects exists for type VirtualWire
2018-03-26 22:27:21.806 GMT  INFO http-nio-127.0.0.1-7441-exec-1 DefaultUniversalSyncListener:66 - - [nsxv@6876 comp="nsx-manager" subcomp="manager"] Some objects are (printing maximum 5 names): Universal Transit, Universal Test, Universal App, Universal Web, Universal DB
2018-03-26 22:27:21.809 GMT  INFO http-nio-127.0.0.1-7441-exec-1 L2UniversalSyncListenerImpl:58 - - [nsxv@6876 comp="nsx-manager" subcomp="manager"] Global VNI pool exists
2018-03-26 22:27:21.814 GMT  WARN http-nio-127.0.0.1-7441-exec-1 ReplicationConfigurationServiceImpl:101 - - [nsxv@6876 comp="nsx-manager" subcomp="manager"] Setting role to TRANSIT because following object types have universal objects VniPool,VdnScope,Edge,VirtualWire
2018-03-26 22:27:21.816 GMT  INFO http-nio-127.0.0.1-7441-exec-1 AuditingServiceImpl:174 - - [nsxv@6876 comp="nsx-manager" subcomp="manager"] [AuditLog] UserName:'LAB\mike', ModuleName:'UniversalSync', Operation:'ASSIGN_STANDALONE_ROLE', Resource:'', Time:'Mon Mar 26 14:27:21.815 GMT 2018', Status:'FAILURE', Universal Object:'false'
2018-03-26 22:27:21.817 GMT  WARN http-nio-127.0.0.1-7441-exec-1 RemoteInvocationTraceInterceptor:88 - Processing of VsmHttpInvokerServiceExporter remote call resulted in fatal exception: com.vmware.vshield.vsm.replicator.configuration.facade.ReplicatorConfigurationFacade.setAsStandalonere.vshield.vsm.exceptions.InvalidArgumentException: core-services:125023:Unable to assign STANDALONE role. Universal objects of following types are present:
If you look closely at the messages above, you can see a list of what still exists. Keep in mind that a maximum of five objects per category is included in the log messages. In this case, they are:
Transport Zones: Universal TZ
Edges: dlr-universal
Logical Switches: Universal Transit, Universal Test, Universal App, Universal Web, Universal DB
VNI Pools: 1 exists
This is indeed a list of everything the customer claims to have deleted from the environment. From the perspective of the ‘Transit’ manager, these objects still exist for some reason.
How We Got Here
Looking back at the order of operations the user did tells us something important:
- First, he disconnected the secondary NSX Manager from the primary. This was successful, and it changed its role from Secondary to ‘Transit’.
- Next, he attempted to convert it to a ‘Standalone’ manager. This failed with the same error message mentioned earlier. This seemed valid, however, because those objects really did exist.
- At this point, he removed the remaining universal logical switches, edges and transport zone. These were all deleted successfully.
- The subsequent attempts to convert the manager to a ‘Standalone’ continue to fail with the same error message even though the objects are gone.
Notice the very first step – they disconnected the secondary from the primary NSX Manager.
The ‘Disconnect from primary’ option is generally used when you want to promote a secondary to a primary while preserving all synchronized universal objects – like in the event of a failover scenario. You can find more information about modifying the NSX manager roles on page 24-25 of the Cross VC Install Guide. Here’s a blurb about the ‘Disconnect from primary’ operation:
“When you run this operation on a secondary NSX Manager, the secondary NSX Manager is unilaterally disconnected from the primary NSX Manager. This operation should be used when the primary NSX Manager has experienced an unrecoverable failure, and you want to register the secondary NSX Manager to a new primary.”
The key phrase to take note of is that the secondary is unilaterally disconnected – i.e. there will be no further synchronization between the primary and this manager. Not only that, but all of the universal objects that previously replicated to this secondary would have been preserved, even if they are deleted from the primary. If we look at the primary NSX Manager’s universal synchronization replicator.log file, we can see that this is indeed the case.
The last successful synchronization with 172.19.10.40 was:
2018-03-26 22:12:00.094 GMT INFO pool-4-thread-1 SecondaryRegistrationProvider:65 - - [nsxv@6876 comp="nsx-manager" subcomp="manager"] Performing full sync on 172.19.10.40
Then we can see the de-registration occur here:
2018-03-26 22:12:17.937 GMT INFO http-nio-127.0.0.1-7442-exec-1 SecondaryRegistrationProvider:140 - - [nsxv@6876 comp="nsx-manager" subcomp="manager"] Performing de-registration tasks on 172.19.10.40
And from then on out, we see no attempt whatsoever to synchronize to the other manager:
2018-03-26 22:14:00.001 GMT  INFO pool-2-thread-1 FullSyncManagerImpl$1:58 - - [nsxv@6876 comp="nsx-manager" subcomp="manager"] Starting full sync, event ReplicationEvent [objectId=null, objectType=null, eventType=FULL_SYNC]
2018-03-26 22:14:00.001 GMT  INFO pool-2-thread-1 FullSyncManagerImpl$1:74 - - [nsxv@6876 comp="nsx-manager" subcomp="manager"] No secondary managers configured. Not starting full sync
2018-03-26 22:14:00.011 GMT  INFO portUpdateScheduler-1 VxlanPrimaryPortUpdater:69 - - [nsxv@6876 comp="nsx-manager" subcomp="manager"] Not resuming. Either all secondary NSX managers are not in same phase or primary is not paused
This is important because we can see that the user deleted the universal objects after the NSX Manager assumed the transit role. They deleted the objects correctly – as all management of universal objects should be done from the primary – but because they aren’t synchronizing, the deletion never propagated to the other manager.
Removing Stale Objects
Because the customer wants to use the manager as a standalone for a period of time before the site is decommissioned, we’ll need to get things cleaned up.
This leaves us with two options – reconnect the transit manager back to the primary in the hope we can synchronize the deleted objects, or we can simply clean up the stale objects. In the interest of education, we’ll clean up the stale objects manually.
Instead of looking for the universal objects from the perspective of the primary NSX manager, we should instead switch to the Transit’s view. This sounds the opposite of the way universal objects should be viewed and managed, but it immediately shows us that these objects really do still exist from the perspective of 172.19.10.40:
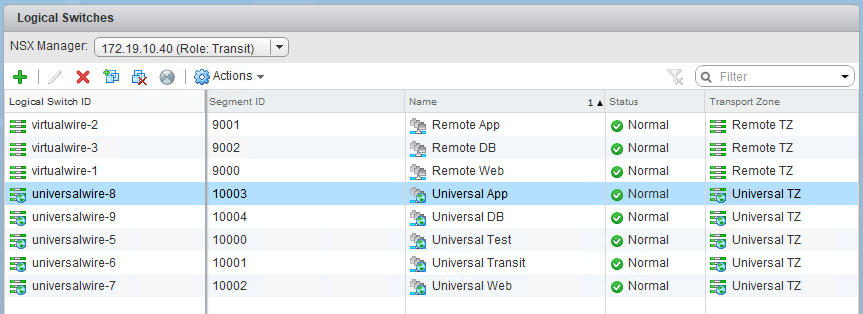
Although the option to modify these universal objects is grayed out – which is normal from anything other than the primary – we can still delete these from the UI.
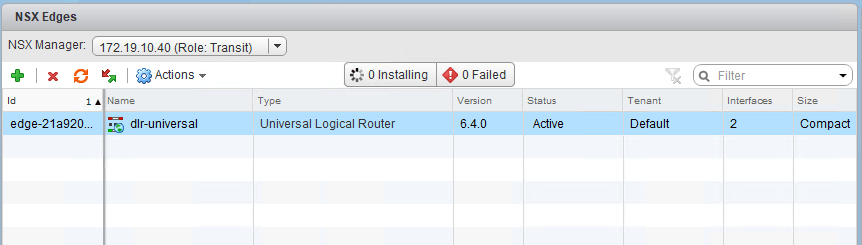
I started by removing the stale DLR entry from the edges view. Although this appliance doesn’t exist, it’s configuration still references universal logical switches and we’ll need to remove it as the first step.
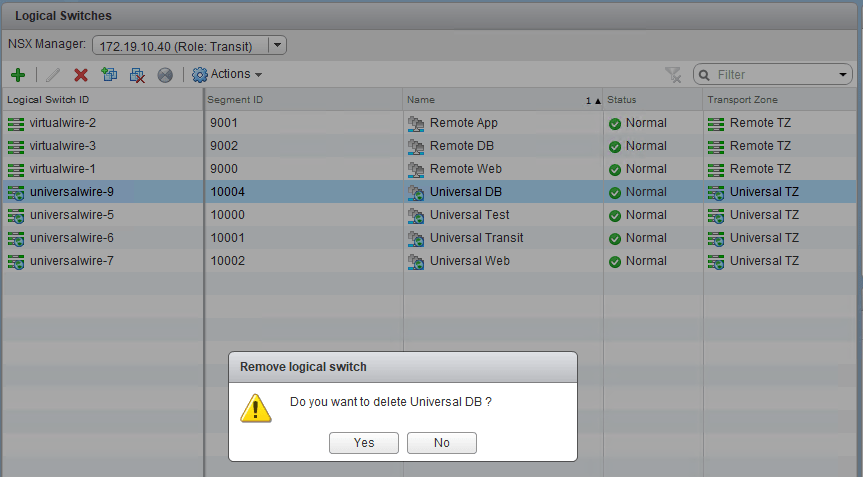
Once the DLR was gone, I could proceed to remove the logical switches:
Once the switches were removed, I could remove the Universal Transport Zone from the transit manager.
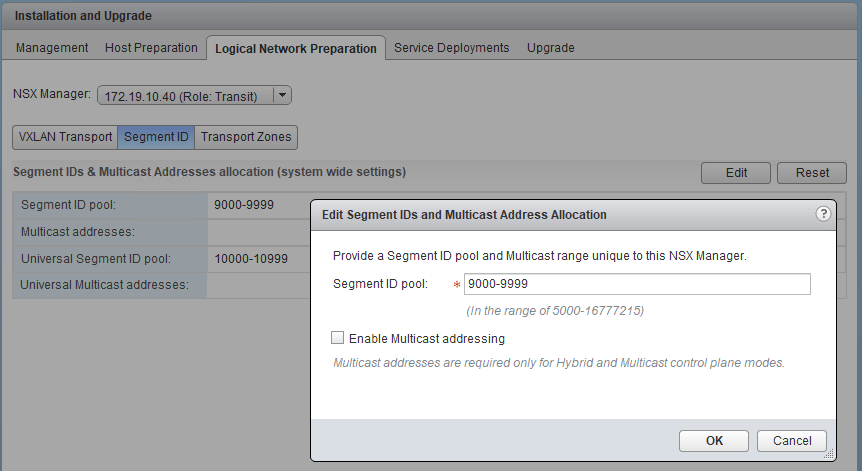
That’s most of it, but there is still one last piece that’s a little trickier to remove. If you recall, the error message earlier also referred to a ‘VNI pool’. This is the range of VXLAN segment identifiers defined in the logical network preparation section of the NSX UI. In this example, a range of 10000-10999 was used for the universal pool. Unfortunately, the UI is somewhat limited in that we can only modify or remove this pool from the primary. If we try to modify segment IDs from the transit manager, we only get the option to modify the local pool:
Thankfully, where the UI lacks, NSX’s powerful REST API functionality fills in the gaps. If you refer to page 20-21 of the NSX 6.3 API guide, you’ll find the calls you’ll need. First, we’ll get the identifier for the segment ID pool using the following GET call:
GET https://172.19.10.40/api/2.0/vdn/config/segments
This gave me the following XML reponse:

Notice that pool ID 3 is marked as ‘true’ for ‘isUniversal’. Next, we’ll delete the specific pool based on the ID from the previous step using a DELETE call. In my case, it’s:
DELETE https://172.19.10.40/api/2.0/vdn/config/segments/3
I got a 200 OK response, and then the segment ID pool was gone from the transit manager.
As another option, the PowerNSX cmdlet Remove-NsxSegmentIdRange can be used as well. The following PowerNSX command will remove all universal segment ID ranges:
Get-NsxSegmentIdRange |where{$_.isUniversal -eq "true"}|Remove-NsxSegmentIdRange
Just be sure PowerNSX is connected to your ‘Transit’ role NSX manager and associated vCenter server when you run it.
And that’s it. Finally, we were able to change the role to standalone successfully.
Conclusion
Understanding how the various NSX Manager cross-VC roles work is important when making changes. You can find a lot of useful information in the Cross-vCenter NSX Installation Guide if you are ever in doubt.
I hope this was useful. Please keep the troubleshooting scenario suggestions coming! Please feel free to leave a comment below or reach out to me on Twitter (@vswitchzero)

This article is exactly what the doctor ordered