Using thin provisioned virtual disks can provide many benefits. Not only do they allow over-provisioning, but with the prevalence of flash storage, performance degradation really isn’t a concern like it used to be.
I recently ran into a situation in my home lab where my Windows jump box ran out of disk space. I had downloaded a bunch of OVA and ISO files and had forgotten to move them over to a shared drive that I use for archiving. I expanded the disk by 10GB to take it from 40GB to 50GB, and moved off all the large files. After this, I had about 26GB used and 23GB free – much better.
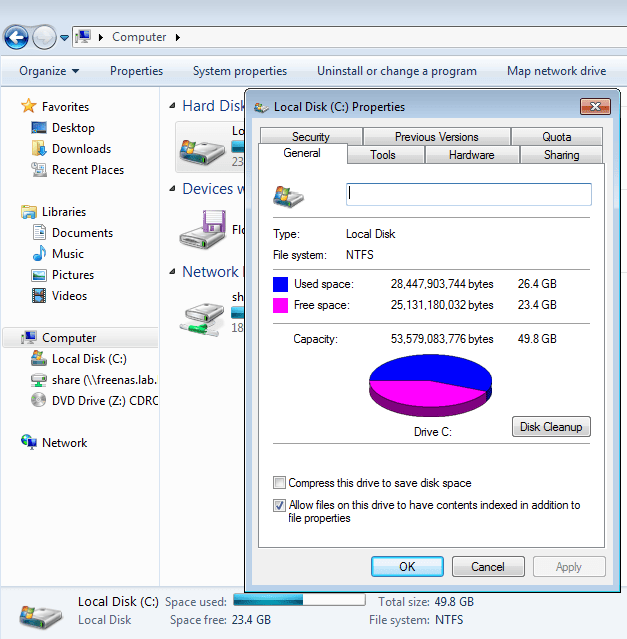
Because that jump box is sitting on flash storage – which is limited in my lab – I had thin provisioned this VM to conserve as much disk space as possible. Despite freeing up lots of space, the VM’s VMDK was still consuming a lot more than 26GB.
Notice below that doing a normal directory listing displays the maximum possible size of a thin disk. In this case, the disk has been expanded to 50GB:
[root@esx0:/vmfs/volumes/58f77a6f-30961726-ac7e-002655e1b06c/jump] ls -lha
total 49741856
drwxr-xr-x 1 root root 3.0K Feb 12 21:50 .
drwxr-xr-t 1 root root 4.1K Feb 16 16:13 ..
-rw-r--r-- 1 root root 41 Jun 16 2017 jump-7a99c824.hlog
-rw------- 1 root root 13 May 29 2017 jump-aux.xml
-rw------- 1 root root 4.0G Nov 25 18:47 jump-c49da2be.vswp
-rw------- 1 root root 3.1M Feb 12 21:50 jump-ctk.vmdk
-rw------- 1 root root 50.0G Feb 16 17:55 jump-flat.vmdk
-rw------- 1 root root 8.5K Feb 16 15:26 jump.nvram
-rw------- 1 root root 626 Feb 12 21:50 jump.vmdk
Using the ‘du’ command – for disk usage – we can see the flat file containing the data is still consuming over 43GB of space:
[root@esx0:/vmfs/volumes/58f77a6f-30961726-ac7e-002655e1b06c/jump] du -h *flat*.vmdk
43.6G jump-flat.vmdk
That’s about 40% wasted space.
Getting that Space Back!
Although this certainly isn’t a new topic, and has been covered elsewhere, I wanted to document my own experience with this process and provide some extra context in case it may be helpful.
Thin provisioned disks are designed to expand and consume more disk space as the virtual machine requires. Unfortunately, as you can see, thin VMDKs only expand. They don’t shrink on their own to release freed disk space.
There are a few reasons for this, but the important thing to remember is that when space is freed in the guest operating system, it doesn’t mean that those blocks no longer contain data. In the example of my Windows jump box, the deletion of OVA and ISO files simply instructed the underlying NTFS filesystem to make those blocks available to be overwritten. I.e. the data stored there is no longer needed and can be replaced with new data in the future. From the perspective of ESXi, nothing really happened to that VMDK – data is still stored in those same locations despite files being deleted in the guest OS. How can the underling VMFS datastore know which NTFS blocks contain actual data and which can be overwritten in the future? It can’t.
That said, reclaiming the space is a two step process:
- First, we need to instruct the operating system to overwrite the ‘freed’ blocks with zeros. This essentially destroys any lingering data and makes the free space identifiable.
- Next, we get ESXi to look for any ‘zero’ blocks of data occupied by the VMDK disk, and release that free space back to the datastore. Thanks to the guest OS zeroing process, the free space can be safely identified from a VMFS perspective.
Before Getting Started
Before getting started, there are a few things to check and a few safety precautions that I want to call out:
- Ensure you have a good backup of the VM before starting. This is just a general best practice for any type of activity that manipulates a virtual disk.
- Consolidate any lingering snapshots. This process will only work on VMDK disks without snapshots.
- Because we are manipulating blocks that should be assigned as free space, it’s important that the guest file system be in good health. File system repair tools may need data in these blocks if there are inconsistencies detected. I’d recommend running a chkdsk or fsck before proceeding.
Zeroing the Blocks
There are likely several different ways that this can be done, but I used the SDelete method recommended for Windows machines in VMware KB 2004155. SDelete is a free tool made by Sysinternals and available for download from the Microsoft site here.
The tool’s primary purpose is to securely delete files by writing randomized data over released blocks to prevent deleted data from being recovered. Obviously we don’t want to write new data over top of the deleted data, so thankfully the tool also has a ‘-z’ option to write zeros over these blocks instead.
Using the tool is quite simple – just run SDelete (or SDelete64 for 64-bit installs) with the -z option against the drive letter in question. In my case, I just ran:
SDelete64 -z c:
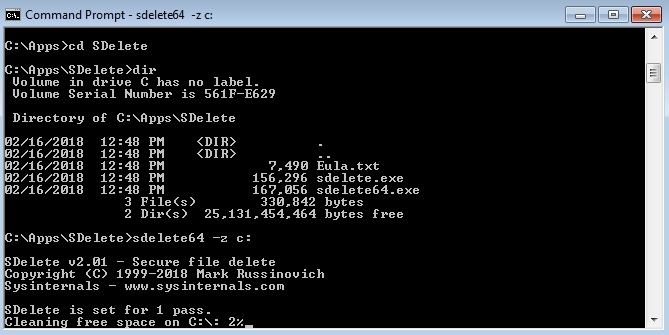
The whole process took only 5 minutes or so and was very uneventful. As expected, from the guest’s perspective, nothing appeared to change.
Obviously, SDelete is a windows-only tool. In Linux, the dd tool can be used in a similar manner. I may run through this process in a future post.
Hole Punching!
Yes, that is a technical term. The final step is to scan the VMDK disk for blocks made up of all zeros, and then ‘hole punch’ those blocks to be used as free space again in the VMFS filesystem. Unfortunately, this step can only be done with the VM powered off, so you’ll need to schedule a maintenance window for this activity.
To do this, we use the powerful vmkfstools command with the -K switch. Once I navigated to the VM’s directory, I simply ran the following command:
[root@esx0:/vmfs/volumes/58f77a6f-30961726-ac7e-002655e1b06c/jump] vmkfstools -K jump.vmdk
vmfsDisk: 1, rdmDisk: 0, blockSize: 1048576
Hole Punching: 100% done.
Note that it has to be run against the descriptor file, not the ‘-flat.vmdk’ file. In my case, the process only took about 5 minutes or so. I suspect it would take a lot longer on spinning disks or if the VMDK was large.
I then repeated the ‘du’ command to see the result and was happy to see that the VMDK is now only 27.8GB:
[root@esx0:/vmfs/volumes/58f77a6f-30961726-ac7e-002655e1b06c/jump] du -h *flat*.vmdk
26.8G jump-flat.vmdk
This process allowed me to get back almost 17GB of space on my SSD backed datastore.
And there you have it! A fairly simple process to reclaim thin provisioned VMDK space. Please feel free to leave any questions or comments below, or reach out to me on Twitter (@vswitchzero)

I unserstand this is your home lab. Why don’t you just svmotion to a different datastore manually choosing thin, and svmotion it back? The result should be the same, no pwr off needed.
Thanks for the comment, Justus.
That was my first thought as well, but I found some conflicting information on this. VMware KB 2004155 seems to suggest that svmotion would only reclaim zero blocks if the destination datastore had a different block size. Since varying block sizes don’t really apply to VMFS5 any more, perhaps svmotion to NFS and back to VMFS may work? If I get some time I may give this a shot in the lab.
Super post! Thank you
svmotion does work but sometimes you’re limited on space
This worked wonders for us as we were able to retrieve a lot of disk space from a drive with 600GB free space
Hi.
I realized that vmkfstools is available only in VSphere setup or ESX/I, and I have only a VMWare Player.
Is there any method to perform the stage of “hole punching” having only a VMWare Player?
Are there any freeware tools that perform that?
Thanks.
if you have access to vmware Workstation you can go into the settings of the virtual machine and press the “compact”.. but you probably need to use sdelete first within the guest OS.
svmotion does not zero space. This process only works if you are already thin.
Thank you!! Sdelete and vmkfstools solved our problem on a server 2008 R2 VM that has outgrown its container
Your post is very helpful with clear instructions. Thank you so much
Hi Everyone,
Dear Mike, everything worked like a charm, esxi with datacore storage, my disk was a static one, I first migrated storage in order to change from static to thin. After that little stunt, I follow your post.
I briefly felt overpressure during the sdelete.exe process because the tool made my C: growing and growing until 100% I was not prepared and worried to put my vm bricked because overdata consumption.
Thank You