As you may have noticed in my recent Building a Retro Gaming Rig series, I’m quite passionate about 1990s era PC hardware. Machines from this time are very nostalgic to me as this is when I really started getting interested in PCs and technology in general. Granted, PC gaming is what really drove my interest in hardware initially, but down the line, I really started enjoyed the hardware just for the sake of it.
I’ve only recently started acquiring and collecting vintage hardware in the last year or so, but I’ve always been drawn to 486 systems. Although we had an old monochrome 8-bit machine growing up – some kind of XT clone – the first PC I was really interested in was a 486 system bought in 1994.

This won’t be the first 486 system I have in my collection. I got a well maintained DEC low profile system from my brother-in-law last summer. It’s a nice system that I hope to take a look at in another post, but it’s very integrated. Everything is on-board and proprietary so it leaves very little room for tweaking. That said, I really wanted something I could customize.
Today’s project all started with an ad on Kijiji I stumbled on a few weeks back – a 486 tower system in “working condition”. Inspecting the posted images carefully, I could see that the system was far from complete – it was missing a video card and didn’t have a hard drive.

It was clearly in rough condition and the case was a total write-off. It was badly yellowed and the plastic front panel broken in numerous places. Because of this, the outer shell wouldn’t stay on. The power supply also had a completely ceased fan, so was in very questionable state. None the less, for only $60, it was worth the risk. I couldn’t get a working 486 motherboard for twice that price on eBay. Even if only some of the hardware was functional, I’d still be content.
The Parts
After getting the machine home, I started disassembling it immediately. Because it had parts rattling around inside and a questionable power supply, I decided to get everything cleaned up before I flipped the switch. Below is an inventory of the parts it came with:
- Pine PT-429 Socket 3 Motherboard dated 1994
- Pine PT-627A VESA local bus I/O controller card
- Intel 486 DX2 66MHz OverDrive Processor
- 1.44MB Mitsumi floppy drive
- 8MB 72-pin SIMM
- ISA 8-bit Token Ring network card
- Mid-tower AT case with 220W power supply and VFD
Pine PT-429 Socket 3 Motherboard
The centerpiece of the system is the Pine Technologies PT-429 motherboard. Despite being improperly mounted in the banged up case, it’s pretty clean and in good condition. Pine Technologies made a lot of parts back in the nineties. Today they are best known as XFX, which is Pine’s manufacturing division.

What’s immediately evident about this board is the total lack of onboard features. Even systems made only a couple of years later integrated a lot more. Aside from a 5-pin DIN style keyboard connector, there is almost nothing that can be connected to this board. There are no serial ports, parallel ports or mouse ports – no floppy controller and no IDE disk controllers either. These are things people just took for granted beginning in the mid to late nineties. If you wanted the system to do something, you had to find an ISA or VESA card for it. This was a bit of a pain, but it gave you a lot of flexibility.


The board is outfitted with 256KB of onboard cache, which is pretty standard for 486 systems. Interestingly there are jumpers to set the cache amount as well. I’m not sure in what scenario this would be needed, but since the chips are socketed, the board could in theory run with less than 256KB.
You’ll notice that I removed the DX2 OverDrive chip from the board and replaced it with an older 33MHz DX processor. I’ve got a few different 486 chips that I hope to try out in this board.
Unfortunately, the board’s socket supports only 5V CPUs. Some boards will have a VRM and jumpers for voltage selection, but the PT-429 doesn’t. This means that some of the newer DX4 and AMD processors won’t work as they require 3.3V or 3.45V. I’ve been keeping an eye out for a socket voltage adapter, but they are very rare these days.


The included SIMM is an 8MB 72-pin stick, which is plenty for a system of this age. The board can take two 72-pin and four 30-pin SIMMs. I’m not sure what the exact requirements or limitations are for this board, but I’ve got some 16MB 72-pin EDO SIMMs I may try out as well.
You’ll also notice a sticker was affixed to the board showing the jumpers required for various FSB frequencies. I was happy to see that this board supports everything from 25MHz to a whopping 50MHz. It would be interesting to try 40MHz for a mild overclock!


The PT-429 has the all too common Varta 3.6V rechargable NiCAD barrel battery on it. Most 386 and earlier 486 based systems had them. Because of it’s age, it doesn’t hold a charge, but even if it did – I’ll still be removing it as a first order of business. These barrel batteries are infamous for leaking and badly corroding the board traces and components as they get old. Quite often the corrosion will permanently damage the system. Thankfully this doesn’t seem to have happened yet on this system.
On a positive note, I was happy to see that the board includes a bypass jumper (JP1) that essentially disconnects the positive terminal of the barrel battery. This allows a 4-pin external battery pack to be used instead. Once I remove the barrel battery, I can rig up a simple non-rechargeable solution.
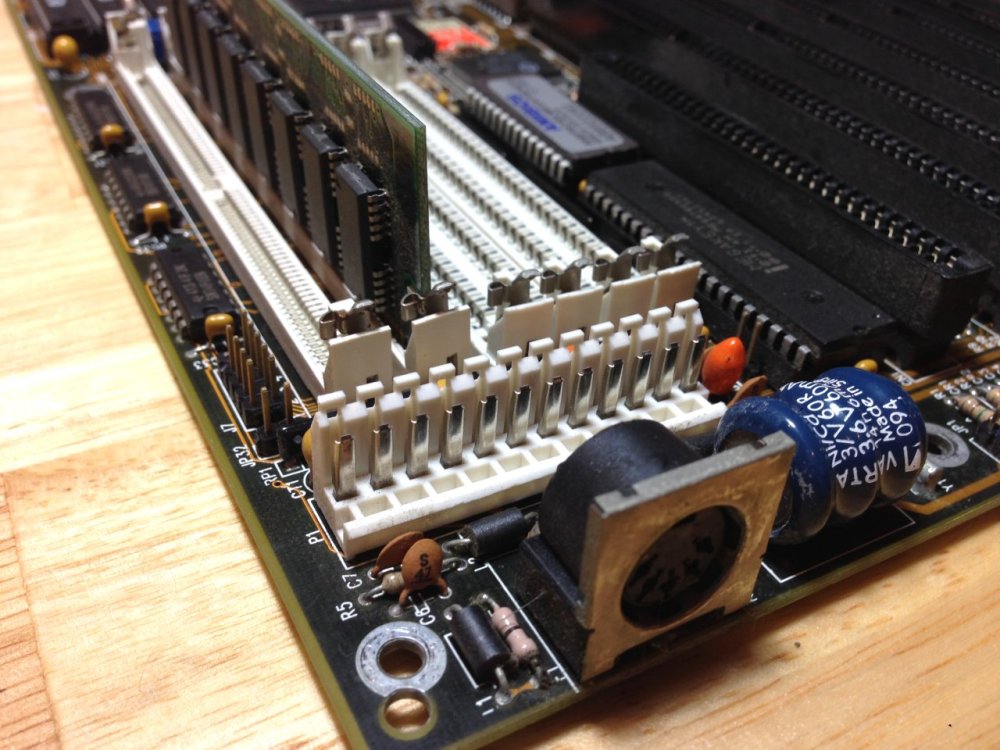
Power is provided by the usual 12-pin AT connector. I recently bought a nifty 12-pin AT to ATX power adapter so that I can use a modern power supply with my AT based boards. You can find the one I use on amazon here. I’ve tried it out on a couple of old Socket-7 AT boards and it works great.
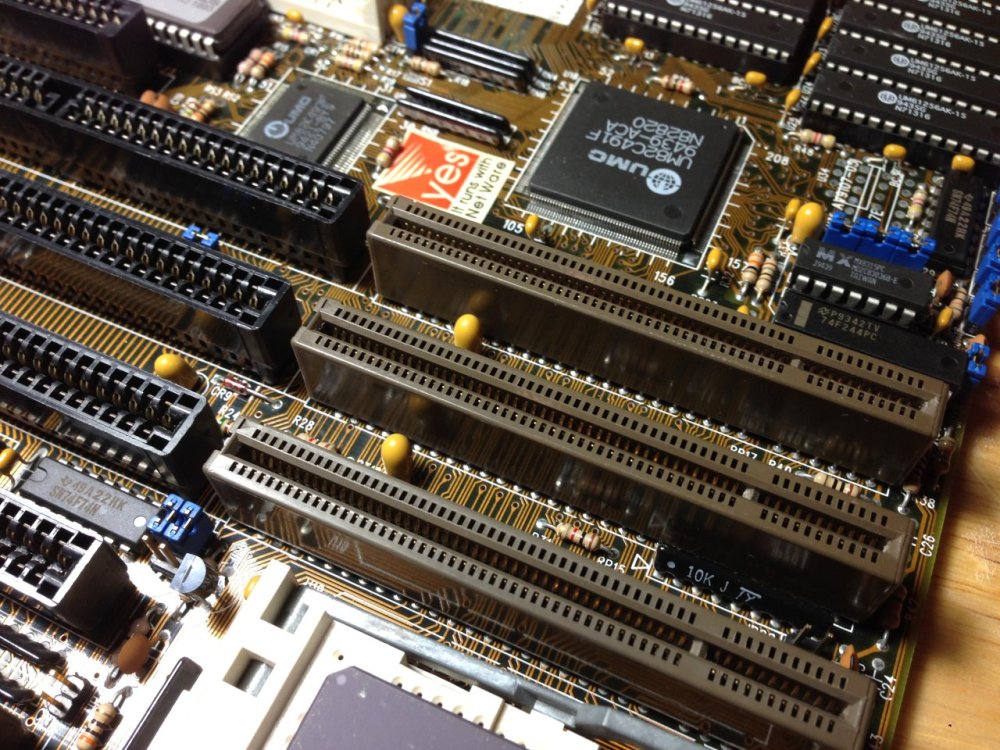
One thing I love about this board is that it includes the iconic VESA Local Bus slots. This type of slot is only found on 486 systems due to the way it interacts with the processor’s memory bus. Some late-model 486 boards included PCI slots, but VLB was common in 1994 when this board was made.
VLB runs at the same frequency as the CPU bus giving it a tremendous advantage over the ISA bus, which is limited to only 8MHz. Many systems of this era used VLB video cards as well as disk controller cards as they benefited from the extra bandwidth. Because these slots were a short-term stop-gap before the PCI standard was ratified and affordable, VESA cards are much harder to find these days.
Pine PT-627A VESA Local Bus I/O Controller card
Although the system didn’t include a video card, it did come with a VESA local bus I/O controller card. Because these motherboards rarely included any I/O controllers or disk controllers, buyers had to rely on expansion cards for these duties.
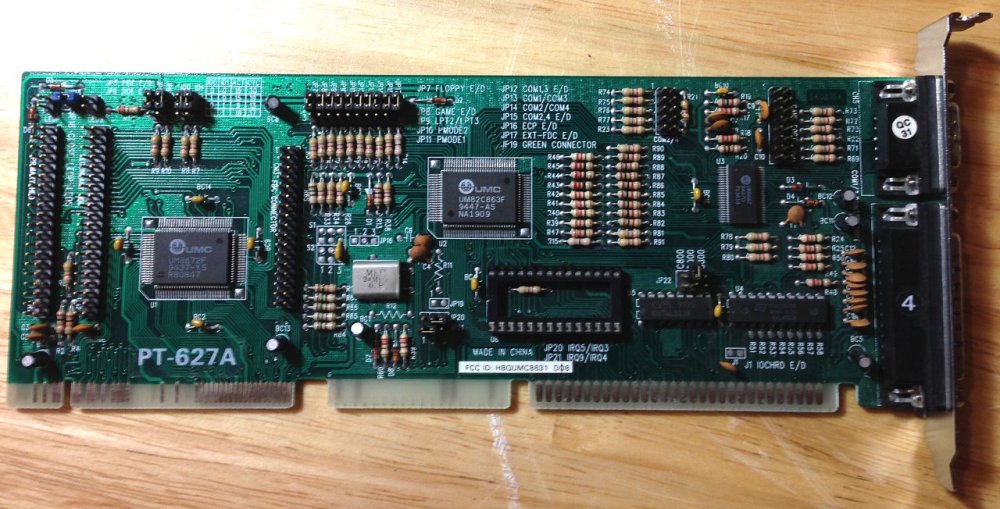
The Pine PT-627A includes two serial ports, a parallel port, a MIDI/Game port, a floppy disk controller and a dual channel IDE controller. Some of these are merely pin-headers that require ribbon cables and external ports. Only a single serial port and parallel port are on the rear of the card. This single card provides just about all of the I/O connectivity you’d need for a system of this age.
The only thing it likely doesn’t support is a CD-ROM drive due to BIOS limitations. Quite often, sound cards would include an IDE CD-ROM controller channel.
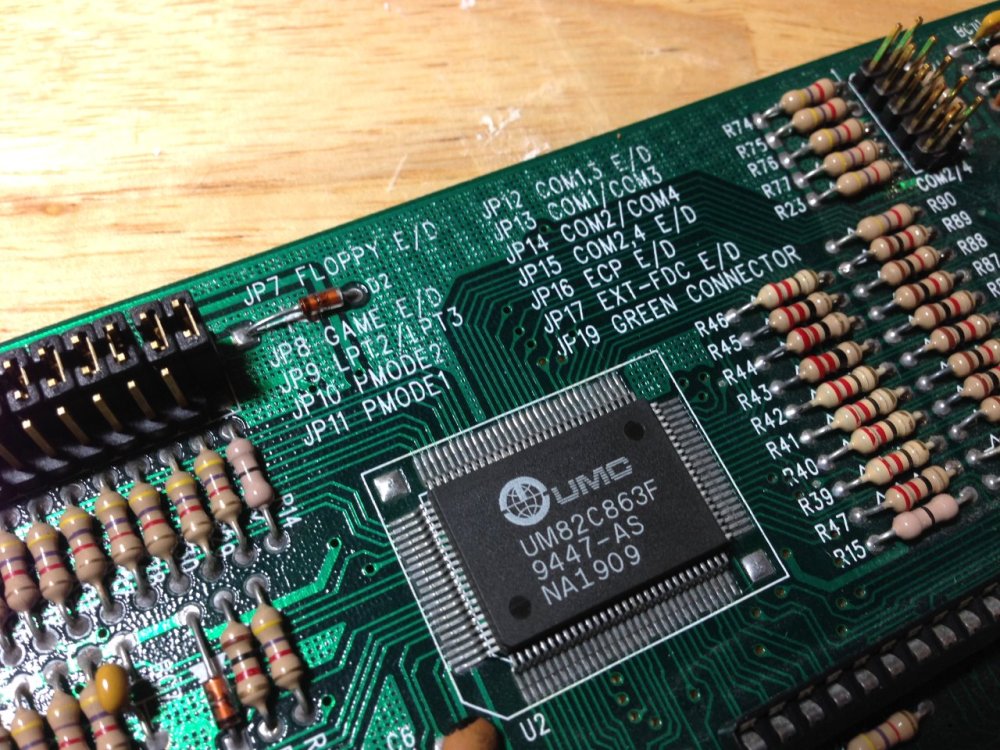
There are numerous, well labeled jumpers to enable/disable certain functions. There are also jumpers for setting IRQ resources. These cards are definitely not plug-and-play, so these jumpers are essential to avoid conflicts.
Intel i486 DX2-66 OverDrive
The processor that came in the system is the very popular 486 DX2-66. Don’t quote me on this, but this was probably the most common 486 processor out there. The DX-33 was probably a close second.
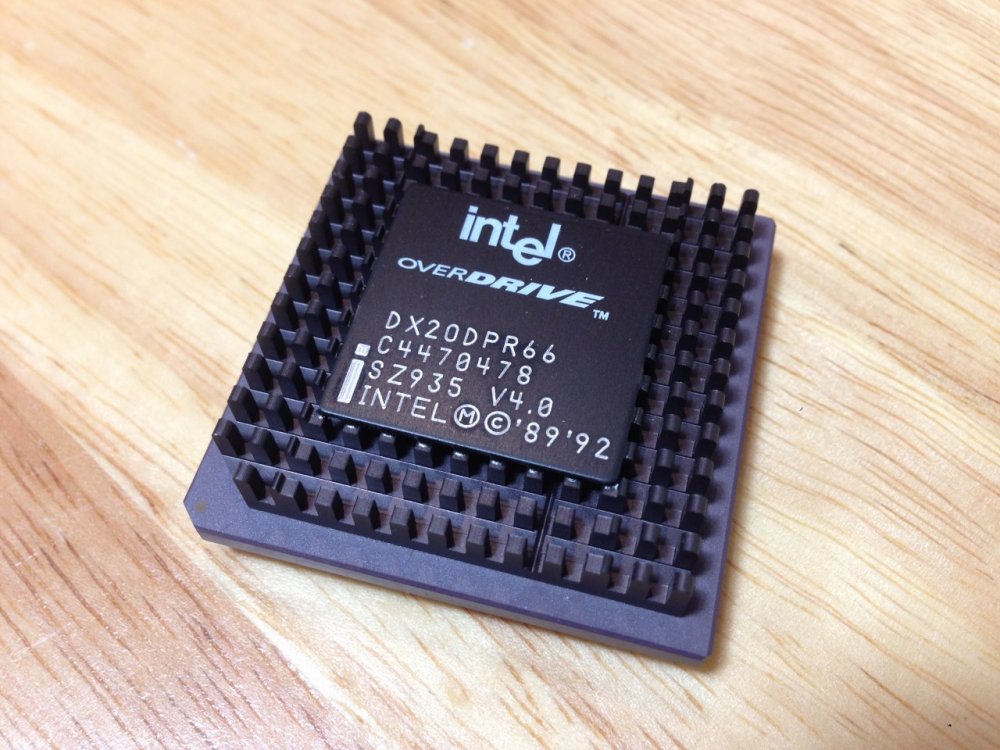
The DX2 chips are ‘clock doubled’ to run a core frequency twice that of the system bus – 66MHz on a 33MHz bus in this case. This allowed Intel to increase the speed of the processor without stressing other components on the bus. Before clock doubling, the fastest chip was the 50MHz DX. But with a 50MHz bus frequency, some cards would have problems – especially on the VESA local bus.
This chip is of the Intel OverDrive variety. Although these are designed to be drop-in upgrades, it’s not uncommon to find new systems built with them as well. I’ve seen a lot more OverDrive DX2 processors out there than the flat-top ceramic type. The ‘R’ in the DX20DPR66 model number indicates that this is a direct processor replacement chip. It is not one of the ODP models designed to fit in a special upgrade socket.
The 486 Restoration – Part 2 >>
What’s Next?
The next order of business will be to remove the NiCAD barrel battery and rig up a temporary 4-pin CMOS battery of some kind. I’ll then hopefully be able to get the system mounted on a test bench for some initial tests!
Stay tuned!

I love that it has a “Yes, it runs with Netware” sticker on the board. Netware was an awesome product back in the day.
I have a 486 that expired. I am not much informed about the workings of it. I think the CMOS clock expired. I don’t know how to fix it. Do yyou have a manual that can tell me how to do this? I have not read all of your three part writings on this yet. My time seems to be taken up by other life distractions, however, I would like to try to fix my old 486 friend. James Parker Tygh Valley, Oregon, USA.
Hi James – yeah, CMOS batteries are generally a problem from that era if they’ve never been replaced. What you’ll need to do depends on the type of battery or RTC module your board has. Check out the link below – it’s a great resource that’ll help you determine what type of battery you have and replacement options.
http://pc-restorer.com/replacing-cmos-batteries-in-old-pcs/
Found your blog! Weirdly I found this exact board in that exact case a couple of years before you did. Even weirder is that the CPU that it came with was the very UMC one I’m sending you. Sadly I don’t have the board anymore, as I killed it by plugging in a CPU the wrong way round. It was my first VLB board and I remember it fondly.
Hi Andrew! Sorry for my slow reply. That’s interesting that you found it in the same case too. I suspect it was a common business setup (with the netware stickers etc). That’s unfortunate that it was fried. I’m always nervous inserting 486s for this reason. Some boards don’t make it very obvious where pin 1 goes either. If I can find some time, I’ll hopefully be able to revisit this board. The VLB slots in it have gotten a bit flaky over time – probably because the board is warped slightly and its not easy to get good contact. I have the matching Pine VLB I/O card for it as well, but it needs to be repaired. Cheers!