My home lab has grown substantially over the last few years and with it, so did power consumption, heat and noise. I selected power efficient parts where possible, but even with 500-600W power usage, 24/7 operation adds up. I can certainly notice the extra cost on my hydro bill, but it’s not just the financial impact – it’s also the environmental impact I’m concerned about.
The bottom line is that I have no reason to run the lab 24/7. I generally use it an hour or two each day – sometimes more, sometimes less. But there are also stretches where I won’t use it for several days like on weekends or when I’m busy with other things.
I found myself manually shutting down the lab when I knew I wouldn’t be using it and then manually powering everything back up. As you can imagine, this was quite a process. Everything had to be powered on or shut down in a very specific order to avoid problems. I’d also need to be standing in front of the equipment for part of this process as some equipment didn’t have remote power-on capability. Because of the work and time involved, I’d inevitably just leave it powered on for much longer stretches than I needed to.
It wasn’t until I added a 10Gbps Quanta LB6M switch to the lab that I realized I needed to do something. It’s not a quiet or energy efficient switch, consuming an average of 120W at idle.
Planning
For more information on my lab setup, please see this post. Before I got started, I knew that I could probably take advantage of IPMI and tools like PowerCLI to automate my power on and power off process. To begin, I needed to map out exactly what needs to happen.
Here’s the general order of what needs to happen at power up:
- Quanta LB6M and D-Link DGS-1210 switches need to be powered up.
- Dell T110 FreeNAS iSCSI storage box needs to power up and fully boot.
- Management ESXi host needs to power up and fully boot.
- Management VMs need to be powered on (AD, DNS, vCenter Server, NSX Manager etc.)
- Some time is required for the necessary services to come up. Usually VC is the slowest to come up.
- Compute cluster ESXi hosts need to be powered up.
- Compute cluster VMs need to be powered up.
Each physical component will need some way to power up/down:
- Quanta LB6M – No remote power features
- Dell T110 – Shared IPMI
- Intel CP2600 (management host) – Shared IPMI
- 3x Supermicro X8SIL (compute hosts) – Dedicated IPMI
- Virtual Machines – PowerCLI
Smart Plugs
I had to find a way to remotely power on and off the power-hungry Quanta LB6M. Leaving this switch powered on 24/7 and automating the other devices wasn’t really an option for me. Thankfully, there are countless home automation gadgets available today including Wi-Fi smart plugs. Since enterprise grade switches must be ‘unplugged’ to power off, a smart plug would be the perfect solution. The only thing I had to be careful about was ensuring I could ‘script’ the tripping of the relay in the smart plug. Using the included software or smartphone apps may not allow this flexibility.
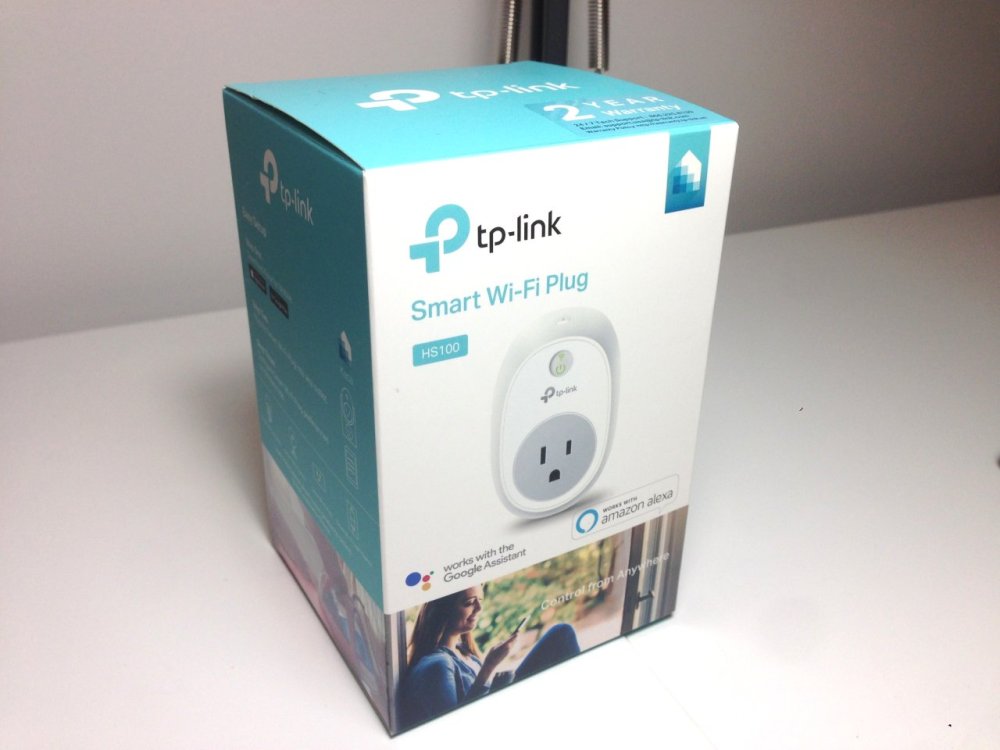
After doing some digging, I came across a relatively inexpensive smart plug – the TP-Link HS100. Someone had reverse engineered TP-Link’s ‘Smart Home Protocol’ on TCP port 9999 and created a python script that could be used to control the plug. You can find the script and documentation on GitHub here.
Once I got the smart plug on my WiFi network, I could turn the plug on with a simple command:
# ./tplink_smartplug.py -t 192.168.1.199 -c on
Sent: {"system":{"set_relay_state":{"state":1}}}
Received: {"system":{"set_relay_state":{"err_code":0}}}
Above you can see that the script sent a request to the plug to set the relay state to 1, which means on. A return error code of ‘0’ means it was successful.
There are a number of commands that can be sent to the smart plug using the -c parameter aside from the expected ‘on’ and ‘off’. You can also query the plug for all sorts of device information, reboot it, reset it to factory defaults and more.
It worked perfectly, so I now had remote power-on and power-off capability for every device I needed to manage in the lab.
Using IPMI
Most server grade hardware will include some form of IPMI (Intelligent Platform Management Interface). The key benefit of IPMI is that it’s ‘out of band’, and the baseboard management controller on the system uses standby power to operate. Even if the system is powered off, it can still be powered on using IPMI commands.
Rather than trying to use a system’s IPMI web interface, I’ll be using other third-party tools to relay power on and power off commands to my hosts. Thankfully all five of the hosts in my lab support IPMI.
I found a nifty cmdlet in PowerShell that can be used to manage IPMI hosts called Get-PcsvDevice and Start-PcsvDevice. If you are using Windows, this is a great option. Check out this blog post for more information on it.
If you are running your scripts in Linux, you will need to consider other alternatives as Get-PcsvDevice and Start-PcsvDevice don’t exist in PowerShell core. Thankfully there has been a great utility called ipmitool available for years. It’s easy to use and is available as a package in just about all Linux distributions.
Here is the basic syntax I use to power on my FreeNAS server:
# ipmitool -I lanplus -H 172.16.1.67 -U root -P "VMware1!" power on
Chassis Power Control: Up/On
I shouldn’t need to shut anything down using IPMI under normal circumstances, but there is also the option for a soft shutdown mimicking a momentary push of the power button. Most modern operating systems will initiate a graceful shutdown when this happens:
# ipmitool -I lanplus -H 172.16.1.67 -U root -P "VMware1!" power soft
The above results in a graceful shutdown of FreeNAS 11.
Raspberry Pi and Orchestration
One of the challenges I had was that my home lab is completely isolated from my home network. This is achieved using a pfSense VM running on the management host. Using NAT, I access a Windows jump box via RDP that also runs on the management host. This VM would normally be a good choice to run the necessary scripts, but it would be powered off along with the management host to conserve power.
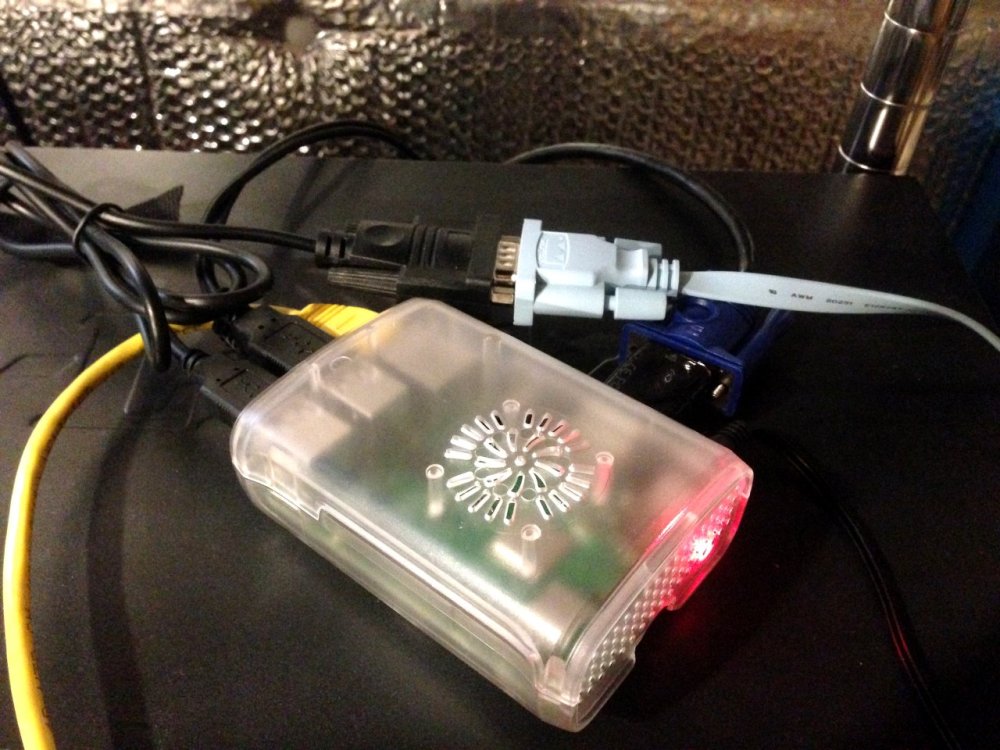
I decided to use a more creative solution and put a Raspberry Pi 3B+ to use. I had already been using it as a secondary jump box on my internal lab network. It’s connected to a monitor and keyboard for administration of devices while I’m standing in front of the lab equipment and provides serial console access to the switches as well.
The great thing about the Raspberry Pi is that is consumes almost no power – especially at idle – and could run everything I’d need to orchestrate the activities. Running Rasbian Linux stretch, I was able to install PowerCLI core, python, as well as ipmitool.
To make this work, I simply connected the Pi to my home WiFi network, and the ethernet interface to my lab’s management VLAN. I allow both SSH and VNC to the Pi on the WiFi interface.
In order to use the Pi for orchestration, I’d need to have a few devices on at all times:
- Raspberry Pi – needs to stay online to orchestrate the tasks.
- CyberPower UPS – everything connects here. Minimal power required to keep the battery charged and for UPS management.
- D-Link DGS-1210 switch – Since my hosts will be using IPMI for power-on/power-off events, they require networking along with the Raspberry Pi. Thankfully this passively cooled 1Gbps switch is very energy efficient and I have no reservations about leaving it powered on 24/7.
And that’s it! The switch and Raspberry Pi use so little power that it doesn’t even register on my UPS display. If I had to guess, the power use of these devices is somewhere in the range of 10-15W.
Conclusion
Now that I had the tools needed, it was time to construct the script. In part 2 I’ll take you through the PowerCLI and python scripting I used to make this work.
Have some suggestions on how I could improve these scripts? Please leave a comment below or reach out to me on Twitter (@vswitchzero)
Home Lab Power Automation Series:
Part 1 – The Tools
Part 2 – Powering Everything On
Part 3 – Shutting Everything Down
