One of the most important tools I use day-to-day is my lab. Although I’m fortunate to have access to some shared lab resources at VMware, I still choose to maintain a dedicated home lab. I like to have the freedom to build it up, tear it down and configure it in any way I see fit.
I’ve had a few people ask me about my home lab recently, so I wanted to take a moment to share my setup. I’m not going to go too much into how I use the lab, or the software side of things but will stay focused on the hardware for now.
My Goals
I’ve had several iterations of home lab over the years, but my most recent overhaul was done about two years ago in 2016. At that time, I had several goals in mind:
- To keep cost low. I chose mainly EOL, second hand hardware that was relatively inexpensive. I often looked for the ‘sweet spot’ to get the best performance for the dollar.
- To use server/workstation grade hardware wherever possible. I’ve had some mixed experiences with consumer grade equipment and prefer having IPMI and being able to run large amounts of registered ECC memory.
- Low noise. I really didn’t like the noise and heat generated by rackmount gear and tried to stick with custom-build server systems wherever possible.
- Power efficiency. Building custom machines with simple cooling systems allowed me to keep power consumption down. I also didn’t see the point of running the lab 24/7 and chose to automate power on and power off activities.
- Sized right. Although more RAM and compute power is always desirable, I tried to keep things reasonably sized to keep costs and power consumption down. I wanted to be able to have some flexibility, but would try to keep VMs sized smaller and power down what I didn’t need.
The Lab
I’ll get more into each component, but here’s a summary:
- 1x Management Node (2x Xeon E5-2670, 96GB RAM)
- 3x Compute Nodes (Xeon X3440, 16GB RAM)
- 1x FreeNAS Server (Dell T110, Xeon 3430, 8GB RAM)
- 1x Raspberry Pi 3 Model B (Automation and remote access)
- Quanta LB6M 24 port 10Gbps Switch (24x SFP+ ports)
- D-link DGS-1210-16 Managed Switch (16x copper ports, 4x SFP)
- Cyber Power PFCLCD1500 UPS system
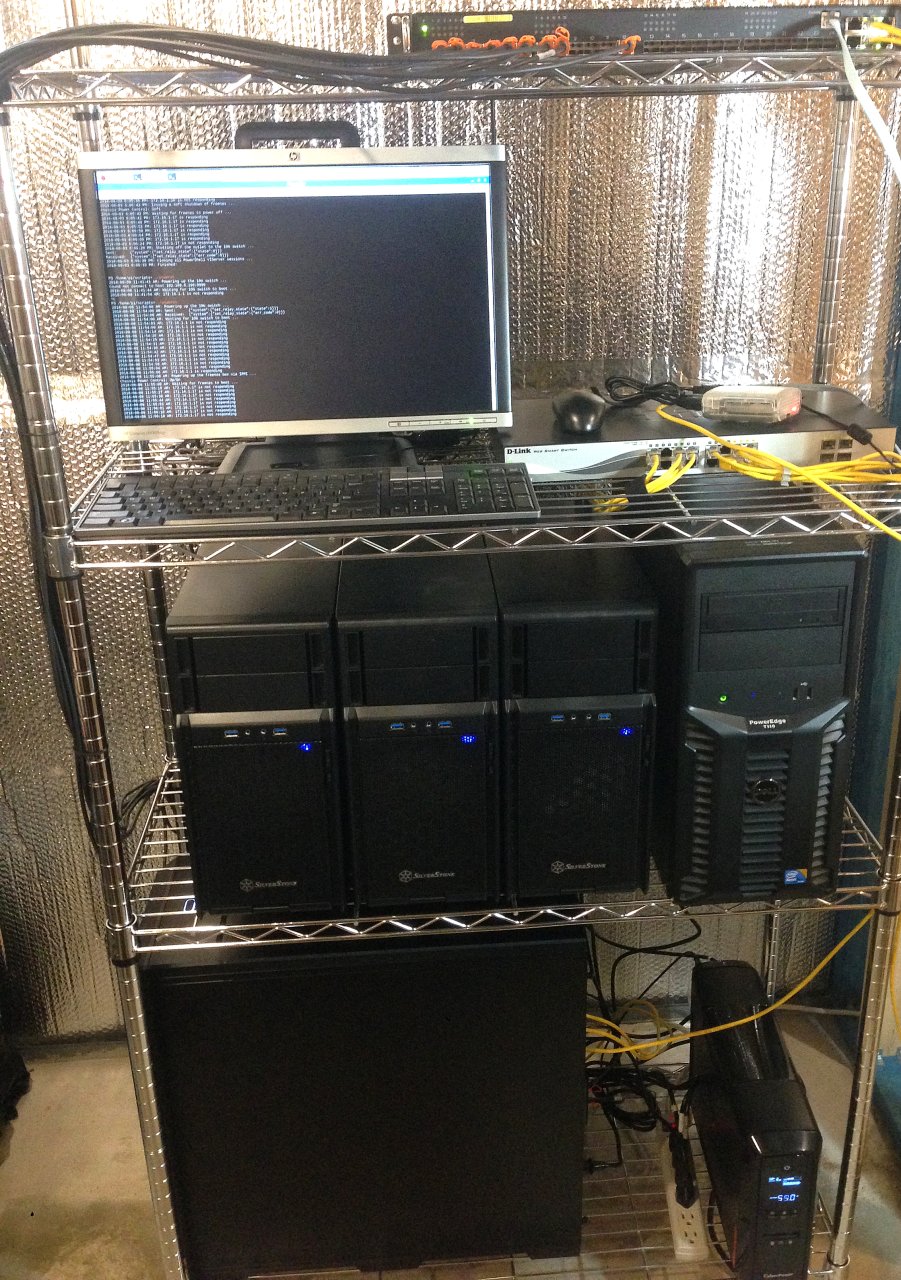
All of the equipment sits comfortably in a wire shelf/rack in a corner of my unfinished basement. Here it can stay nice and cool and the noise it generates doesn’t bother anyone.
Management Node
When I rebuilt my lab, the biggest challenge I had was the ever increasing size of VMware’s appliances. vCenter Server, NSX Manager, NSX controller nodes, PSCs – they kept getting bigger and more demanding. To be able to handle these machines, and to have some headroom for a few nested ESXi hosts, I chose to build a single heavy-duty management node with a lot of compute resources.
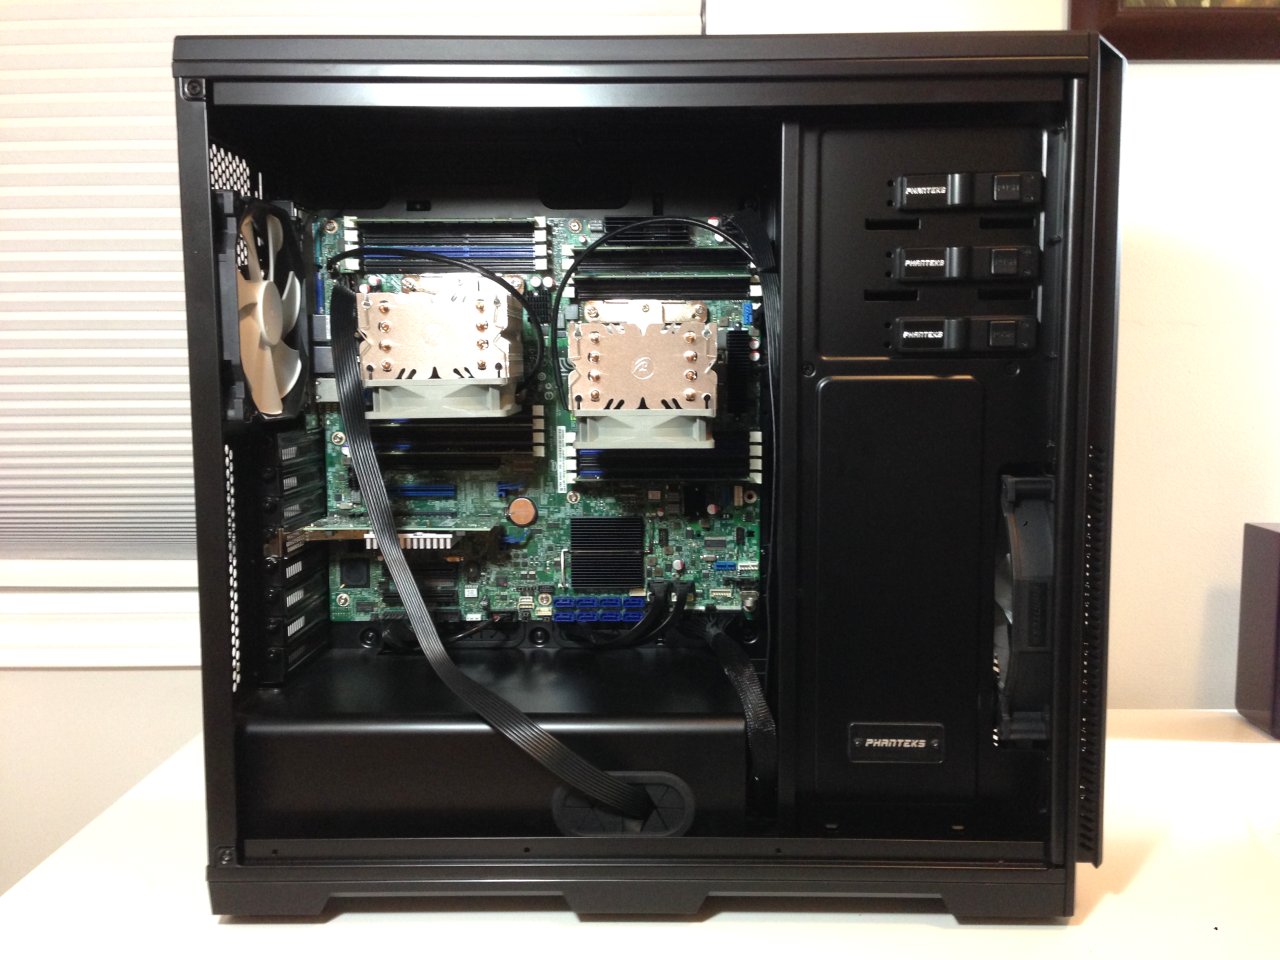
For this, I chose a custom built Intel S2600CP based dual processor system. Below are the specifications:
- 2x Intel Xeon E5-2670 processors (2.6/3.3GHz, 8 cores, 16 threads, 20MB cache)
- Intel S2600CP Motherboard (16 DIMM slots, lots of PCI-E and SATA)
- 224GB RAM (14x16GB PC3-12800 registered ECC)
- Solarflare SFN-7122F 10Gbps NIC (dual port SFP+)
- 4x Intel 1Gbps NICs (igb, onboard shared IPMI)
- 500GB MLC SSD drive and 500GB SATA mechanical drive (local storage only)
- 8GB USB for ESXi boot (internal)
- EVGA 650W Gold PSU
- Phanteks Enthoo Pro case (EATX/SSI-EEB form factor)
- 2x Rajintek heatsinks with Noctua Redux 92mm fans
Despite the 16 cores and hefty specifications, this system is very quiet – more so than a lot of desktop systems out there. It’s powerful enough to run all of my management VMs and has plenty of CPU headroom. A single E5-2670 would probably have been sufficient for my purposes, but having the second CPU allows a lot more RAM in the system. With 244GB of RAM in the system, I can cram a lot of VMs on this box.


The 10Gbps networking is provided by a dual port Solarflare SFN7122F NIC:


I was originally looking at Intel X520 and Melanox NICs, but I found some great deals on second hand Solarflare NICs recently. These have been solid and perform well for my purposes. What I like most about them is their low power consumption – the heatsinks barely get warm, which can’t be said for many 10Gbps NICs. Another great thing about them is that they are not at all picky about DAC cables or optics, which was important for me as some vendor-specific cables and SFPs can be pricy.
Overall, I’ve been very happy with this management node. The total build cost was about $1000 CDN, minus the storage which I already had. I’d imagine it would be even cheaper at today’s prices.
Compute Nodes
For compute nodes, I’ve got three identical systems based on Supermicro X8SIL motherboards and Xeon X3440s. These systems are over nine years old now and are really showing their age. If it wasn’t for the horrible DDR4 pricing out there right now, they would probably be long gone already.


Below are the full specifications:
- Intel Xeon X3440 (2.53/2.93GHz, 4 cores, 8 threads, 8MB cache)
- Supermicro X8SIL-F (Intel 3400 chipset)
- 16GB RAM (4x4GB PC3-10600R registered ECC)
- Solarflare SFN-5122F 10Gbps NIC (dual port, SFP+)
- 2x Intel e1000e NICs (onboard)
- Dedicated IPMI
- 8GB USB for ESXi boot (internal)
- 400W Seasonic Bronze PSU
- Silverstone PS08-B mATX case
Despite their age, these systems are pretty power efficient. Intel did a great job with the power saving features in the lynnfield architecture compared to previous generations. Since these systems spend most of their time at idle and have no local storage, they consume only about 50W or so.


A single 120mm intake fan provides plenty of airflow, and the small mATX footprint makes it easy to line up several side-by-side on my wire rack. These systems are nearly silent as well.


10Gbps networking is provided by a dual port Solarflare SFN-5122F card. These are older adapters compared to the SFN-7122F models I have, but are still very low power and can perform well. Unfortunately, these hosts are somewhat CPU limited to be able to handle 10Gbps networking well as you can see in my recent post on VXLAN throughput.
Storage
For shared storage, I use an old Dell T110 server running FreeNAS. I don’t use FreeNAS to it’s full potential, but it’s a very stable and fast platform for iSCSI storage. I wrote a multi-part build series on this system so I won’t get into too much detail here.


The specifications:
- Dell T110 (v1) tower server
- Intel Xeon X3430 CPU (2.4/2.8GHz, 4 cores, 4 threads, 8MB cache)
- 8GB RAM (2x4GB PC3-10600 Unbuffered ECC)
- Dell PERC H200 (flashed to LSI IT for ZFS use)
- 2x2TB WD Black 7200RPM drives
- 2x128GB Kingston MLC SSDs
- Solarflare SFN-7122F 10Gbps NIC (dual port, SFP+)
- Broadcom 1Gbps NIC (onboard, shared IPMI)
- 8GB USB flash drive (internal, for boot drive)


This server is relatively quiet, and performs very well. With the 10Gbps networking that was recently added, I can get about 900MB/s out of the SSD drives. Granted, most of that is thanks to ZFS caching, but I’m really pleased with the throughput.
I’ll likely look into moving to vSAN once I upgrade my compute nodes, but until then, this solution meets my needs. The only thing I may look into is some additional flash based storage once prices come down.
Networking
On the switch front, I have recently added 10Gbps networking with a Quanta LB6M 24-port SFP+ switch. These can be found as refurbished or sold new and are very affordable switches. This one was new in box and set me back about $300 US. Mine looks like it was once destined for use by Amazon based on a label inside of it.
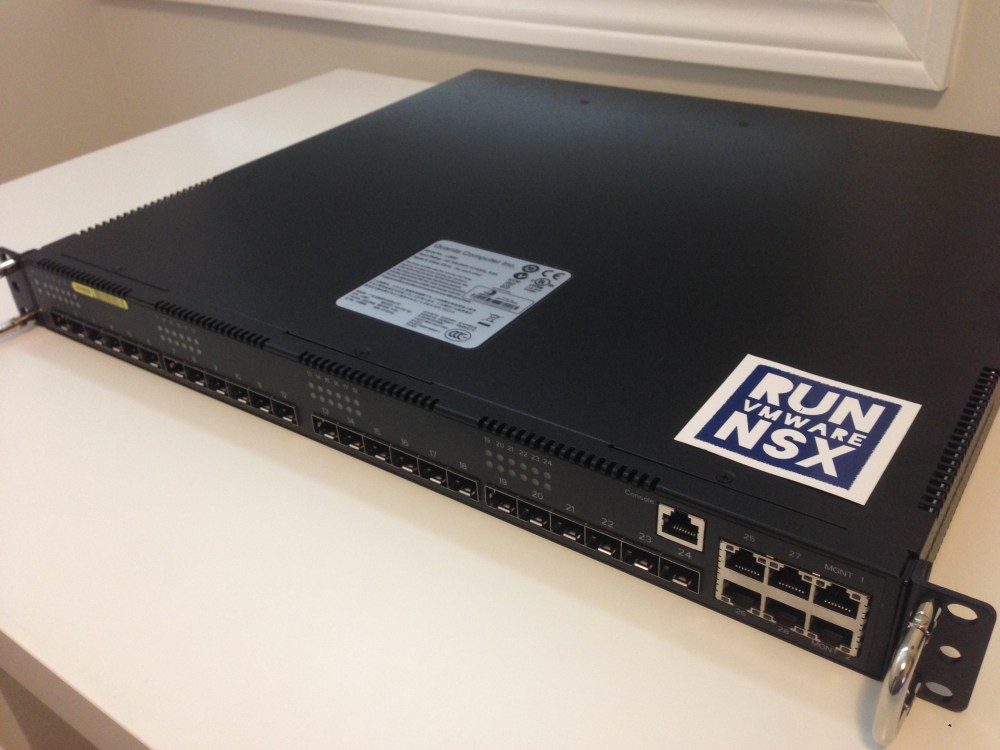
In addition to the 24x SFP+ ports, there are four 1Gbps copper ports and a pair of dedicated management interfaces. Based on an older Broadcom hardware platform, the unfortunate disadvantage to this switch is the heat, noise and power consumption.


As is typical with 1U enterprise gear, it has very high-RPM 40mm fans. I can slow down the fans in software, but the power supplies are still quite noisy. Total power draw of the switch averages at around 120W, which isn’t great. Thankfully with the lab in the basement, this is a non-issue for me – especially since I don’t run it 24/7.
For cabling, I stuck with passive DAC cables. Thankfully the Solarflare NICs and Quanta LB6M aren’t picky about DACs at all, and passive models work just fine. The ones I use are Cisco branded SFP-H10GB-CU3M models, three meters in length. They are relatively inexpensive and sell for about $10-15 CDN on eBay.
For 1Gbps networking, I use a trusty old D-link DGS-1210 16-port switch that I’ve had for years. Although pretty old now, it’s actually a very solid switch that supports VLANs, IGMP snooping, LACP and more. I uplink it to the LB6M with two copper ports in an LACP bond.
Raspberry Pi
Although this may seem like an odd piece of hardware to have in a home lab, it’s an important component for me. It acts as a gateway of sorts between my home network and my isolated home lab environment. I also use it to orchestrate all power-on/power-off actions using PowerCLI and other tools.
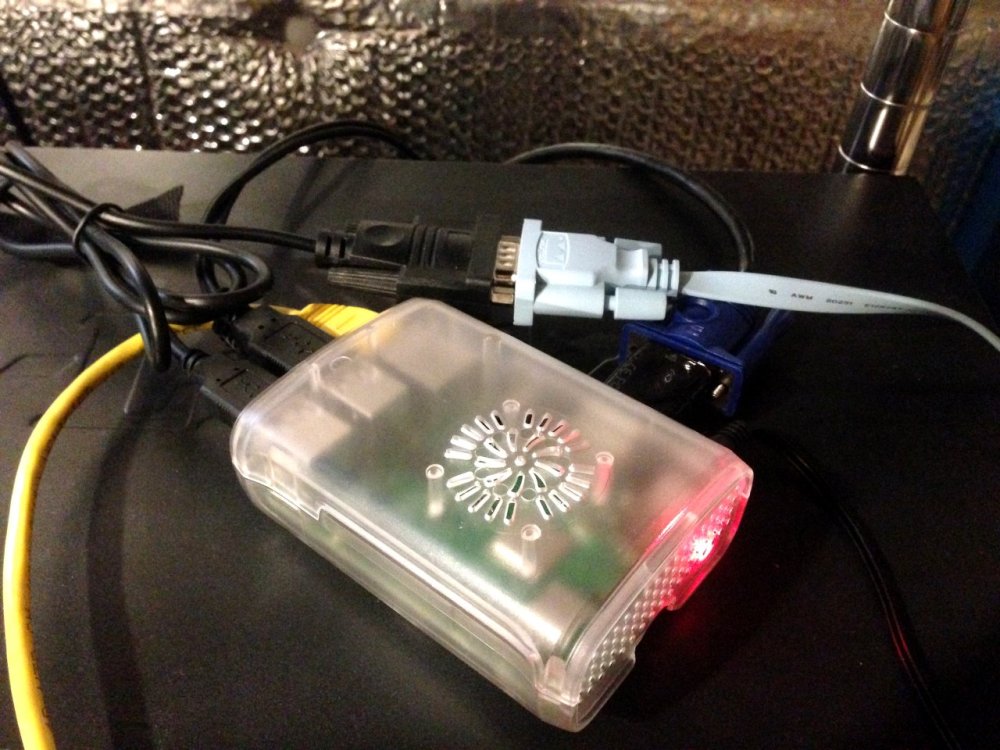
With my home lab powered down, the only components still online are the Raspberry Pi, a TP-LINK smart outlet and my D-link DGS-1210 switch. Together, they don’t even consume enough power to register above zero on my UPS. This is all I need to orchestrate a complete power on/off of the equipment.
A power on event takes about 15-20 minutes for everything to come online and stabilize. A full shutdown takes about 5-10 minutes. You can find more on the scripting I use for this here.
Aside from orchestrating power operations, it also plays several other important roles:
- A backup jump box that I can use to access ESXi hosts and other components if VC is down.
- Serial console access to switches.
- NTP time source for the entire lab.
- Local KVM console that I use in front of the gear in the basement.
Conclusion
And there you have it. Some old gear, some newer, but it all serves it’s purpose. I definitely don’t think this is a dream lab by any stretch of the imagination, but it works well for me. This is the important part. My advice to anyone thinking of building a home lab – don’t get caught up in needing the latest and the greatest – after all, this is a lab.
I just wanted to finish off by saying how thankful I am to my wonderful wife. I know I’ve pushed my luck with my lab purchases on more than one occasion. Despite this, she’s always been very supportive of what I do. 🙂

Nice post Mike. Gave me some ideas, including a repurposing of my RPi!