There are many different approaches you can take when building a VMware home lab, but I always prefer to do custom-build tower systems. This allows me to select the components I want – the fans, heatsinks, PSU – to keep the noise to a minimum. Even though I keep the lab in the basement, I really don’t like to hear it running. I don’t need the density that a rack provides, and I’m quite happy to have my nearly silent towers humming along on a wire shelf instead. Not to mention that lower noise usually equates to lower power consumption and of course, it keeps my wife happy as well – the most critical metric of all.
I finally got around to upgrading my three ancient compute nodes recently. I have been using the included Dynatron R13 1U copper heatsinks that came with the motherboards I bought on eBay. They work, and keep the CPUs relatively cool, but as you can imagine, noise was not a key consideration in their design. They are as compact and as efficient as possible at only an inch tall. At idle, the Supermicro X9SRL-F keeps them at a low RPM, but put any load on the systems and you’re quickly at 7500RPM and the noise is pretty unbearable. No problem for a datacenter, but not for a home lab.
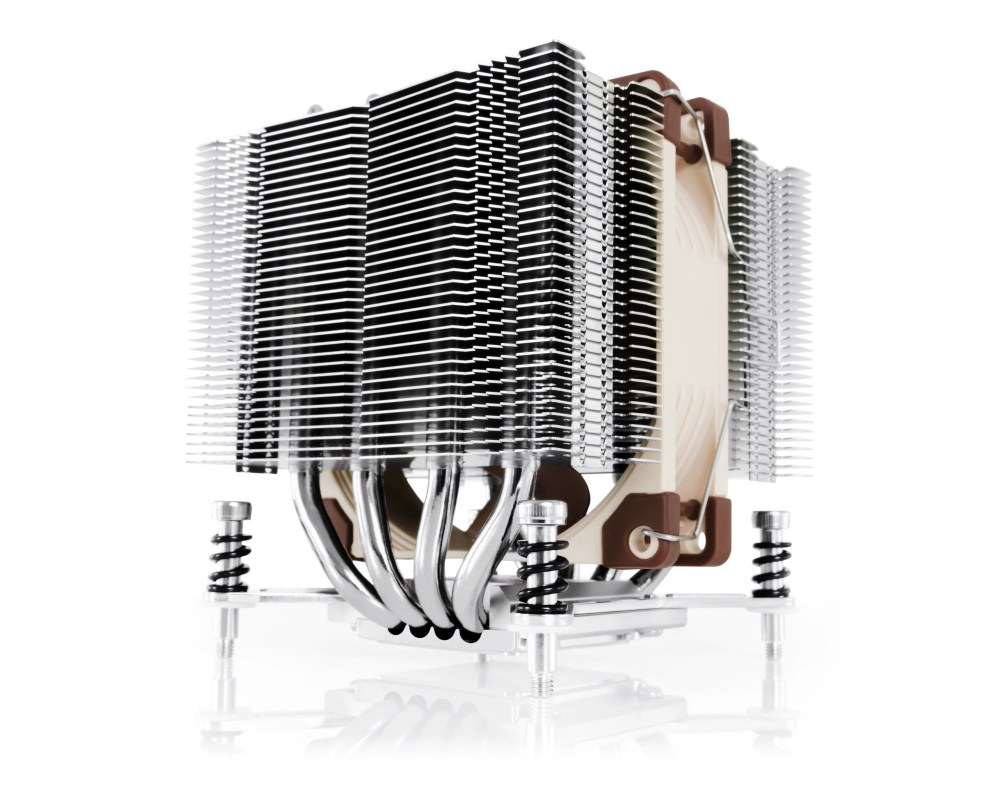
Today I’ll be taking a bit of a departure from my regular posts and will be doing an in-depth review of two high-end Noctua heatsinks. Noctua was kind enough to send me a review sample of not one, but two of their Xeon heatsinks – the NH-U9DX i4 and the NH-D9DX i4 3U.
Noctua
 Noctua is an Austrian company well known for their low noise fans and high-end heatsinks. I’ve been using Noctua heatsinks for ages. In fact, I reviewed some of their original heatsinks and fans many years ago when I used to write hardware reviews. This included their original NH-U12P, the NH-C12P and the smaller NH-U9B. Back then, I praised them for their high-quality construction, near silent operation, excellent mounting hardware and most importantly – excellent cooling performance. That was over ten years ago, and it seems that Noctua is still very well respected for all the same reasons today.
Their gear has always been pricey compared to the competition, but when it comes to Noctua, you get what you pay for.
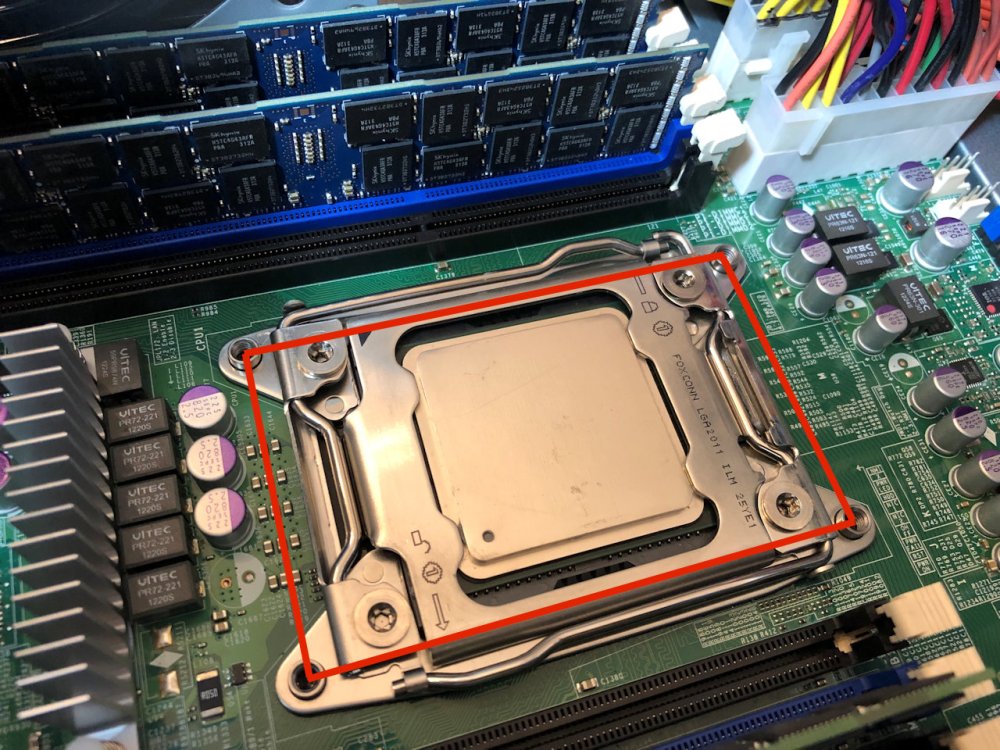
Square vs Narrow ILM LGA 2011
One of the challenges I had with my new/used Supermicro X9SRL-F boards is that they don’t use the common ‘square’ LGA2011 mounting pattern. Instead, they use what’s referred to as ‘Narrow ILM’ that allows the socket to be more rectangular in shape. This allows more real estate for memory slots and other components on the board. Because of this, I was severely limited in my heatsink choices. Most of what’s available out there for Narrow ILM are rack mount heatsinks similar to what I’m hoping to remove. The majority of the consumer-grade stuff for LGA2011 simply won’t fit.
Here you can see the Dynatron R13 narrow ILM heatsink mounted:
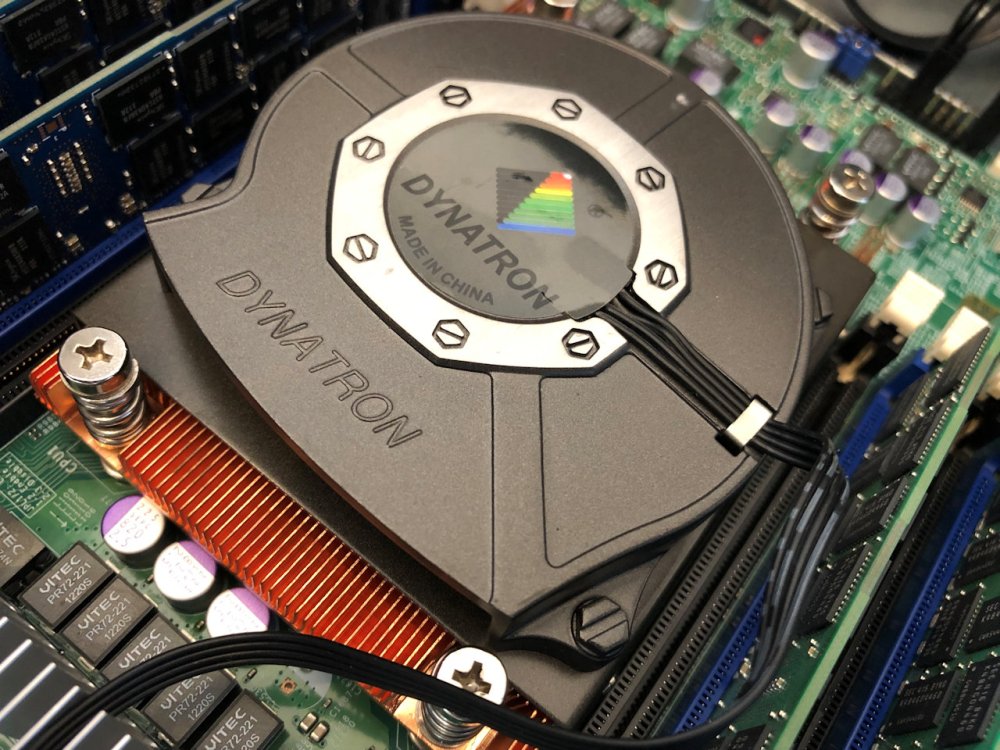
A very capable 1U heatsink, but not something you’d want running in your home lab if you need to stay anywhere near it. At 7500RPM it is unbearably loud.
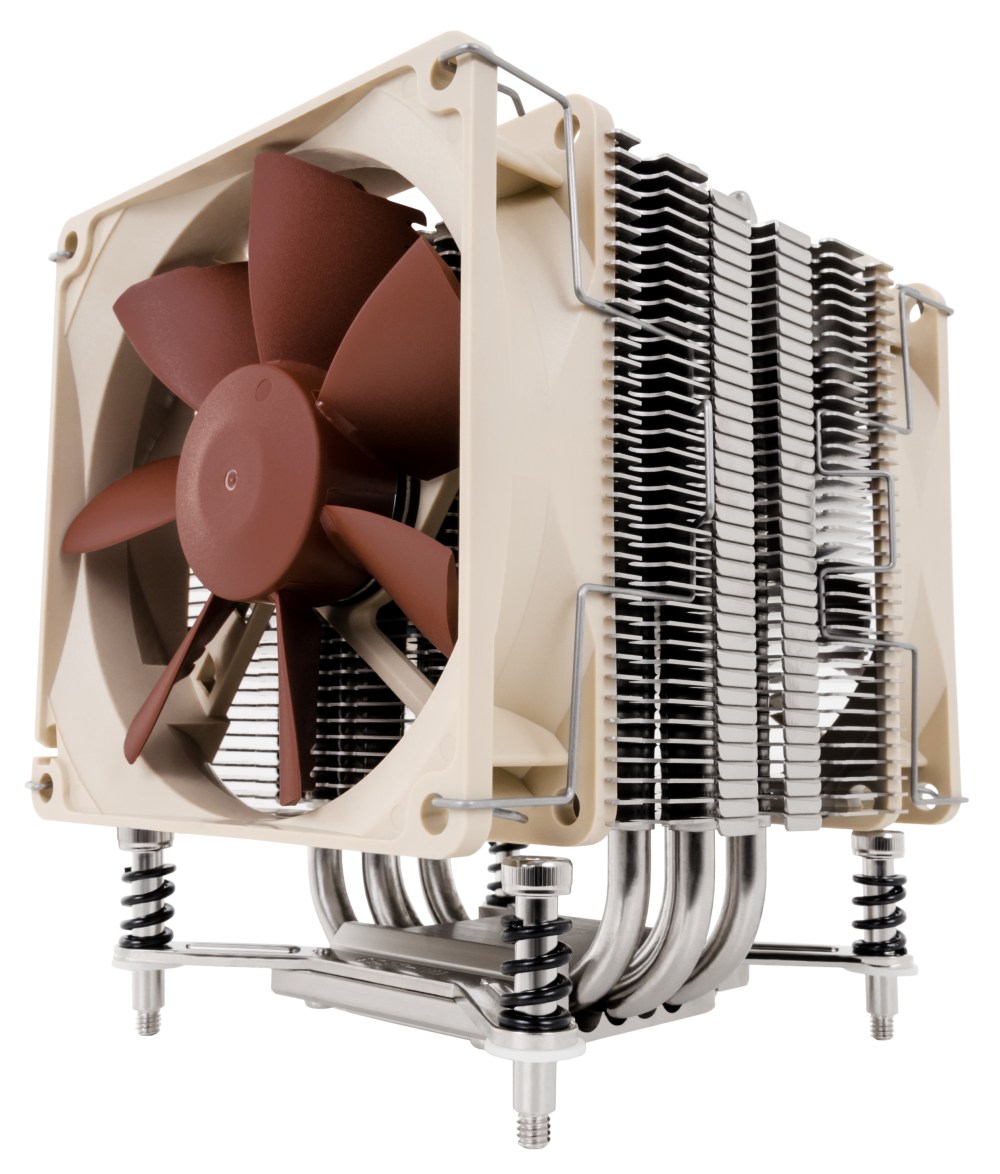
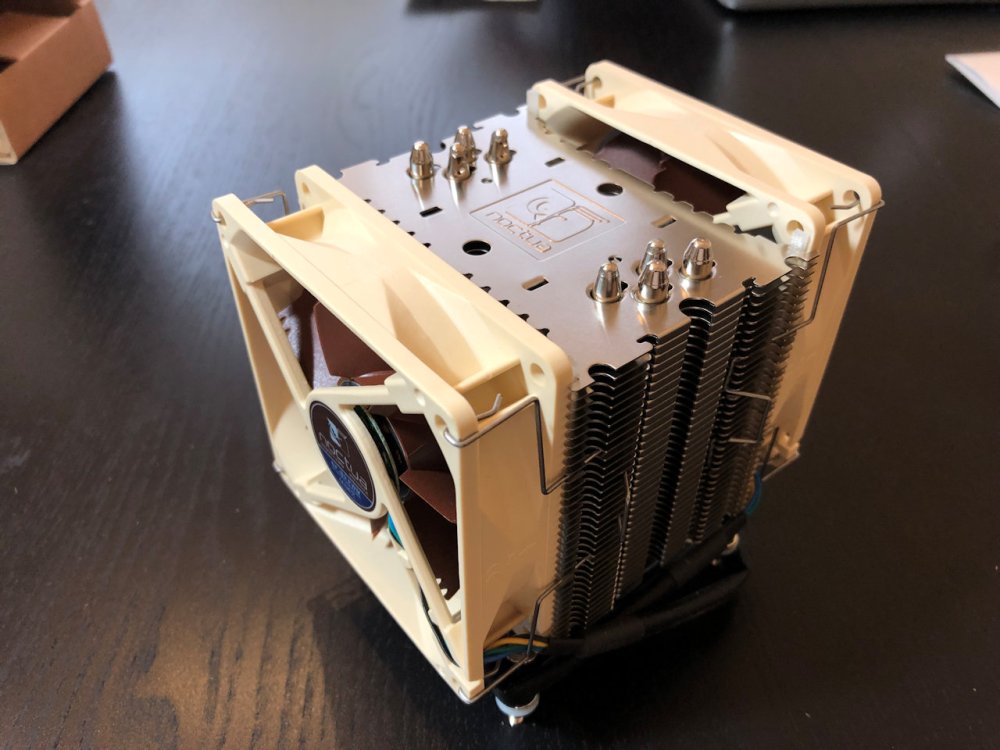
Noctua NH-D9DX i4 3U
The first heatsink I’ll be looking at is the Noctua NH-D9DX i4 3U. This model is unique in that it’s short at only 110mm and as the name implies, will fit in a 3U rackmount chassis. It sandwiches a 92mm fan between two separate banks of heatpipes and fins to keep its width and depth at only 95mm. It looks very much like a scaled down version of the massive Noctua NH-D15.
You can find a full list of specifications at the Noctua website, but here are a few highlights:
Dimensions (h/w/d): 110mm/95mm/95mm
Weight: 428g (531g with fan)
Fan compatibility: 92x92x25mm
Materials: Copper base and heat pipes, aluminum fins.
Socket compatibility: LGA2066, LGA2011 (square and narrow ILM), LGA 1356/1366.
The NH-U9DX weighs in at only a pound or so and shouldn’t put any undue stress on the socket mounts – especially at only 110mm tall. All the recent Intel server/workstation sockets are covered for compatibility, including LGA2011 narrow-ILM that I’m most interested in.


I was quite impressed to see that Noctua has used 100% recyclable cardboard packaging. The only plastic packaging I found was the accessory bag. Some creative folds and shapes have provided a protective shell to keep the heatsink safe during transport.
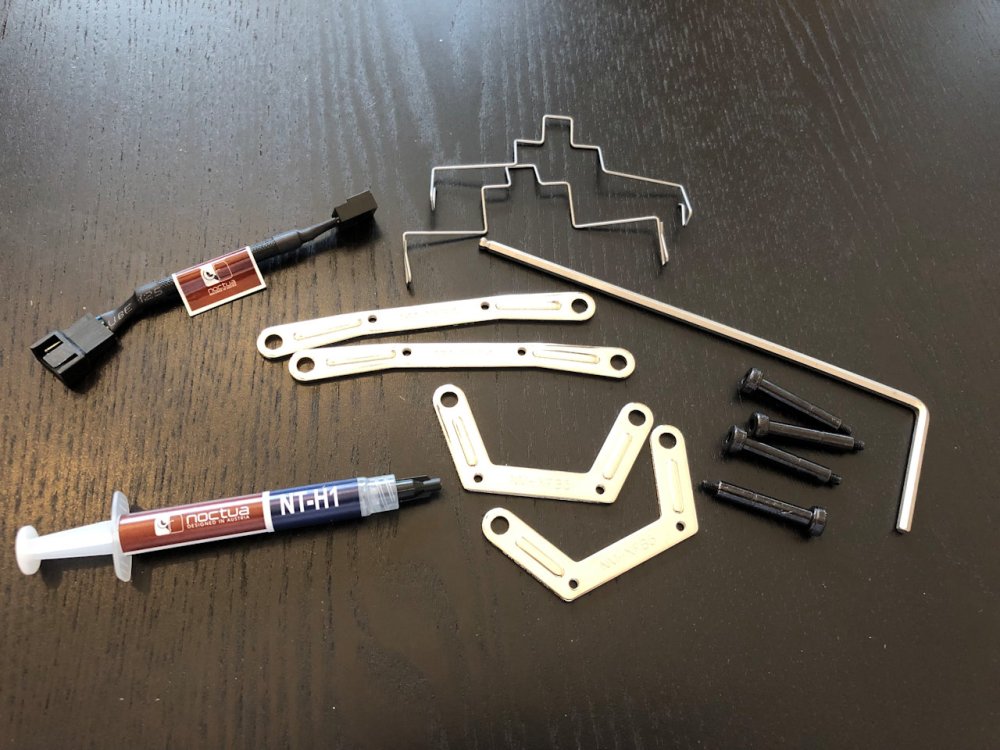
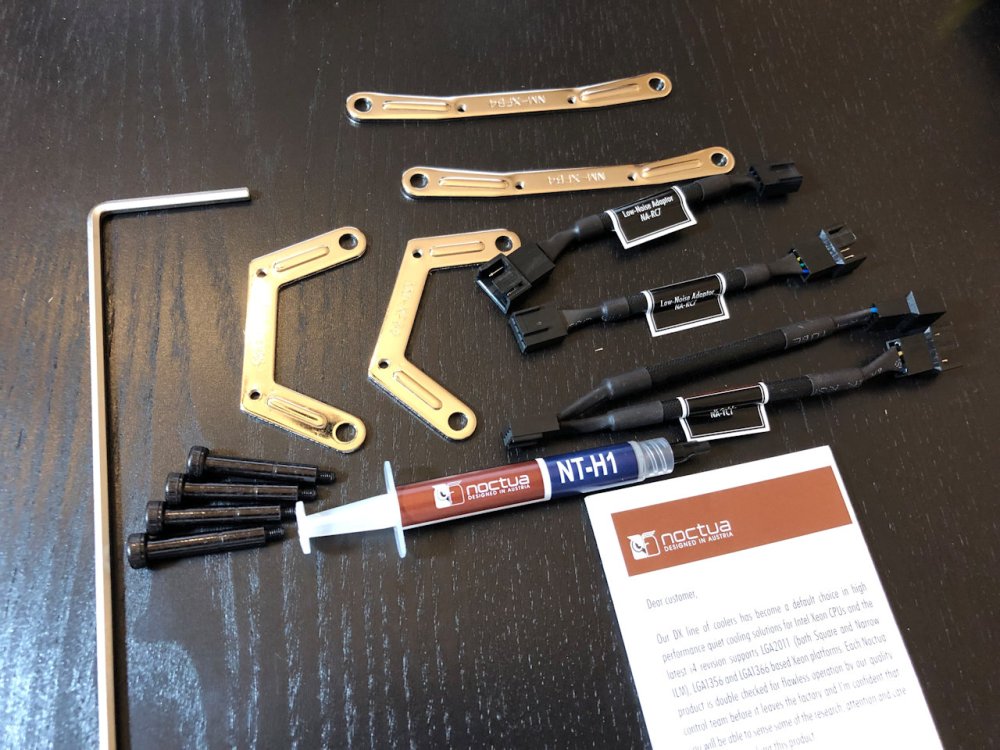
Noctua includes several things in the accessory bag. Here is a quick inventory:
- NA-RC7 Low-Noise adapter
- Narrow ILM adapters for two different orientations
- 4x bolts for 1366/1367 mounting
- 2x extra fan mounts for an additional NF-A9 fan
- Long allen-key wrench for mounting
- NT-H1 thermal paste
- Installation manual
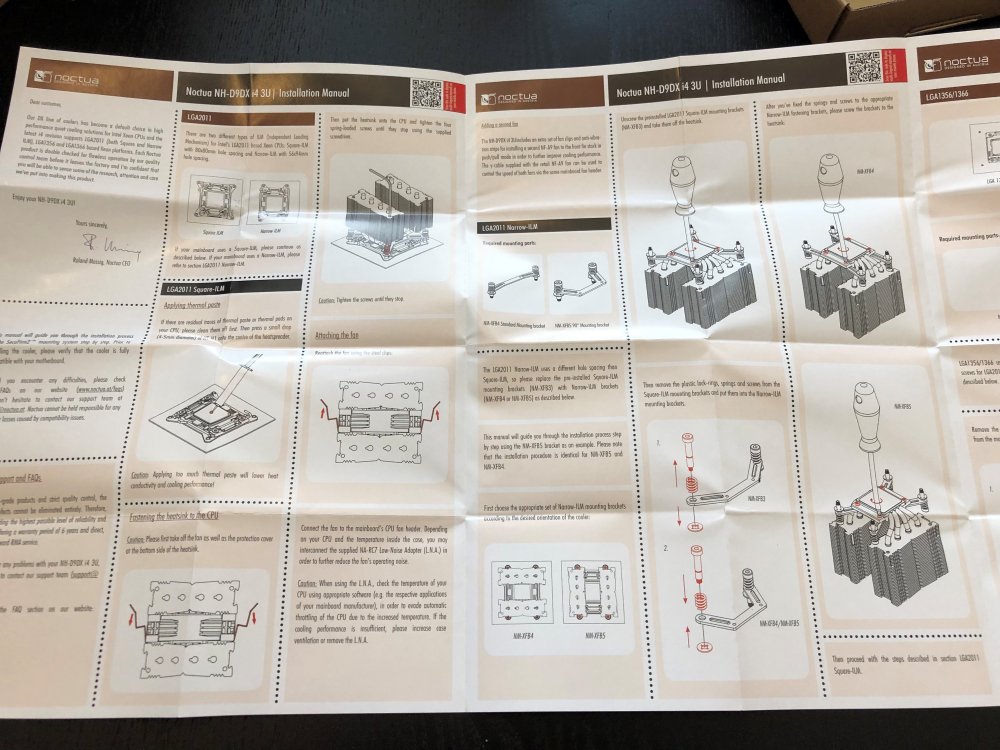
Unlike many other manufacturers, Noctua does an excellent job with documentation. The instructions are very clear and with great illustrations.
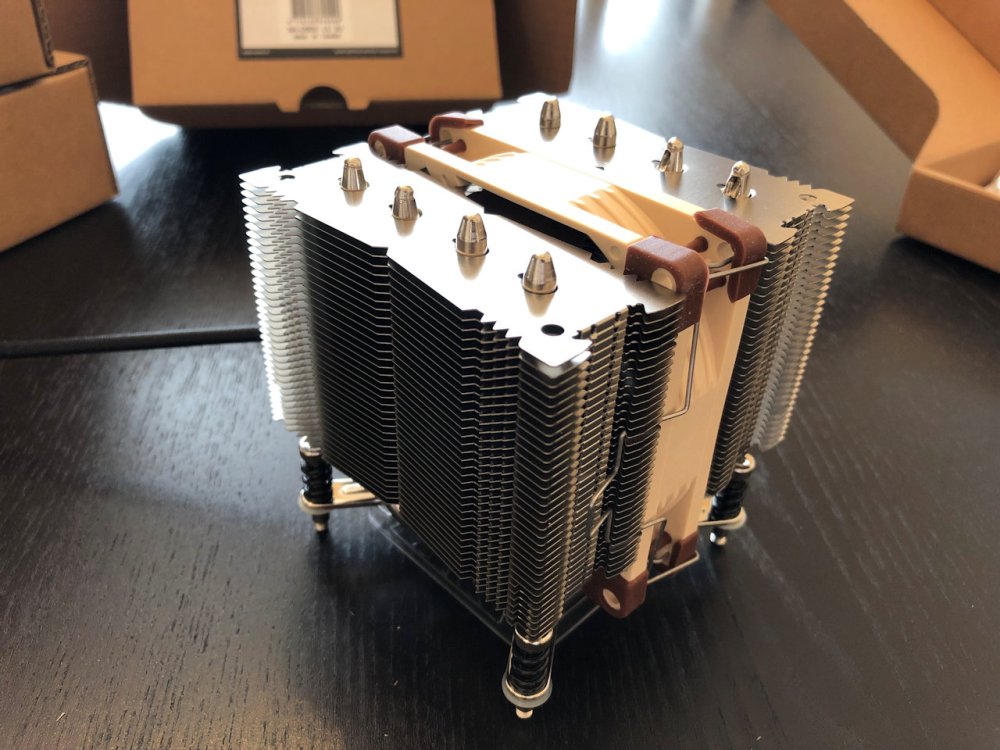
Once I got it out of the box, I was immediately impressed by the look and feel of the heatsink. Everything looks very well made and it has a solid feel to it. Even the fins are rigid and don’t bend at the slightest touch like some cheap heatsinks out there.


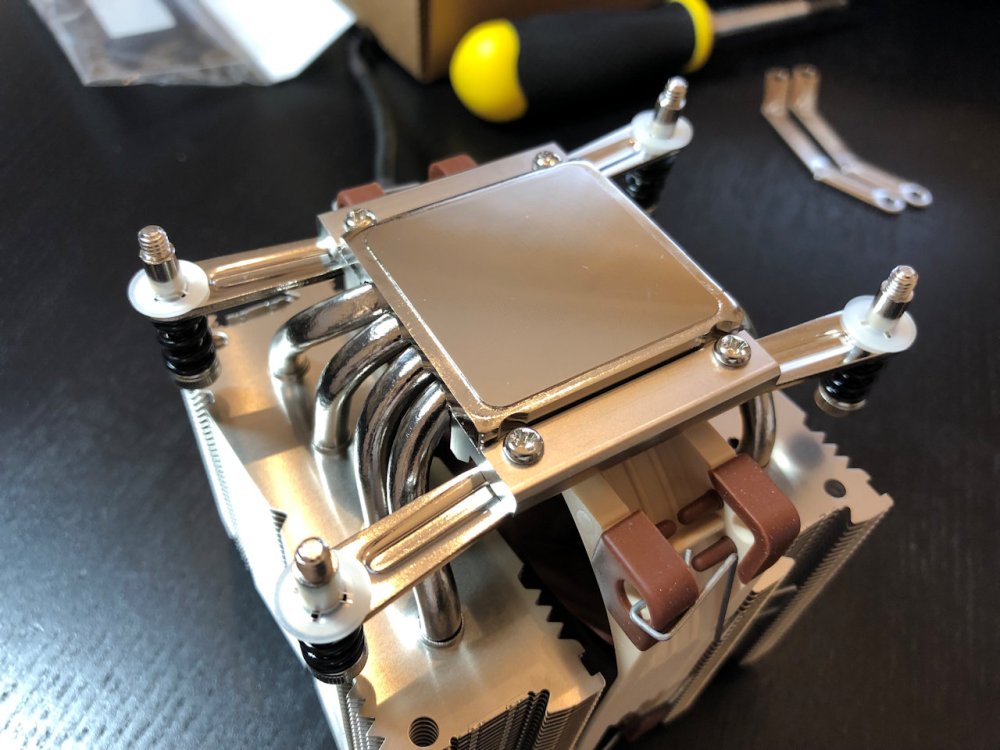
The base quality was excellent with a mirror finish and just very slight machining marks visible. The heatsink came out of the box with square ILM socket 2011/2066 mounting hardware already installed on it.
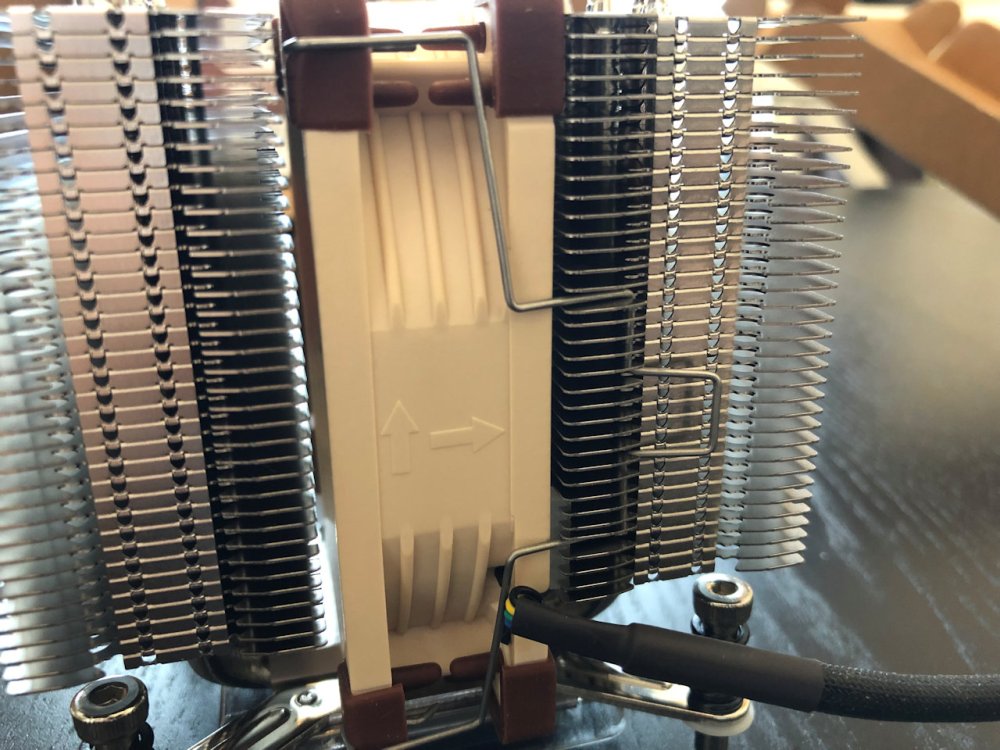
The NF-A9 fan is secured using convenient wire clips. I love the protruding handle that allows the fan to be easily removed with a small amount of pressure. Some heatsinks can be a real chore to install/remove a fan with wire clips, but not the NH-D9DX i4 3U. Notice the airflow direction arrows on the fan as well, which is useful when mounting.


Ah, the iconic brown and beige Noctua fans! Not everyone is a fan of the color scheme, but no one can deny that Noctua makes some awesome fans. The NF-A9 is a newer 92mm fan model that replaces the older ‘B’ series 92mm fans. This is a 4-pin PWM model with a maximum rotational speed of 2000RPM. The new A series fans appear to have higher static pressure and are better suited for close/dense heatsink mounting than previous models. The extra static pressure will be useful on the D9DX i4 3U because of how the fan sits sandwiched between fins on both sides.
You can find more information on the NF-A9 as well as some of the unique aerodynamic features it employs at the Noctua site.
With the fan removed, you can see the two independent fin banks.
Narrow ILM Brackets
The NH-U9DX i4 and i4 3U both come with square ILM mounting hardware installed out of the box. Since I’ll be mounting this on the narrow ILM socket of the Supermicro X9SRL-F, I’ll need to change out the mounting hardware.
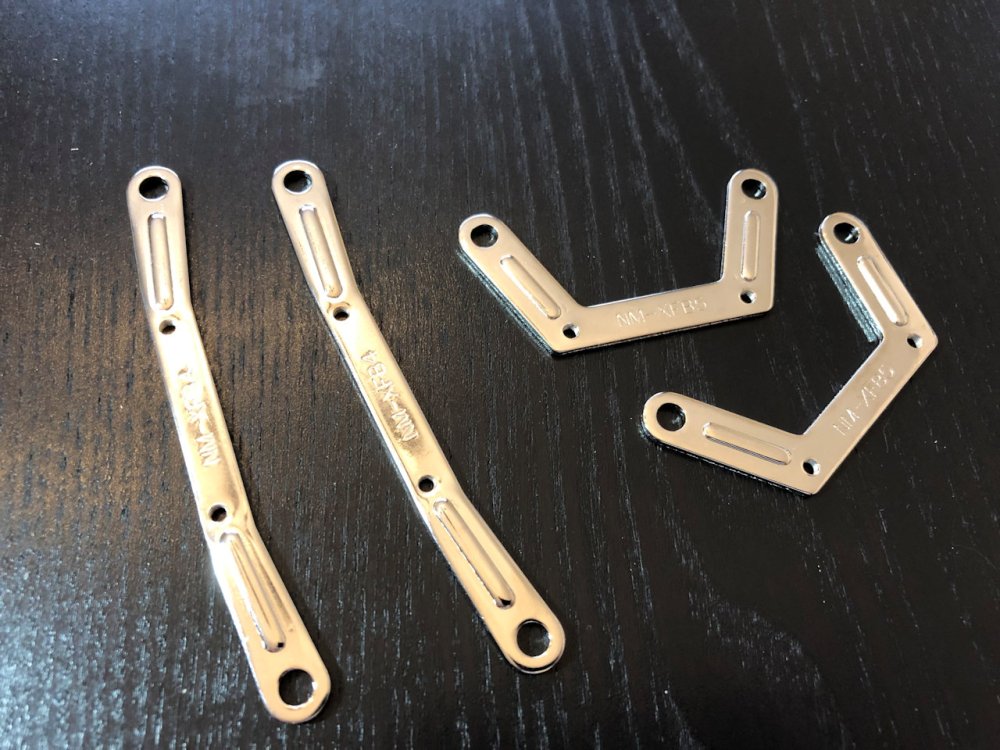
For narrow ILM socket 2011, Noctua thoughtfully included two sets of mounting brackets. This allows the heatsink to be installed in two different orientations. Hot air can exhaust toward the back of the case in one orientation, or toward to top of the case in the other.


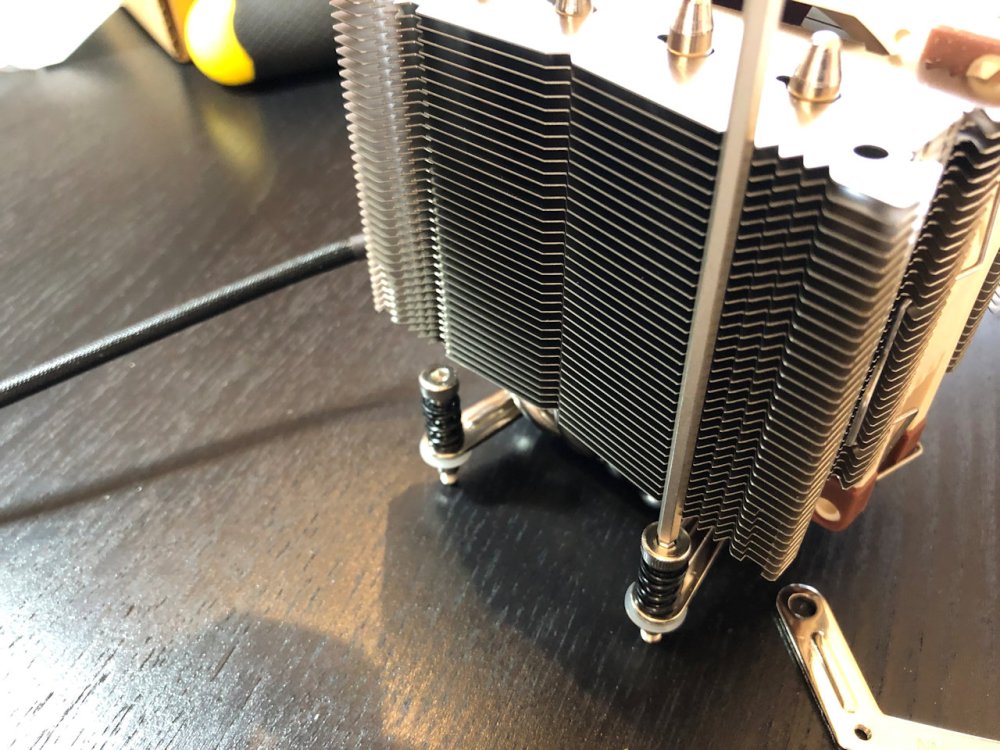
Four small screws hold the brackets in place. They are easy to remove with a Philips screwdriver. Although they look small, they are precision-threaded and hold the brackets down very securely. Once they are off, it’s necessary to remove the bolts, springs and plastic washers for reuse on the other brackets.
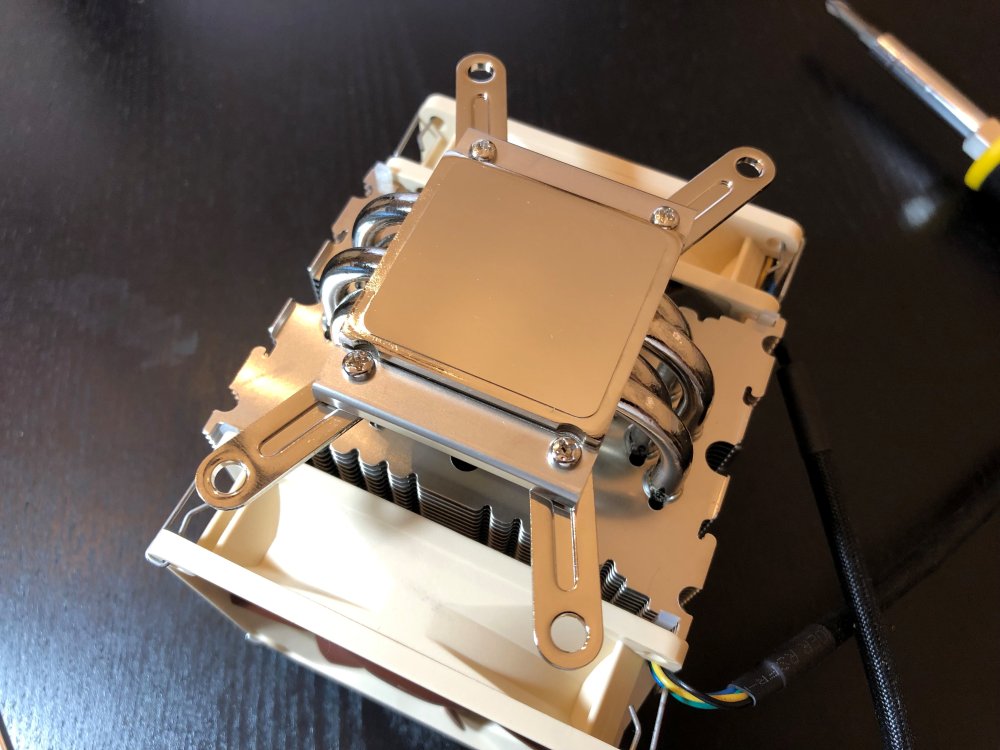
I installed the long NM-XFB4 “standard” mounting bracket. This allows the heatsink to be mounted with exhaust air toward the rear of the case. The NM-XFB5 is for “90 degree” mounting and can be used to exhaust air toward the top of the case.
The bolts may look obstructed, but Noctua put a small indentation in the fins just wide enough for their wrench tool to gain access to them. These are the small details that differentiate Noctua from many of their competitors.
Noctua NH-U9DX i4
Next, I’ll look at the NH-U9DX i4. Again, you can get a full list of specifications at the Noctua site but here are the highlights:
Dimensions (h/w/d): 125mm/95mm/120mm (with two fans mounted)
Weight: 460g (640g with two fans)
Fan compatibility: 92x92x25mm
Materials: Copper base and heat pipes, aluminum fins.
Socket compatibility: LGA2066, LGA2011 (square and narrow ILM), LGA 1356/1366.
Just like the NH-D9DX i4 3U, Noctua used all cardboard packaging.


Always great to see manufacturers using recyclable materials instead of plastics that will go to landfills.
The heatsink certainly feels quite a bit wider than the i4 3U – mainly due to the two fans mounted. Again, I was immediately impressed by the solid feel of the heatsink.


A small amount of spacing exists between the heatsink and the fan. The NH-U9DX i4 also employs four heatpipes per side, but they are clustered together as opposed to spread out in front of the fan. The base quality is excellent – almost a mirror finish with a very slight texture present.
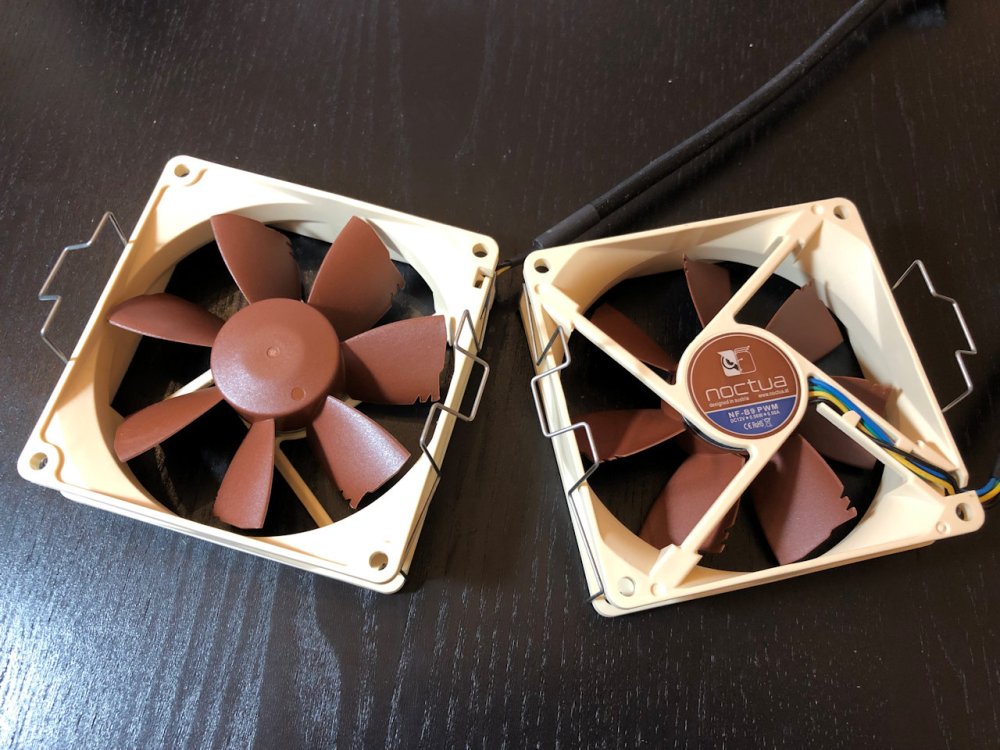
Unlike the i4 3U, the NH-U9DX i4 includes two of Noctua’s older NF-B9 fans as opposed to their newer NF-A9. Although the NF-B9 is now discontinued, I’ve been a big fan – no pun intended – of this model for many years. It has a slower rotational speed (1600RPM vs 2000RPM) and lower static pressure – but it’s very quiet as a result. It wouldn’t surprise me if Noctua updates the NH-U9DX i4 in the future to use their newer NF-A9 fans. You can find detailed specifications for the NF-B9 here.
Included in the accessory bag, we find a very similar set of gear. Again, we get the NT-H1 thermal paste, brackets for narrow ILM mounting as well as two NA-RC7 low-noise adapters. Also included is a PWM fan splitter cable that allows both fans to be run on a single CPU fan header. Since these fans hardly draw any current there should be no issues doing this.
I went ahead and mounted the “standard” narrow ILM brackets using the same process I documented earlier. This should allow the heatsink to exhaust hot air toward the rear of the case.
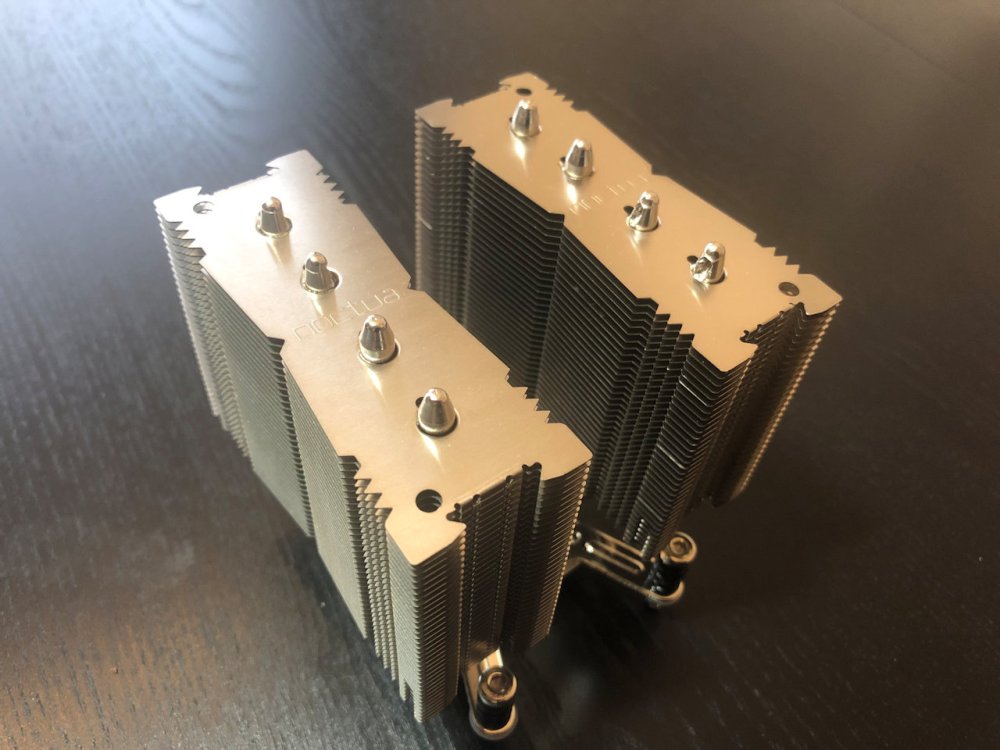
Heatsink Side-by-Side Comparison
Side-by-side, we can see that there is quite a height difference between the NH-D9DX i4 3U and the NH-U9DX i4.
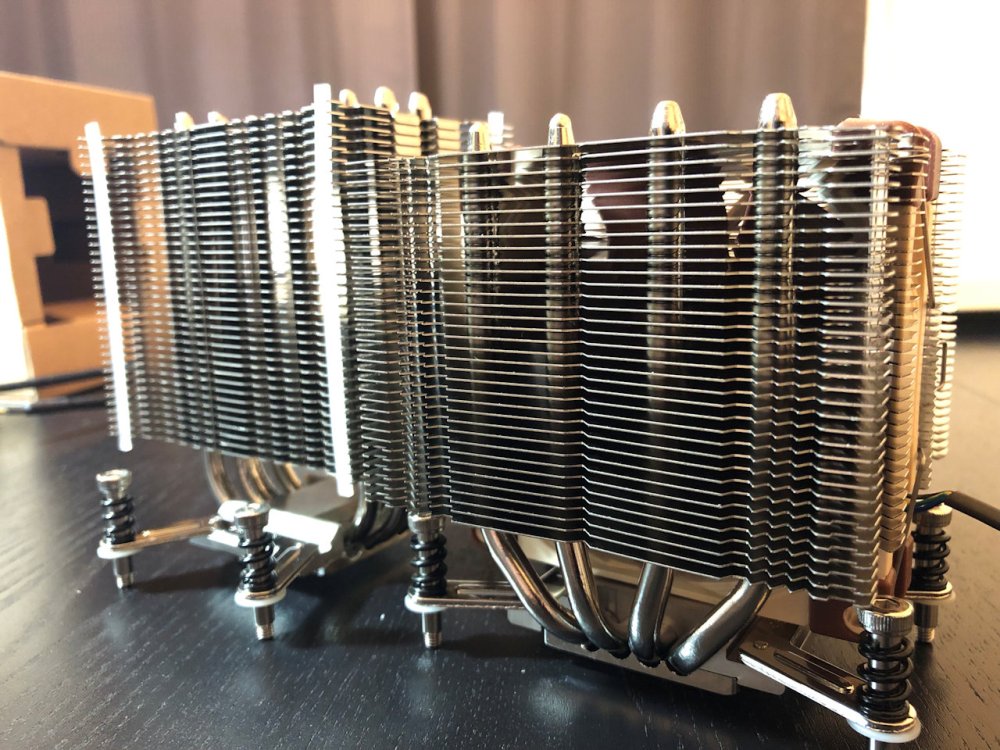
Despite both using 92x92x25mm fans, the 3U is 15mm shorter.


With both fans mounted, the NH-U9DX i4 is noticeably wider too – about 25mm wider. Going down to one fan, the two heatsinks are the same width at only 95mm.
Installing the NH-D9DX i4 3U
Before installing the NH-D9DX i4 3U, I applied the included NT-H1 thermal compound. It applies very easily and has a very workable consistency.


The pressure from the heatsink mount spread a small bead of compound out very well.
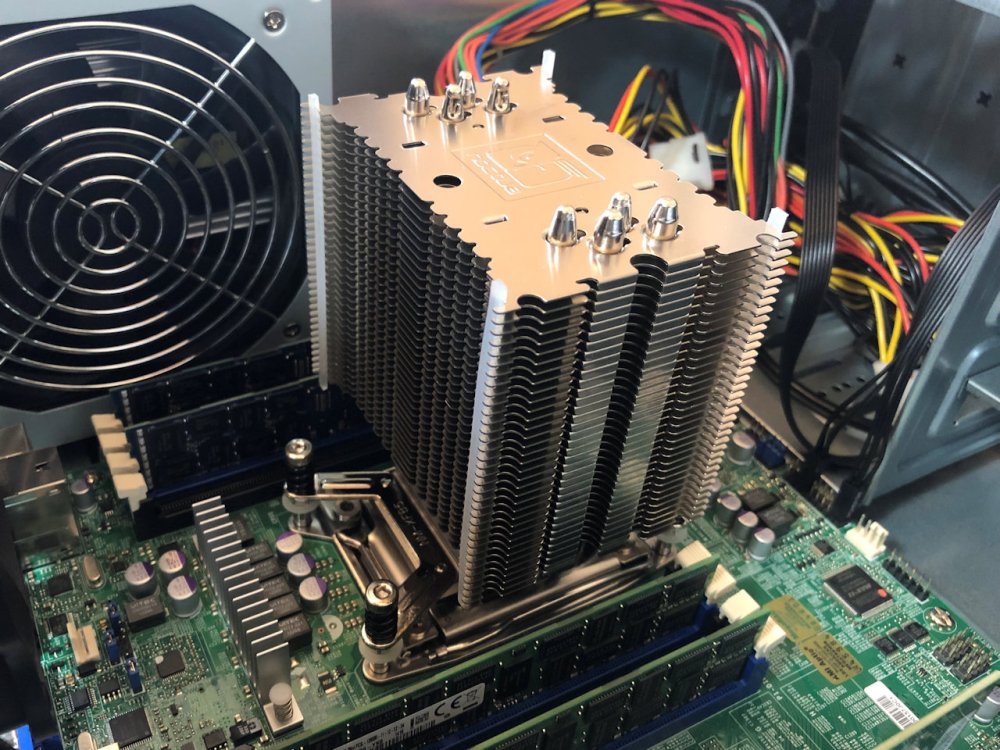
Securing the four bolts to the board was simple using the included wrench. I alternated the bolts, doing a couple of turns, moving to the bolt on the opposite corner (diagonally) each time I switched. This puts even pressure down and helps to spread the thermal compound. There is no guess work in this mount – simply keep screwing until they are bolted all the way in and don’t turn any more.
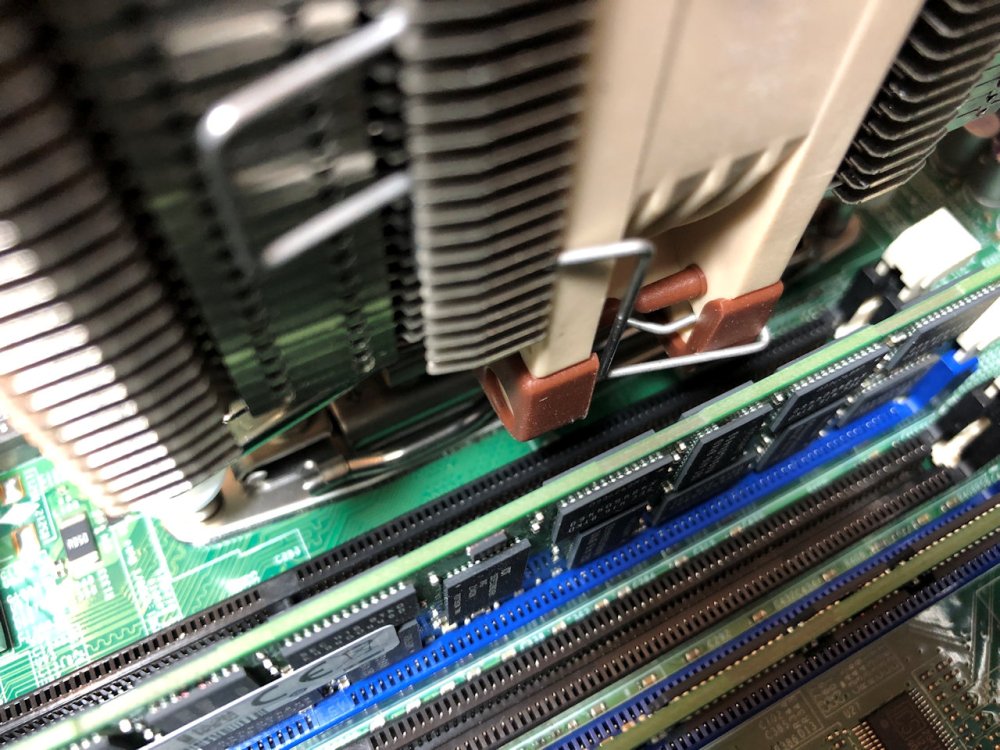
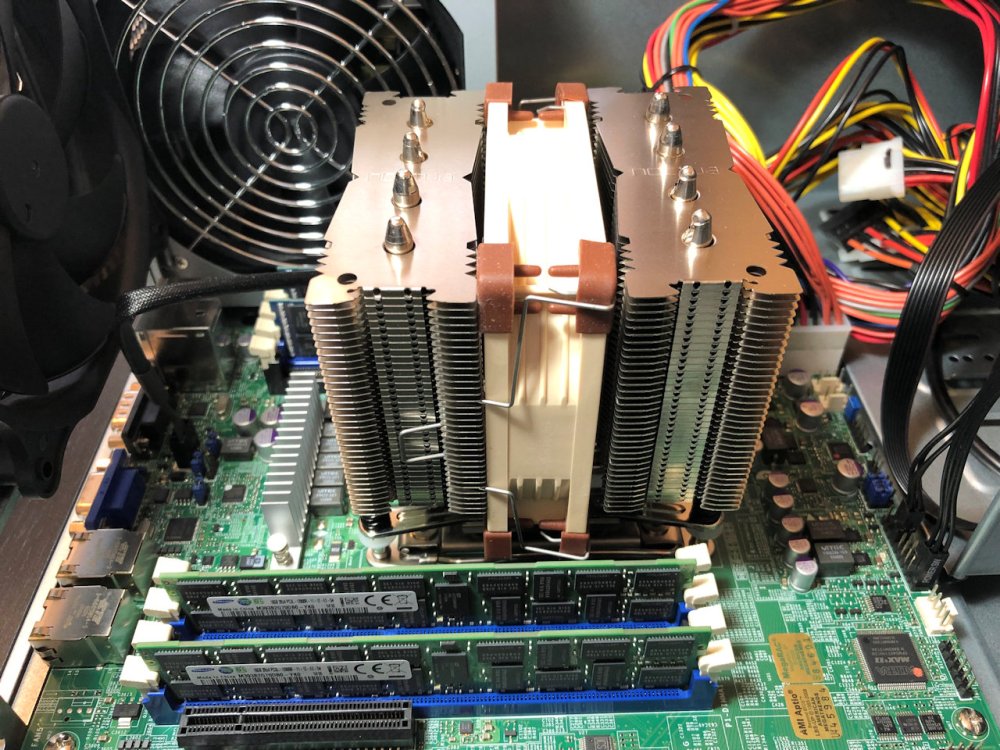
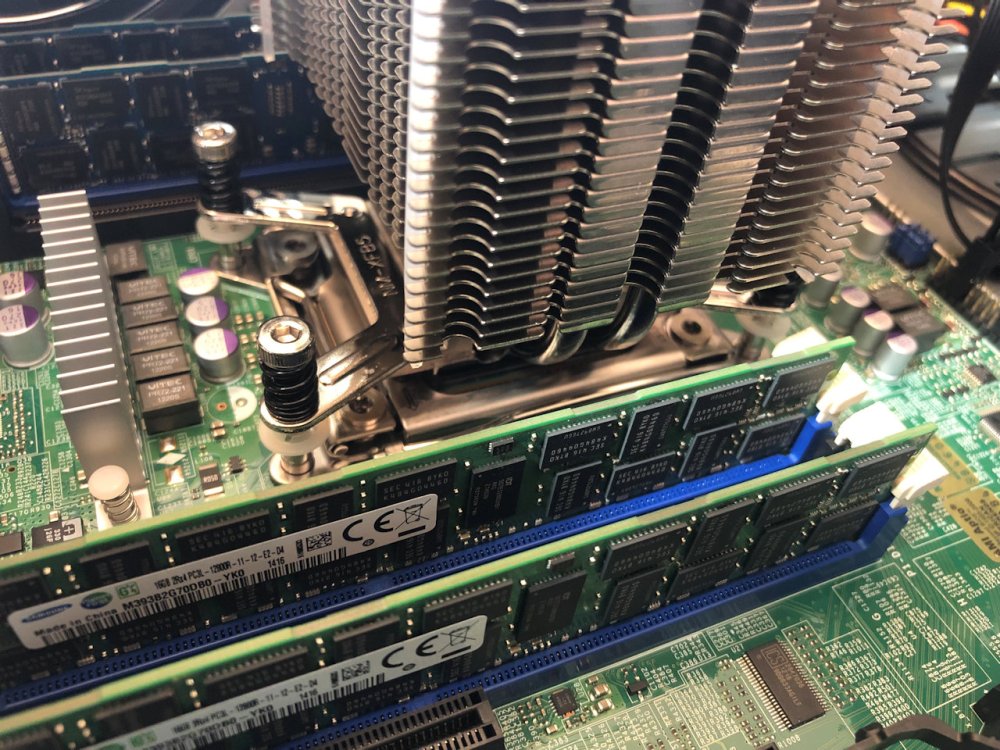
Unfortunately, the socket area of the Supermicro X9SRL-F is really cramped. The inner-most RAM slots are only millimeters away from the socket. In the “standard” mounting orientation, the NF-A9 fan blocks two of the RAM slots. It is possible to mount the fan higher up by adjusting the clips and this would allow them to be used. The heatsink fins are high enough that any ‘standard’ height DIMMs would not pose a problem. Unfortunately, raising the fan would increase the height of the cooler so that may not be feasible for everyone.


In the 90-degree orientation, I had no problems at all with RAM clearance. All eight slots could be easily accessed. The final mount felt very solid in both orientations – the heatsink is very securely held down and because of its short stature, doesn’t feel like it’s putting any undue weight on the socket.
Installing the NH-U9DX i4
Installing the NH-U9DX i4 was a very similar exercise.
Because the mounted fans obstruct the bolts, I had to remove both fans to mount the heatsink. Thankfully this is a very simple task thanks to the awesome fan clip system that Noctua uses. Remounting the fans would be easy to do even in a cramped case.
Even in the standard mounting orientation, there were no issues with RAM clearance. The fins overhang the slots, but even standard height DIMMs have plenty of clearance on the X9SRL-F.
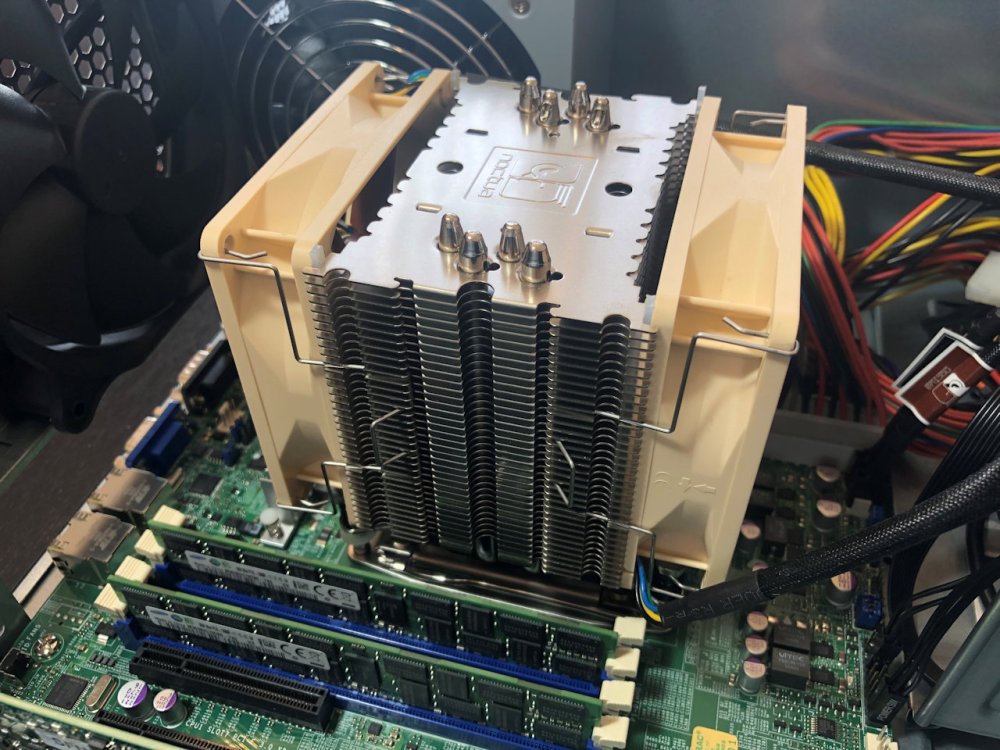
Once again, the final mount was very sturdy and the heatsink looks like it means business with two fans mounted.
BMC Fan Control
I immediately ran into some problems when allowing the baseboard management controller of the Supermicro X9SRL-F to manage PWM fan speed. With both the NH-U9DX i4 and i4 3U, the fans would cycle up and down every few seconds from low speed to full speed.
I’d see the fan sensor drop below 300RPM, throw an alarm and then in response it would be switched to full speed. It then falls back down, and the cycle continues. I’d question the accuracy of the RPM sensor at low speeds – it seems correct at higher speeds, but the measurements seem too low when the fans ramp down.
At any rate, I was able to rectify the problem by modifying the fan alarm thresholds with ipmitool in Linux. Setting the threshold to 200RPM allowed the fans to remain at a lower RPM and corrected the cycling problem:
test@USB-lubuntu:~$ sudo ipmitool sensor thresh "FAN 1" lower 100 150 200
[sudo] password for test:
Locating sensor record 'FAN 1'...
Setting sensor "FAN 1" Lower Non-Recoverable threshold to 100.000
Setting sensor "FAN 1" Lower Critical threshold to 150.000
Setting sensor "FAN 1" Lower Non-Critical threshold to 200.000
At idle, this worked very well and the NF-A9 and NF-B9 fans were completely inaudible. Unfortunately, the X9SRL-F’s BMC is not aggressive enough at increasing the RPM as the temperature of the CPU increases. I saw the CPU temperature increase up beyond 60’C before the fans would start increasing – and even then, only slightly.
My Intel S2600CP motherboard allows modification of the PWM curve easily from the BIOS, as well as setting custom fan profiles. Unfortunately, I haven’t found anything like this available for the Supermicro X9SRL-F and much of what is set in ipmitool isn’t persistent across reboots.
This is unfortunate, because the PWM control of higher-RPM fans – like that of the Dynatron R13 – works beautifully and the fan ramps up appropriately as CPU temperature increases. It seems the PWM fan curve just hasn’t been tuned well for low-RPM fans on the X9SRL-F. To be clear, this isn’t an issue at all with the Noctua fans, but rather a limitation of the BMC on the X9SRL-F. Please use caution if you want your fans BMC controlled. The fans will be extremely quiet, but your CPU will get quite warm under load.
Noise
I was originally looking at using a phone app to get decibel measurements of the heatsinks, but I honestly don’t think those numbers mean much to people. Added to that, the logarithmic scale that sound measurements use make these comparisons even more confusing. For example, the difference between 20db and 30db may not sound like a lot, but 30db is ten times louder than 20db. It can be hard to wrap your head around these numbers. Rather than taking objective measurements, I’ll provide a subjective description of the sound.
I ran the system in a quiet room with no other PCs. Inside the Antec VSK4000E case was the Antec 1000RPM 120mm rear exhaust fan as well as a Seasonic 400W power supply with a 120mm fan. I’d consider the case fan and PSU fan extremely quiet and barely audible. I then ran the Noctua fans in several modes, including at full speed, with the included low noise adapter/adapters and with 100% BMC fan control using Supermicro’s ‘standard’ profile.
Beginning with the NH-D9DX i4 3U and its NF-A9 fan, I’d make the following observations:
Full Speed: At 100% fan speed, the Noctua NF-A9 fan spins at about 2000RPM. At this speed, I would consider the fan quiet, but not silent. It was audible above the case fan and power supply. The noise could be described as the rushing of air through the heatsink. It did not exhibit any whine or unpleasant or annoying acoustics.
NA-RC7 Adapter: With the NA-RC7 adapter attached, the BMC fan sensor read about 1500RPM. This speed was noticeably quieter, despite maintaining a decent level of airflow. At this speed, I could barely distinguish the sound of the NF-A9 from the case/PSU fans. With this adapter, the system is very quiet and would sit very comfortably in a home office without causing any bother at all.
BMC Fan Control: Allowing the Supermicro BMC to have full PWM control of the fan kept the rotational speed very low – perhaps too low. At any rate, the fan had no issues starting up at about 500RPM and at this speed the NF-A9 is completely silent. I could not hear it at all above the case/PSU fans. In fact, if I unplugged the NF-A9, there was no difference in sound.
Next, the NH-D9DX i4 and its NF-B9 fans:
Full Speed: At 100% fan speed, the Noctua NF-B9 fans were audible above the case and power supply fans, but just barely. I’d consider them a bit quieter than the NF-A9, which makes sense given the ~400RPM slower rotational speed. The acoustics of the fans were good with no annoying whine, clicking or other motor noise – just rushing air. Using two fans on the NH-D9DX i4 were just slightly louder than one from what I could tell. In my subjective opinion, two NF-B9 fans are about the same noise level as a single NF-A9.
NA-RC7 Adapter: With the NA-RC7 adapter, the two NF-B9 fans were barely audible. Even with two fans running, the noise level was very low.
BMC Fan Control: Even with two NF-B9 fans, I could not hear them at all. The PSU and case fan completely drown them out.
Cooling Performance
To test the cooling performance of these heatsinks, I used several varying fan configurations. Here is the system hardware used:
CPU: Intel Xeon E5-2670 (2.6/3.3GHz, 8 cores, 16 threads, 115W TDP)
TIM: Noctua NT-H1 thermal paste was used for all tests.
Motherboard: Supermicro X9SRL-F ATX Motherboard (Socket 2011 narrow-ILM, uni-processor)
Memory: 64GB (4x16GB) PC3L-12800R, running at 1333MHz and 1.35V
Case: Antec VSK4000E Mid-Tower, one rear Antec 1000RPM 120mm exhaust fan
Power Supply: Seasonic SS-400ET 400W ATX with 120mm fan
Operating System: Lubuntu 18.04 LTS
Idle temperature was measured after waiting ten minutes once the system booted and then recording the CPU temperature reported by the BMC. To generate load, I used the simple ‘stress’ command in Linux to run 16 threads. This puts the Xeon E5-2670 at 100% full load utilizing all its cores including the extra threads that hyperthreading provides:
test@USB-lubuntu:~$ stress --cpu 16
stress: info: [1789] dispatching hogs: 16 cpu, 0 io, 0 vm, 0 hdd
The stress utility was run for 10 minutes, and then a reading from the BMC sensor for CPU temperature was recorded for each scenario. All tests were run with an ambient room temperature of between 21 and 21.5’C.
The following configuration scenarios were tested:
- Dynatron R13 1U Heatsink – 7500RPM at full speed.
- Noctua NH-D9DX i4 3U Heatsink – Noctua NF-A9 fan at 2000RPM full speed.
- Noctua NH-D9DX i4 3U Heatsink – Noctua NF-A9 fan with NA-RC7 low noise adapter. ~1500RPM.
- Noctua NH-D9DX i4 Heatsink – 1x Noctua NF-B9 fan at 1600RPM full speed.
- Noctua NH-D9DX i4 Heatsink – 2x Noctua NF-B9 fan at 1600RPM full speed.
- Noctua NH-D9DX i4 Heatsink – 1x Noctua NF-B9 fan with NA-RC7 low noise adapter. ~1300RPM.
- Noctua NH-D9DX i4 Heatsink – 2x Noctua NF-B9 fan with 2x NA-RC7 low noise adapter. ~1300RPM.
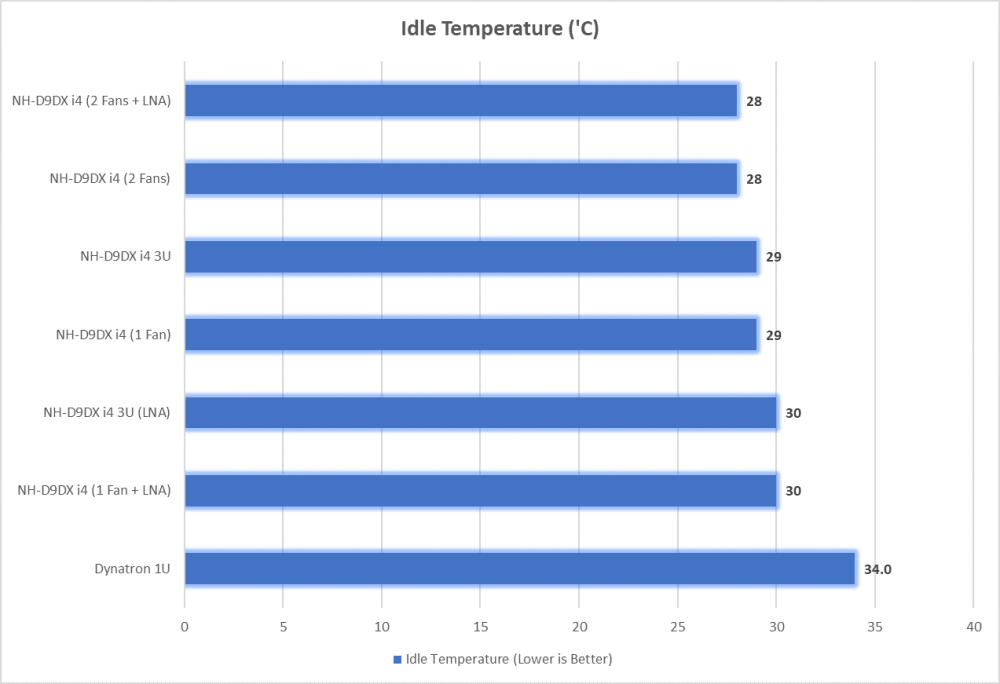
At idle, all of the Noctua configurations kept the E5-2670 nice and cool. I’ve never seen temperatures below 30’C on this type of CPU, so clearly this was an indication of some impressive cooling potential. The Dynatron also does a good job keeping the CPU cool, but at 7500RPM it is very painful to listen to.

The NH-D9DX i4 with its two NF-B9 fans does an incredible job cooling the toasty E5-2670. At load, this older generation 8-core CPU can generate a fair bit of heat and is rated for 115W. Being able to keep it just a hair over 50’C is an impressive feat. Even more impressive was that using two NA-RC7 adapters – making the heatsink much quieter – resulted in only a single degree increase in load temperature. Clearly, using two fans can make a very significant difference in heat dissipation.
Once we get down to a single fan, the NH-D9DX i4 and the i4 3U perform very similarly and usually stay within a degree or two of each other. Keeping this 8-core CPU at around 60’C is very impressive. The NA-RC7 low noise adapters decrease performance slightly, but only by a few degrees despite lowering RPM by about 25%.
The Dynatron R13 heatsink wasn’t able to compete with these Noctua towers and managed about 72’C. To be fair, that is a very impressive number considering the wafer-thin copper heatsink it utilizes and its 80mm blower-style fan. If you are constrained to a 1U chassis, you can rest assured that the Dynatron R13 can keep even higher end Xeons cool. Obviously, the elephant in the room is the noise. At a full 7500RPM, the R13 is extremely loud. I can hear it just about anywhere in my house when its running – fine for a datacenter, not so good for a home lab.
Power Consumption
It seems very logical that higher speed fans would consume more electricity than slower, quieter ones – but just how much may surprise you. I did a quick comparison of the NH-D9DX i4 with two fans running at full speed with the 1U heatsink also running at full speed.
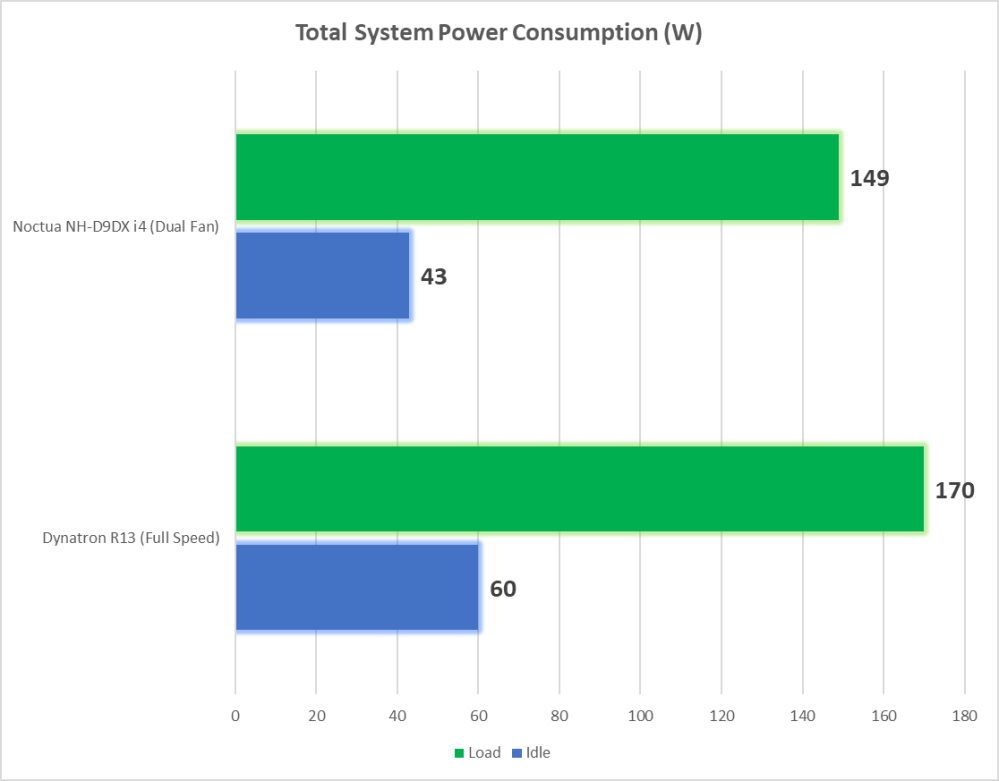
I was not expecting such a drastic difference – an average of about 19W measured at the wall! Even if you don’t care about noise, there are clear efficiency benefits to using quieter cooling solutions. Granted, this was with the Dynatron R13 at full speed – one would hope the BMC fan control would be keeping it at much lower RPM – and power levels – most of the time. But with most rackmount cases, there are not just one but multiple high-RPM fans. Power consumption is one key reason I stay away from rack-mount servers for home lab use.
Again, this is not intended to knock the Dynatron R13 – it’s an excellent heatsink for its intended use case. It’s able to effectively cool a 115W CPU in very confined 1U cases.
Conclusion
It has been over ten years since I reviewed the original Noctua NH-U9 heatsink, and I’m happy to say that the new 92mm towers are even better. Both the NH-U9DX i4 and i4 3U did an excellent job cooling a toasty Xeon E5-2670 and managed to do so at very reasonable noise levels. The mounting kit that comes with the heatsinks is excellent and I especially love the fan wire clip system they use now. Not only does Noctua support narrow ILM mounting on these heatsinks, but they also include two sets of brackets for different mounting orientations. The included accessories are generous, including a large tube of their NT-H1 thermal paste, and NA-RC7 low-noise adapters. With the NA-RC7 adapters, Noctua can keep the full-speed RPM a bit higher for maximum cooling performance but still provide buyers an easy way to reduce RPM and noise if needed.
The original question I was hoping to answer in this comparison was whether to buy the NH-U9DX i4 or the i4 3U heatsink for my three compute nodes. In my situation, the NH-U9DX i4 appears to be the better choice. It currently retails for slightly less than the i4 3U, includes two fans instead of one and has better RAM clearance. My mid-tower cases don’t need the shorter stance that the i4 3U provides, but if height is important, the i4 3U may be for you.
Its no secret that Noctua heatsinks and fans come at a premium price, but I’d argue that you certainly get what you pay for. You don’t just pay for a brand name – the quality is very evident in all their products.
Overall, I’d highly recommend both the NH-U9DX i4 and NH-D9DX i4 3U! For a home lab setup, you can’t go wrong.
Pros:
- Excellent cooling performance
- Low noise
- Very high build quality
- Relatively small footprint – especially the i4 3U.
- Great accessory bundles, including NT-H1 thermal paste, low noise adapters and extra fan clips.
- Top-notch mounting system
- Good documentation
- Socket 2011 Narrow ILM compatible with multiple orientations
- 6-year warranty
Cons:
- A little on the expensive side
- Some RAM clearance issues depending on the motherboard model and mounting orientation

These look like nice heatsinks/fans. Thanks for reviewing them – I’m thinking of getting one for a server I’m building. With the board I’m considering (X10SRA-F), the larger of the two would result in the fans overhanging the ram slots if I oriented it for airflow to go from front to back.
Just one thing to possibly correct: You review “NH-D9DX i4 3U” but refer to it in the title as “NH-U9DX i4 U3”.
Good catch, thanks Andrew! I just realized I was calling it by both names throughout the entire article, along with calling it the U3 instead of the 3U. Should be fixed now 🙂
Let me know how you like the heatsink with the X10SRA-F. I think the layout is probably pretty similar to the X9SRL-F.
Just wanted to ask if you are able to use the slots next to the cpu when using NH-U9DX i4? I use NH-U12DX i4 today but thinking about changing it too isolated heater cooler from corsair or equal with the narrow adapter since I would like to skip top fans
Thanks for this thorough review! Precisely the heatsinks I was looking to compare! (including the dynatron!)
Thanks for this thorough review! Precisely the heatsinks I was looking at to compare! Including the dynatron!
Thank you very much for this review. I have managed to get my hands on a good deal for the exact same Supermicro board, and after not being able to fit my first CPU cooler this guide helped a lot!