There are many different reasons you may want to patch your ESXi host. VMware regularly releases bug fixes and security patches, or perhaps you need a newer build for compatibility with another application or third-party tool.
Update 3/15/2021: See my video tutorial on how to update your ESXi 7.x host from the CLI:
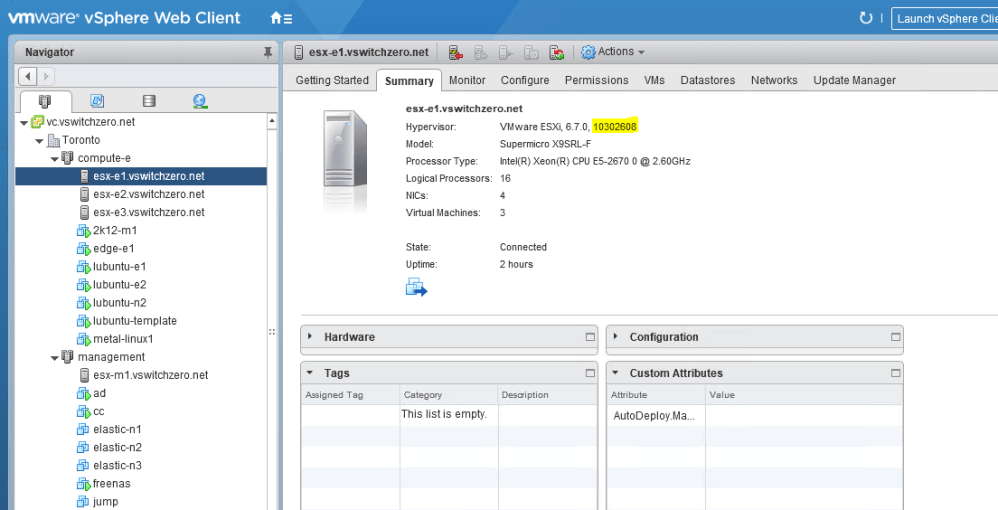
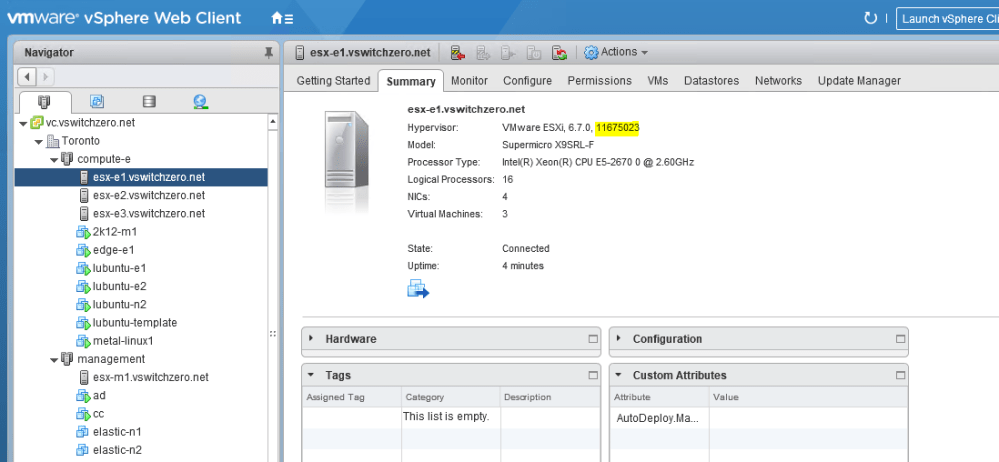
In my situation, the ESXi 6.7 U1 ESXi hosts (build 10302608) are not compatible with NSX-T 2.4.0, so I need to get them patched to at least 6.7 EP06 (build 11675023).
Before you get started, you’ll want to figure out which patch release you want to update to. There is quite often some confusion surrounding the naming of VMware patch releases. In some cases, a build number is referenced, for example, 10302608. In other cases, a friendly name is referenced – something like 6.7 EP06 or 6.5 P03. The EP in the name denotes an ‘Express Patch’ with a limited number of fixes released outside of the regular patch cadence, where as a ‘P’ release is a standard patch. In addition to this, major update releases are referred to as ‘U’, for example, 6.7 U1. And to make things more confusing, a special ‘Release Name’ is quite often referenced in security bulletins and other documents. Release names generally contain the release date in them. For example, ESXi670-201903001 for ESXi 6.7 EP07.
The best place to start is VMware KB 1014508, which provides links to numerous KB articles that can be used for cross referencing build numbers with friendly versions names. The KB we’re interested in for ESXi is KB 2143832.
Once you’ve been able to get the build number for your desired patch, you can visit the VMware Patch Tool site. In my case, I went ahead and downloaded ESXi670-201901001.zip. This ZIP file – and all ESXi patches – are what is referred to as an “offline bundle”. Offline bundles are collections of VIBs bundled with metadata describing their contents. You don’t need to extract the ZIP file as part of the upgrade process. The ESXi host will process the ZIP file automatically to pull out the modules and metadata.
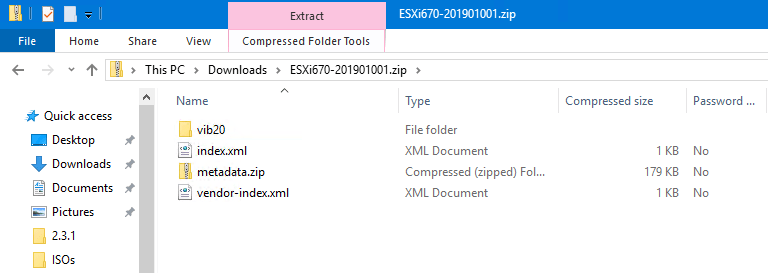
In the ZIP file, the VIBs are contained in the vib20 directory. The other files contain metadata, including vendor related information.
The first thing we’ll need to do is upload the file over to a location that can be accessed by the ESXi hosts. Quite often, WinSCP is used for this process, but you can also use the datastore browser to put it in a shared datastore that can be accessed by all your hosts.
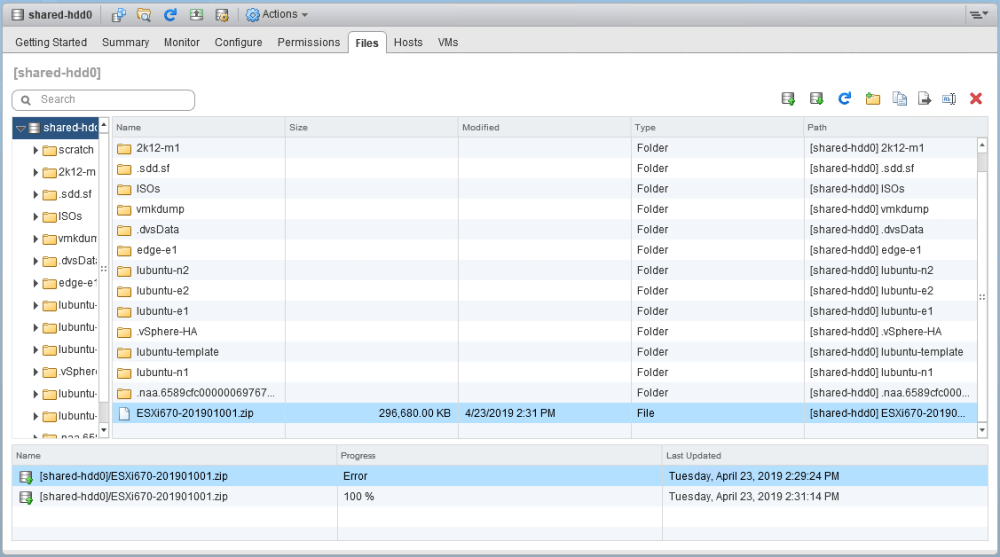
I uploaded it to the root of the datastore called shared-hdd0. Before you begin, it would be a good idea to put the host into Maintenance Mode.
I then opened an SSH session and logged into esx-e1 as root:
[root@esx-e1:~] ls /vmfs/volumes/shared-hdd0/*.zip
/vmfs/volumes/shared-hdd0/ESXi670-201901001.zip
Make a note of the full path. Notice that the datastore name is used after /vmfs/volumes.
The command to initiate the update is esxcli software vib update, specifying an offline depot using the -d or –depot flags. The syntax I used is listed below:
[root@esx-e1:~] esxcli software vib update --depot=/vmfs/volumes/shared-hdd0/ESXi670-201901001.zip
My first attempt actually failed with the following error:
 [StatelessError]

 The transaction is not supported: VIB VMware_bootbank_lsu-lsi-lsi-msgpt3-plugin_1.0.0-9vmw.670.1.39.11675023 cannot be live installed. VIB VMware_bootbank_esx-base_6.7.0-1.39.11675023 cannot be live installed. VIB VMware_bootbank_esx-update_6.7.0-1.39.11675023 cannot be live installed. VIB VMware_bootbank_vsan_6.7.0-1.39.11399593 cannot be live installed. VIB VMware_bootbank_lsu-lsi-lsi-msgpt3-plugin_1.0.0-8vmw.670.0.0.8169922 cannot be removed live. VIB VMware_bootbank_esx-update_6.7.0-1.28.10302608 cannot be removed live. VIB VMware_bootbank_esx-base_6.7.0-1.28.10302608 cannot be removed live. VIB VMware_bootbank_vsan_6.7.0-1.28.10290435 cannot be removed live.

 Please refer to the log file for more details.
This is a common issue where certain kernel modules fail to unload. If you run into this, the workaround is quite simple. Make sure the host is in maintenance mode, reboot it and then run the command again. In my case it was successful after doing this:
[root@esx-e1:~] esxcli software vib update --depot=/vmfs/volumes/shared-hdd0/ESXi670-201901001.zip

Installation Result
   Message: The update completed successfully, but the system needs to be rebooted for the changes to be effective.
   Reboot Required: true
   VIBs Installed: VMware_bootbank_esx-base_6.7.0-1.39.11675023, VMware_bootbank_esx-update_6.7.0-1.39.11675023, VMware_bootbank_lsu-lsi-lsi-msgpt3-plugin_1.0.0-9vmw.670.1.39.11675023, VMware_bootbank_vsan_6.7.0-1.39.11399593, VMware_bootbank_vsanhealth_6.7.0-1.39.11399595
   VIBs Removed: VMware_bootbank_esx-base_6.7.0-1.28.10302608, VMware_bootbank_esx-update_6.7.0-1.28.10302608, VMware_bootbank_lsu-lsi-lsi-msgpt3-plugin_1.0.0-8vmw.670.0.0.8169922, VMware_bootbank_vsan_6.7.0-1.28.10290435, VMware_bootbank_vsanhealth_6.7.0-1.28.10290721
   VIBs Skipped: VMW_bootbank_ata-libata-92_3.00.9.2-16vmw.670.0.0.8169922,
<snip>
Once the update is finished, it’ll be necessary to reboot the host.
That’s it! Not difficult at all, and can be useful for standalone ESXi hosts that don’t have access to vCenter and Update Manager.
