vCenter 7 Upgrade Error Due to Expired Password

If you are attempting to upgrade your vCenter Server and are getting stuck in stage one while connecting to the source appliance, a simple password change may get you going again. In my case, I was upgrading from vCenter 6.7 U2 to 7.0 but this could certainly occur with other upgrade paths as well. I got the following error:

“A problem occurred while getting data from the source vCenter Server.”

vs7-upgfail

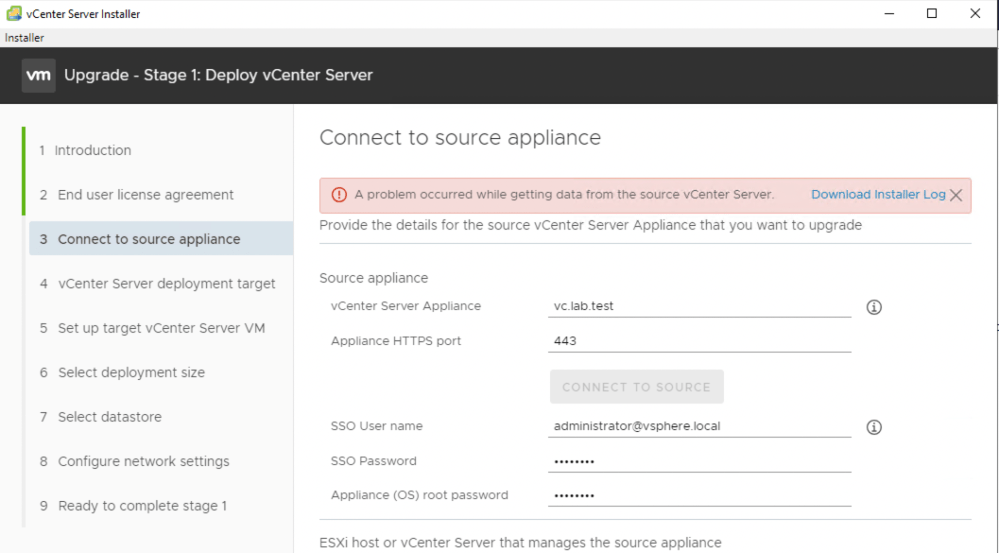
The error message is pretty non-descript, but we do get the option to download some logging. In the log file downloaded, it seems pretty clear that this is an authentication problem:

2020-04-12T20:13:55.435Z - info: VM Identifier for Source VC: vm-16
2020-04-12T20:13:55.568Z - debug: initiateFileTransferFromGuest error: ServerFaultCode: Failed to authenticate with the guest operating system using the supplied credentials.
2020-04-12T20:13:55.568Z - debug: Failed to get fileTransferInfo:ServerFaultCode: Failed to authenticate with the guest operating system using the supplied credentials.
2020-04-12T20:13:55.568Z - debug: Failed to get url of file in guest vm:ServerFaultCode: Failed to authenticate with the guest operating system using the supplied credentials.
<snip>
2020-04-12T20:13:55.569Z - error: Failed to read the nodetype, Error: Failed to authenticate with the guest operating system using the supplied credentials.
2020-04-12T20:13:55.569Z - info: Checking if password expired
<snip>
2020-04-12T20:13:58.915Z - info: Stream :: close
2020-04-12T20:13:58.915Z - info: Password not expired
2020-04-12T20:13:58.917Z - error: sourcePrecheck: error in getting source Info: ServerFaultCode: Failed to authenticate with the guest operating system using the supplied credentials.

Despite double checking that my credentials were correct, the logging insisted that there was something wrong with them. The logging also states that the password was not expired. Despite this, I decided to check anyway:

root@vc [ ~ ]# chage -l root
You are required to change your password immediately (root enforced)
chage: PAM: Authentication token is no longer valid; new one required

Well, that’ll do it. Looks like the root password was expired after all. I found it odd that it allowed me to login via SSH without any kind of password expiry warning. I changed the password using the ‘passwd’ root shell command.

root@vc [ ~ ]# passwd
New password:
BAD PASSWORD: it is based on a dictionary word
Retype new password:
passwd: password updated successfully
root@vc [ ~ ]# chage -l root
Last password change                                    : Apr 12, 2020
Password expires                                        : Jul 11, 2020
Password inactive                                       : never
Account expires                                         : never
Minimum number of days between password change          : 0
Maximum number of days between password change          : 90
Number of days of warning before password expires       : 7

After changing the password from the CLI, the upgrade progressed normally! Hopefully this tip may help others that get stuck on this step as well.

An In-depth Look at SR-IOV NIC Passthrough

SR-IOV or “Single Root I/O Virtualization” is a very interesting feature that can provide virtual machines shared access to physical network cards installed in the hypervisor. This may sound a lot like what a virtual NIC and a vSwitch does, but the feature works very similarly to PCI passthrough, granting a VM direct access to the NIC hardware. In order to understand SR-IOV, it helps to understand how PCI passthrough works. Here is a quote from a post I did a few years ago:

“PCI Passthrough – or VMDirectPath I/O as VMware calls it – is not at all a new feature. It was originally introduced back in vSphere 4.0 after Intel and AMD introduced the necessary IOMMU processor extensions to make this possible. For passthrough to work, you’ll need an Intel processor supporting VT-d or an AMD processor supporting AMD-Vi as well as a motherboard that can support this feature.

In a nutshell, PCI passthrough allows you to give a virtual machine direct access to a PCI device on the host. And when I say direct, I mean direct – the guest OS communicates with the PCI device via IOMMU and the hypervisor completely ignores the card.”

SR-IOV takes PCI passthrough to the next level. Rather than granting exclusive use of the device to a single virtual machine, the device is shared or ‘partitioned’. It can be shared between multiple virtual machines, or even shared between virtual machines and the hypervisor itself. For example, a single 10Gbps NIC could be ‘passed through’ to a couple of virtual machines for direct access, and at the same time it could be attached to a vSwitch being used by other VMs with virtual NICs and vmkernel ports too. Think shared PCI passthrough.

Continue reading “An In-depth Look at SR-IOV NIC Passthrough”

Updating NIC Drivers in ESXi from the CLI

A video walk-through on updating your NIC drivers from the command line for maximum control.

There are a number of reasons you may want to update your NIC drivers and firmware. Maybe it’s just a best practice recommendation from the vendor, or perhaps you’ve run into a bug or performance problem that warrants this. Whatever the reason, keeping your NIC drivers up to date is always a good idea.

There are several ways to go about updating your drivers, but the tried and tested ‘esxcli’ method works well for small environments. It’s also a good choice to ensure you have maximum control over the process. The below video will walk you through the update process:

Remember that finding the correct NIC on the VMware Compatibility Guide is one of the most important steps in the driver update process. For help on narrowing down your exact NIC make/model based on PCI identifiers, be sure to check out this video.

Another important point to remember is that some server vendors require specific or minimum firmware levels to go along with their drivers. The firmware version listed in the compatibility guide is only the version used to test/qualify the driver. It’s not necessarily the best or only choice. VMware always recommends reaching out to your hardware vendor for the final word on driver/firmware interoperability.

Stay tuned for another video on using VMware Update Manager to create a baseline for automating the driver update process!

I hope you found this video helpful. For more instructional videos, please head over to my YouTube channel. Please feel free to leave any comments below, or on YouTube.

Identifying NICs based on PCI VID and DID

A better way to find your exact NIC model on the VMware Compatibility Guide.

If you’ve ever tried to search for a NIC in the VMware Compatibility Guide, you may have come up a much longer list of results than you expected. Many cards with similar names have subtle differences. Some have multiple hardware revisions, varying numbers or types of ports and may also be released by different OEMs. In some situations, the name of the card in the vSphere UI may not match what it truly is, adding to the confusion.

Thankfully, there is a much better way to identify your card. You can use the PCI VID, DID, SVID and SSID identifiers. The below video will walk through how to find these identifiers, as well as how to use them to find your specific card on the HCG.

Please feel free to leave any comments or questions below or on YouTube.

Properly Removing a LUN/Datastore in vSphere

Taking the time to remove LUNs correctly is worth the effort and prevents all sorts of complications.

This is admittedly a well-covered topic in both the VMware public documentation and in blogs, but I thought I’d provide my perspective on this as well in case it may help others. Unfortunately, improper LUN removal is still something I encountered all too often when I worked in GSS years back.

Having done a short stint on the VMware storage support team, I knew all too well the chaos that would ensue after improper LUN decommissioning. ESX 4.x was particularly bad when it came to handling unexpected storage loss. Often hosts would become unmanageable and reboots were the only way to recover. Today, things are quite different. VMware has made many strides in these areas, including better host resiliency in the face of APD (all paths down) events, as well as introducing PDL (permenant device loss) several years back. Despite these improvements, you still don’t want to yank storage out from under your hypervisors.

Today, I’ll be decommissioning an SSD drive from my freenas server, which will require me to go through these steps.

Update: Below is a recent (2021) video I did on the process in vSphere 7.0:

Step 1 – Evacuate!

Before you even consider nuking a LUN from your SAN, you’ll want to ensure all VMs, templates and files have been migrated off. The easiest way to do this is to navigate to the ‘Storage’ view in the Web Client, and then select the datastore in question. From there, you can click the VMs tab. If you are running 5.5 or 6.0, you may need to go to ‘Related Objects’ first, and then Virtual Machines.

lunremove-1
One VM still resides on shared-ssd0. It’ll need to be migrated off.

In my case, you can see that the datastore shared-ssd still has a VM on it that will need to be migrated. I was able to use Storage vMotion without interrupting the guest.

lunremove-2
It’s easy to forget about templates as they aren’t visible in the default datastore view. Be sure to check for them as well.

Templates do not show up in the normal view, so be sure to check specifically for these as well. Remember, you can’t migrate templates. You’ll need to convert them to VMs first, then migrate them and convert them back to templates. I didn’t care about this one, so just deleted it from disk.

Continue reading “Properly Removing a LUN/Datastore in vSphere”

Memory Usage Alarm with PCI Passthrough VMs

In the recent revamp of my lab environment, I decided to use VT-d passthrough for a pfsense VM. It has been working well with the integrated Intel igb based NICs on my management host, but I noticed that I started getting memory alarms on the VM.

vtd-mem-0

At first, I thought I may have sized the VM a bit too small with only 512MB of RAM, but when checking in the guest itself, I saw only a small amount was actually being used:

vtd-mem-2

At only 19% utilized, I’m nowhere near the 95% required to trigger this alarm. As you can see in the performance charts, all of the memory is being used by the guest from the perspective of ESXi:

vtd-mem-1

But after thinking about this for a moment, it makes sense – one of the requirements for PCI passthrough is to reserve all guest memory. For passthrough to function, the hypervisor must provide 100% consistent and reliable memory to the guest. What better way to ensure that then to reserve and pin all memory to the VM.

Although I understand why all memory is active and consumed, it’s unfortunate that vCenter doesn’t take into consideration the reason for this. In my search for an answer, I came across VMware KB 2149787. It appears that this can impact not only VMs with passthrough, but also fault tolerant VMs and VMs with latency sensitivity set to ‘high’. Unfortunately, the resolution suggested is to disable to virtual machine memory alarm at the vCenter object level. This effectively disables the alarm for everything in the inventory. I hope that at some point, vSphere will allow disabling specific alarms on a per-VM basis because few people would want to take this approach.

For now, I think the best course of action is to simply click ‘Reset to Green’, which should clear the alarm until the VM is powered off/on again. Just keep in mind that this is normal for this type of VM and that the alarm can be disregarded.

USB Passthrough and vMotion

I was recently speaking with someone about power management in a home lab environment. Their plan was to use USB passthrough to connect a UPS to a virtual machine in a vSphere cluster. From there, they could use PowerCLI scripting to gracefully power off the environment if the UPS battery got too low. This sounded like a wise plan.

Their concern was that the VM would need to be pinned to the host where the USB cable was connected and that vMotion would not be possible. To their pleasant surprise, I told them that support for vMotion of VMs with USB passthrough had been added at some point in the past and it was no longer a limitation.

When I started looking more into this feature, however, I discovered that this was not a new addition at all. In fact, this has been supported ever since USB passthrough was introduced in vSphere 4 over seven years ago. Have a look at the vSphere Administration Guide for vSphere 4 on page 105 for more information.

I had done some work with remote serial devices in the past, but I’ve never been in a situation where I needed to vMotion a VM with a USB device attached. It’s time to finally take this functionality for a test drive.

Continue reading “USB Passthrough and vMotion”