If you’ve ever gone through an NSX upgrade, you know how many components there are to upgrade. You’ve got your NSX manager appliances, control cluster, ESXi host VIBs, edges, DLR and even guest introspection appliances. In the past, every one of these needed to be upgraded independently and in the correct order.
VMware hopes to make this process a lot more straight forward with the release of the new ‘Upgrade Coordinator’ feature. This is now included as of 6.4.0 in the HTML5 client.
The aim of the upgrade coordinator is to create an upgrade plan or checklist and then to execute this in the correct order. There are many aspects of the upgrade plan than can be customized but for those looking for maximum automation – a single click upgrade option exists as well.
It is important to note that although the upgrade coordinator helps to take some of the guess work out of upgrading, there are still tasks and planning you’ll want to do ahead of time. If you haven’t already, please read my Ten Tips for a Successful NSX Upgrade post.
Today I’ll be using the upgrade coordinator to go from 6.3.3 to 6.4.0 and walk you through the process.
Upgrading NSX Manager
Although the upgrade coordinator plan covers numerous NSX components, NSX manager is not one of them. You’ll still need to use the good old manager UI upgrade process as described on page 36 of the NSX 6.4 upgrade guide. Thankfully, this is the easiest part of the upgrade.
You’ll also notice that I can use the upgrade coordinator for my lab upgrade even though I’m at a 6.3.x release currently. This is because the NSX manager is upgraded first, adding this management plane functionality to be used for the rest of the upgrade.
Note: If you are using a Cross-vCenter deployment of NSX, be sure to upgrade your primary, followed by all secondary managers before proceeding with the rest of the upgrade.
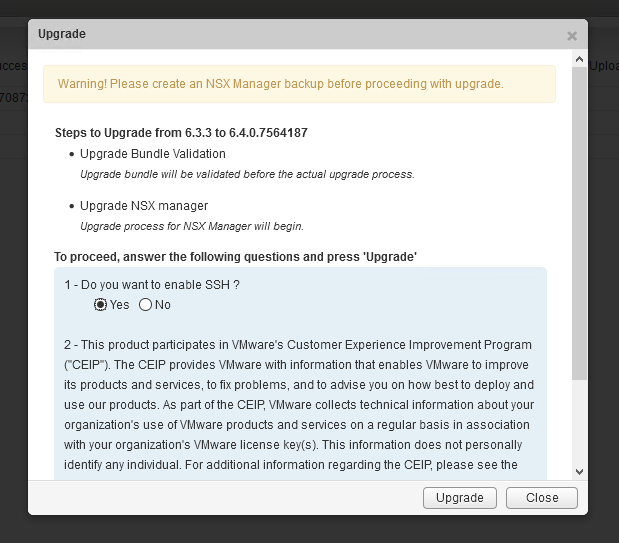
Upgrading NSX Manager to 6.4.x should look very familiar as the process really hasn’t changed. Be sure to heed the warning banner about taking a backup before proceeding. For more info on this, please see my Ten Tips for a Successful NSX Upgrade post.
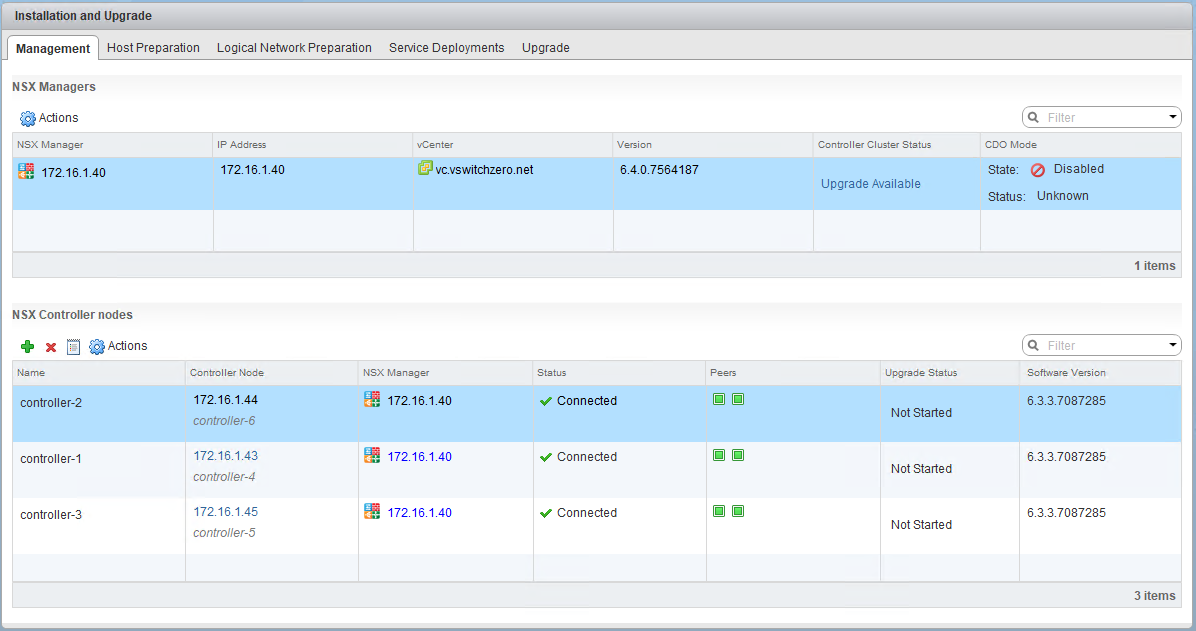
Once that process is complete, NSX manager will be at 6.4.0 with the rest of the environment at 6.3.3, including controllers, edges etc.
Using the Upgrade Coordinator
To get to the upgrade coordinator, you’ll need to visit the HTML5 Web Client. If you’ve never been there, the URL should be your vCenter Server IP or FQDN followed by /ui. Once there, you should see a ‘Networking and Security’ option in the menu.
Tip: If you don’t see a ‘Networking and Security’ link, log out of the client, clear your browser cookies/cache and log in again. Clearing your cache can also fix some initial glitches with labels not appearing as they should.
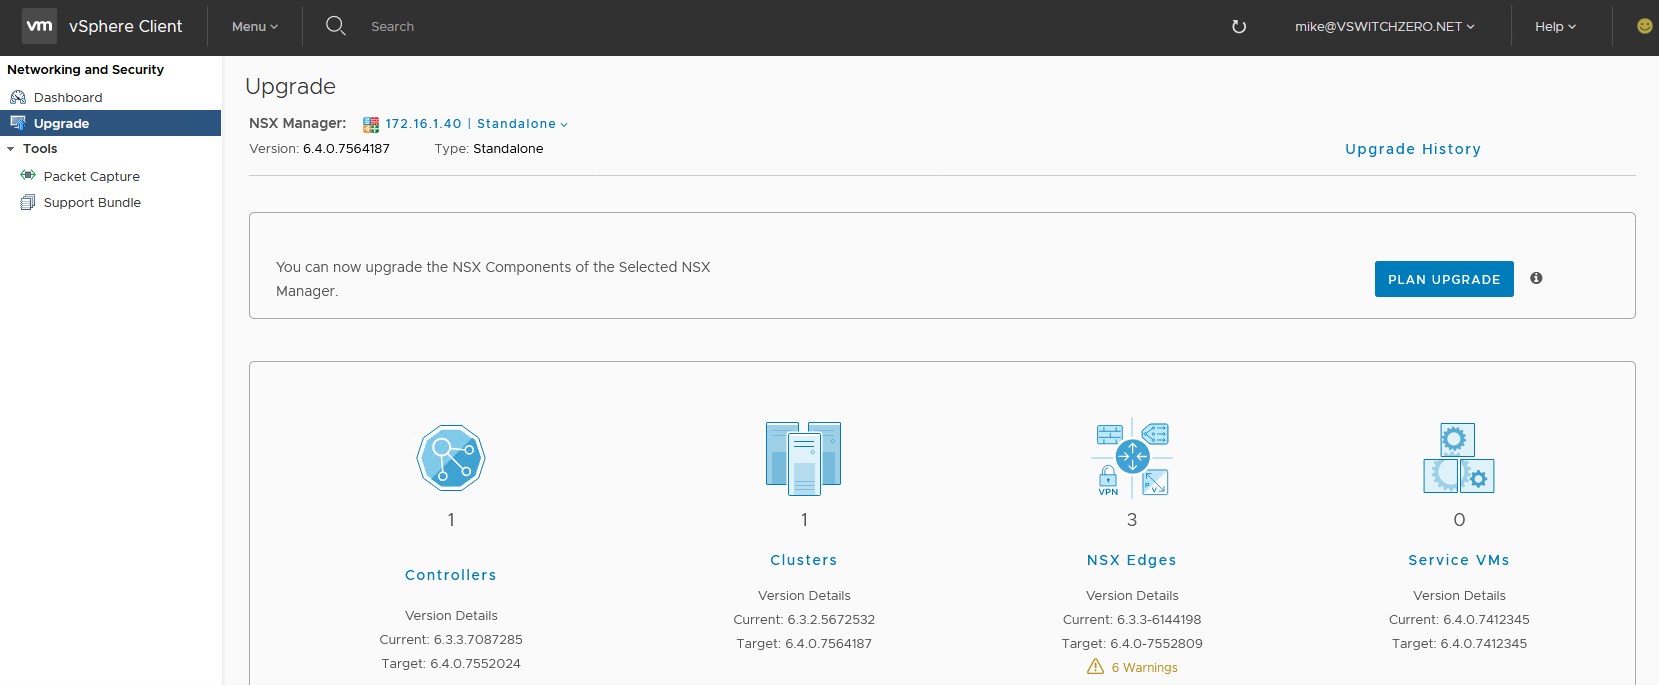
The upgrade coordinator can be found by clicking ‘Upgrade’ in the left tree view. You’ll then be greeted by a sleek looking overview page. VMware breaks the upgrade into four buckets – controllers, clusters, edges and service VMs. Keep in mind that a value of 1 for controllers simply indicates a single control cluster of three nodes. The same goes for clusters – I have a single cluster of three hosts in my lab. Service VMs would be for guest introspection if you are using 3rd party anti-virus products or the identity firewall.
If there are any specific component warnings, you’ll see them show up underneath the icon. In my case, there are six ESG warnings listed – two for each appliance. Clicking this warning will give you a summary:
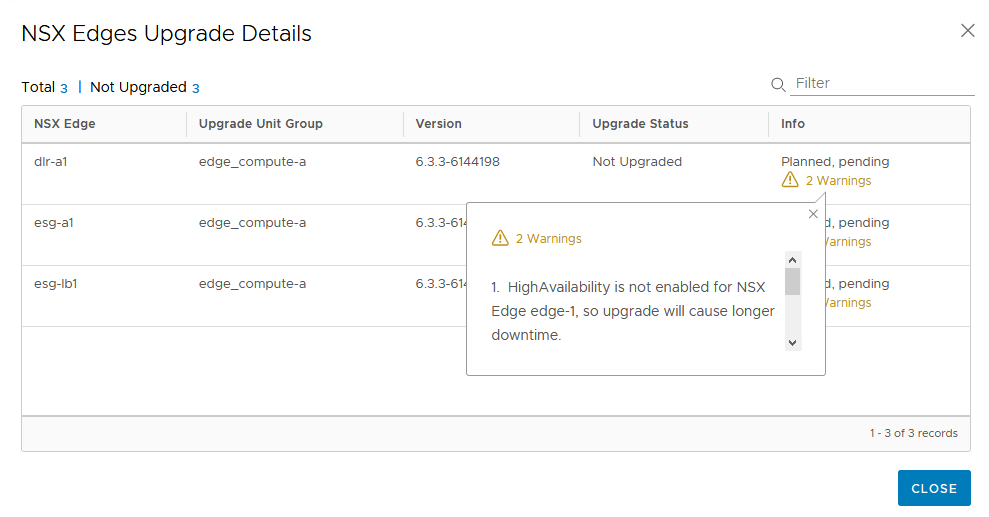
In my case, it was simply warning that the host VIBs need to be upgraded prior to the ESGs and that HA was not enabled.
All of the action happens in upgrade coordinator after clicking the ‘Plan Upgrade’ button. This will bring you to a ‘Upgrade Components’ wizard:
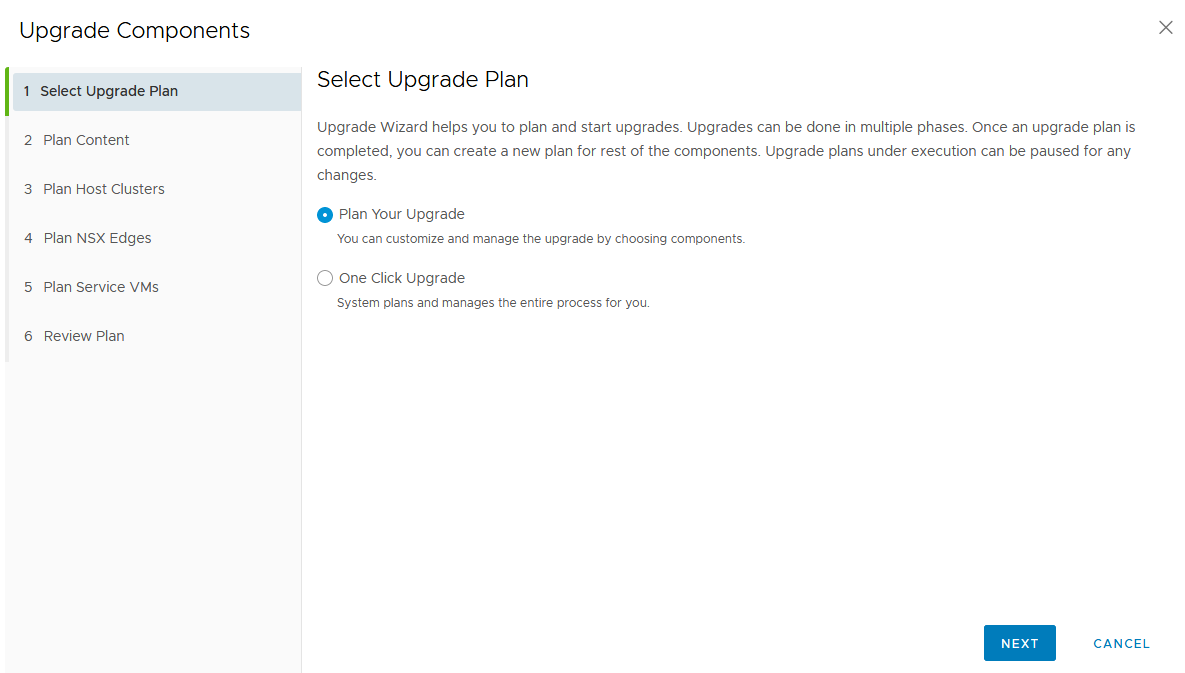
Your first order of business will be to decide whether you want to create an upgrade plan or spring for the completely automated ‘one click upgrade’. From the NSX 6.4 upgrade guide:
“When you upgrade using Upgrade Coordinator, you can select to perform a One Click Upgrade, where everything is upgraded during one upgrade session. Or you can select to Plan Your Upgrade, and customize which components are upgraded, and organize component objects into upgrade groups”
You can think of the one click upgrade as allowing NSX to select all the upgrade plan defaults and simply progress through the upgrade in the correct order. Although some people may like this, I like the idea of automation with a bit more visibility and control. As such, I’ll be customizing the upgrade plan.
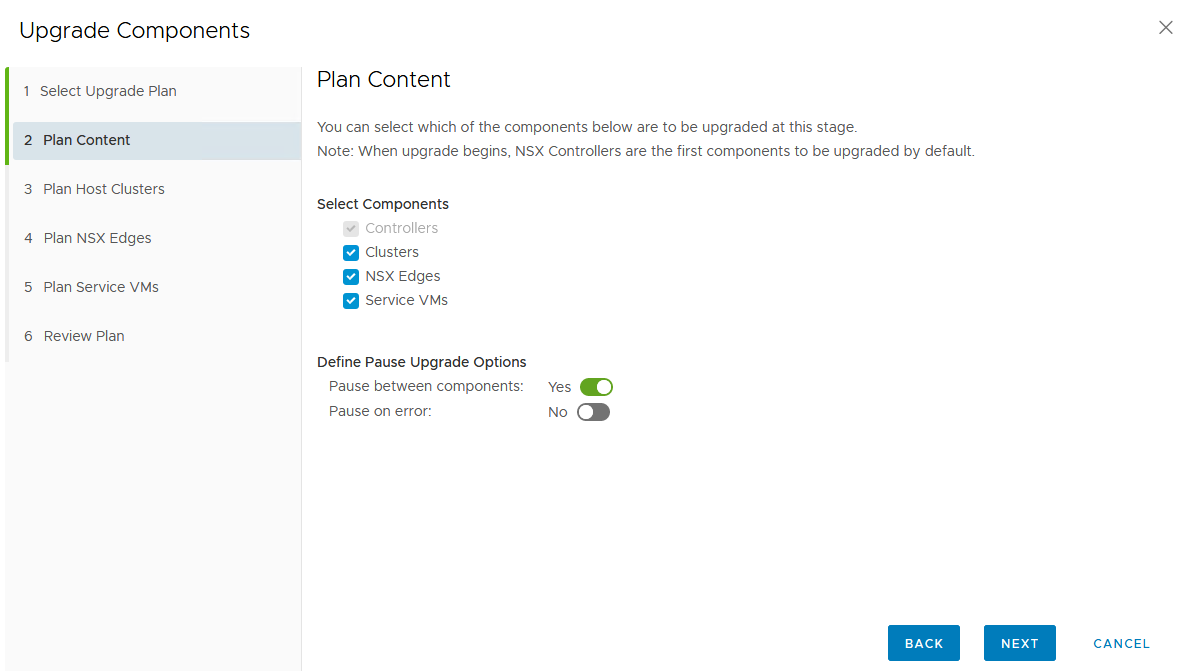
Next, you’ll be able to select which components to include as part of the plan. Most people would probably try to do everything at once, but there is no reason why you couldn’t create a plan for a partial upgrade. For example, you may want to do controllers and ESXi hosts only and then schedule a future change window for the ESGs.
You’ll also notice a couple of other options including ‘Pause between components’ and ‘Pause on error’. Pausing between components simply means that after each component type is finished, the upgrade plan will wait for user input before proceeding. I.e. you’ll need to click the resume button. Personally, I’d recommend leaving this option enabled – that way you can do some checks before resuming. In my case, I’d want to check the control cluster health when the upgrade is completed and make sure the control plane still functions correctly.
Pausing on error could be a good idea in smaller environments, but if you’ve got hundreds of hosts that need to be upgraded, you may not want to pause if only one has some trouble. You could always revisit individual hosts later.
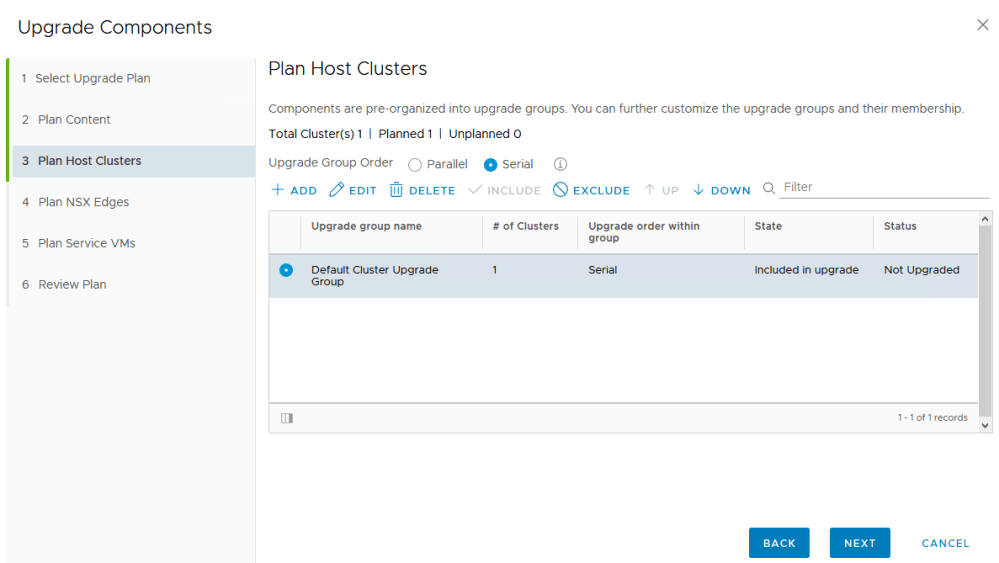
For the host clusters, you’ll find that they are lumped into a single ‘upgrade group’. In my case, I’ve got only a single cluster, but in theory you could create separate upgrade groups for multiple clusters in the environment. This gives you a lot of flexibility and allows you upgrade different groups of clusters simultaneously, or in different orders etc. From the information button on this page:
“In ‘Parallel’ mode the upgrade groups will start simultaneously, whereas in ‘Serial’ mode the upgrade groups will start one after the other. For ‘Parallel’ mode ensure that adequate resources ( disk space, computing etc. ) are available in the system.”
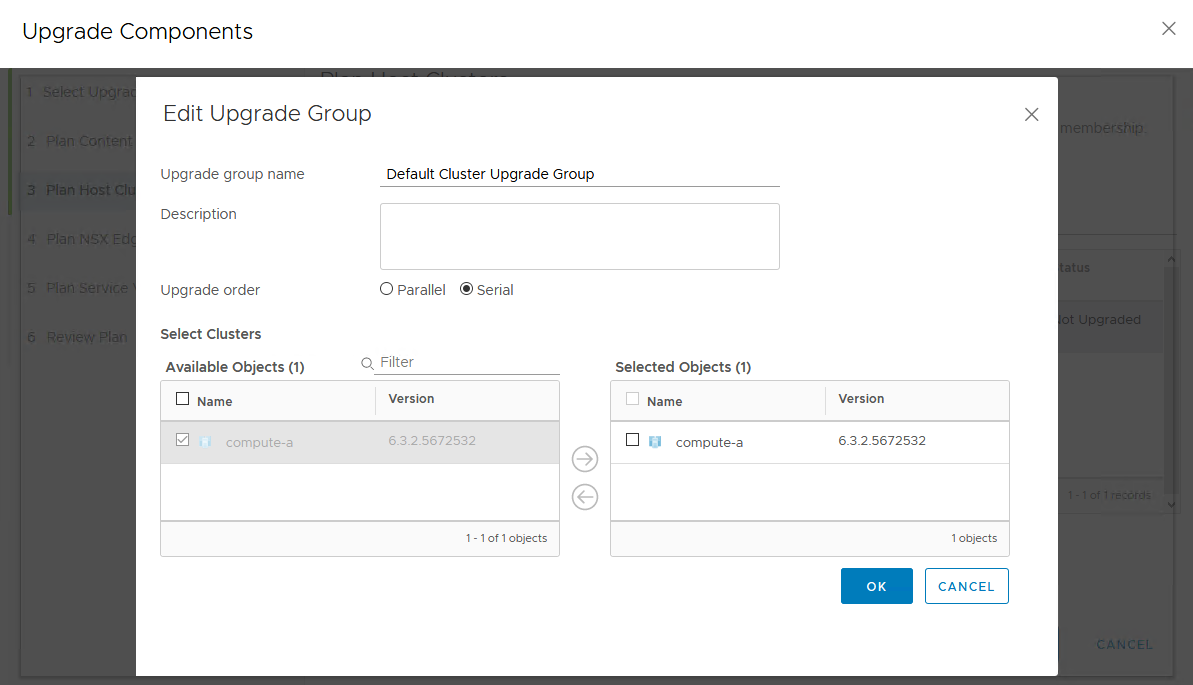
You’ll also notice that that the upgrade order can be set as serial or parallel within the group itself too. Most simple environments wouldn’t need multiple cluster groups, but there are some situations where it may be beneficial. They’ll allow you to upgrade clusters in a specific order, or control which groups of clusters can upgrade simultaneously. I’ll talk more about that in the ‘Understanding Upgrade Order and Upgrade Groups’ section below.
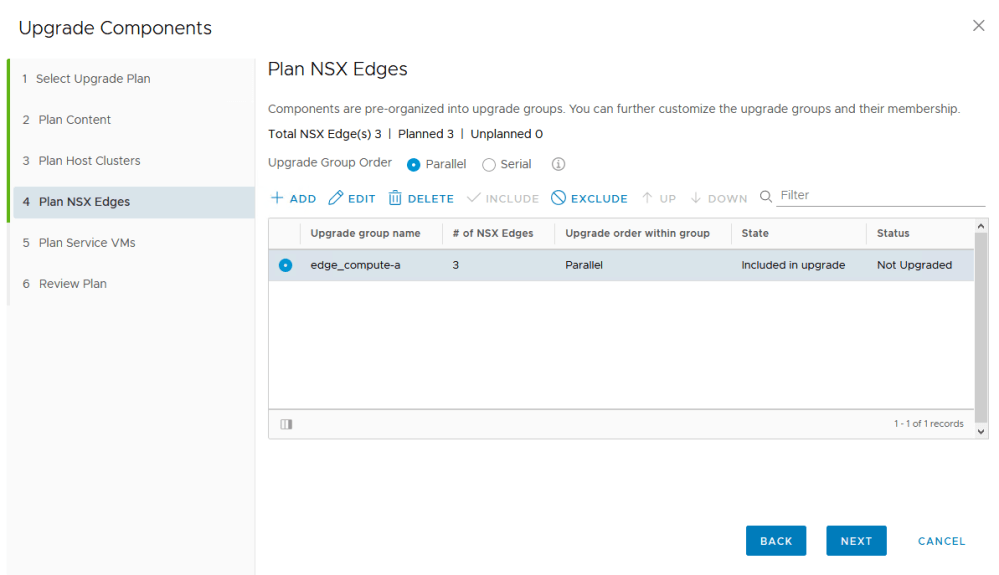
Once you’ve got your clusters ready to go, you’ll find the same options for upgrade groups and order of NSX Edges and Service VMs as well.
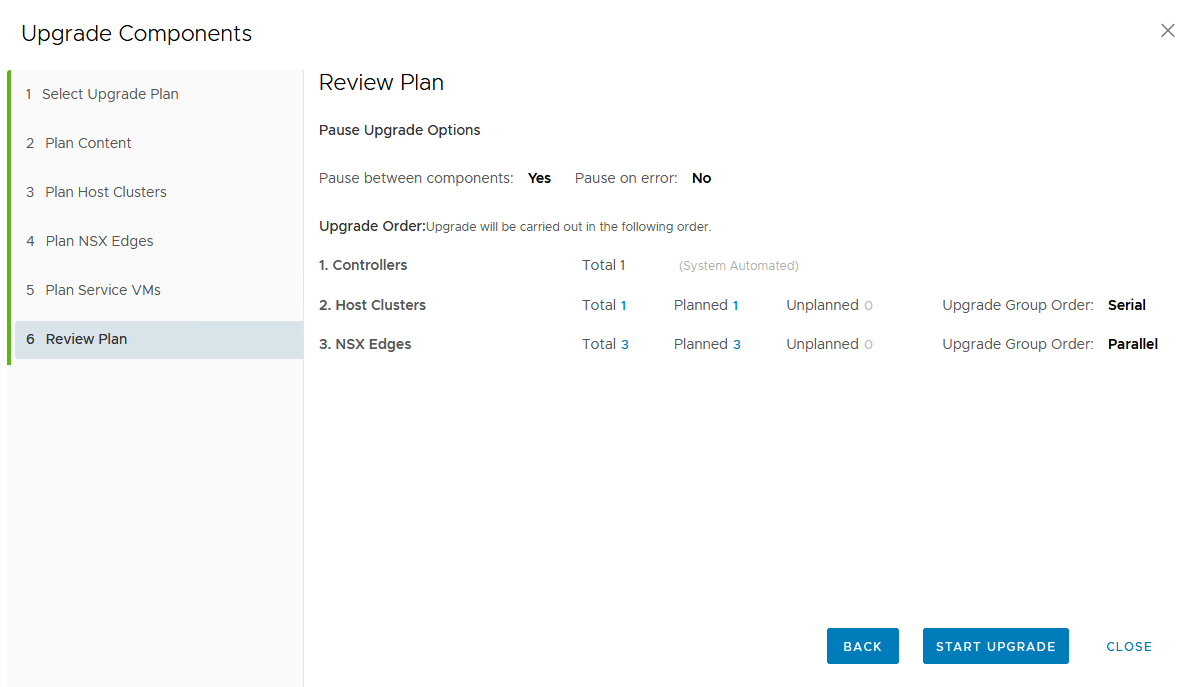
Finally, you’ll arrive at a summary page and be prompted to start the upgrade.
The Upgrade Process
Once the upgrade begins, you’ll be returned to the summary page.
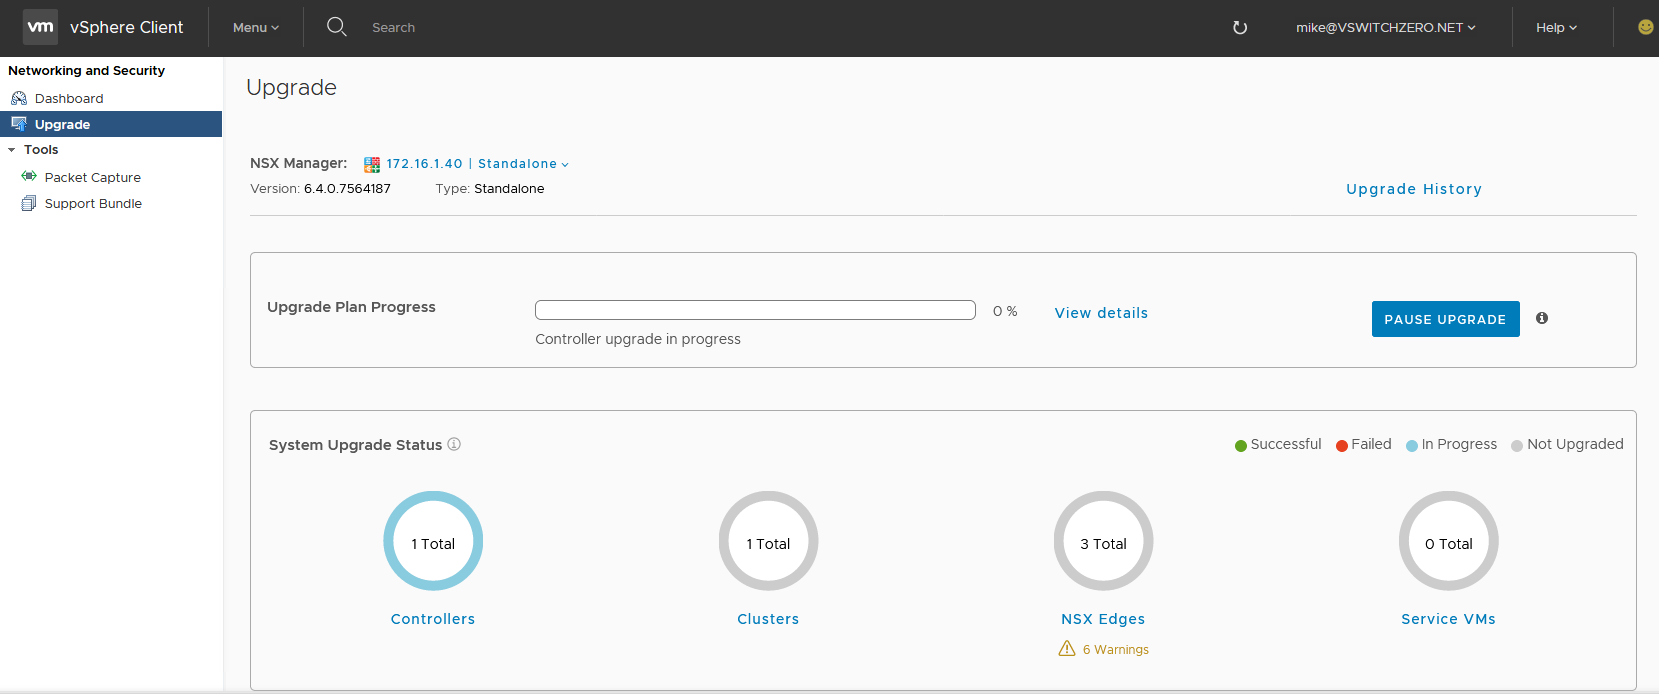
An upgrade progress bar will be displayed along with the option to pause the upgrade. The four icons associated with each NSX component will be replaced with large rings. Each ring will change color as the upgrade progresses. Blue means the upgrade of that component is in progress, green means it’s finished, grey means it hasn’t started and red means it failed.
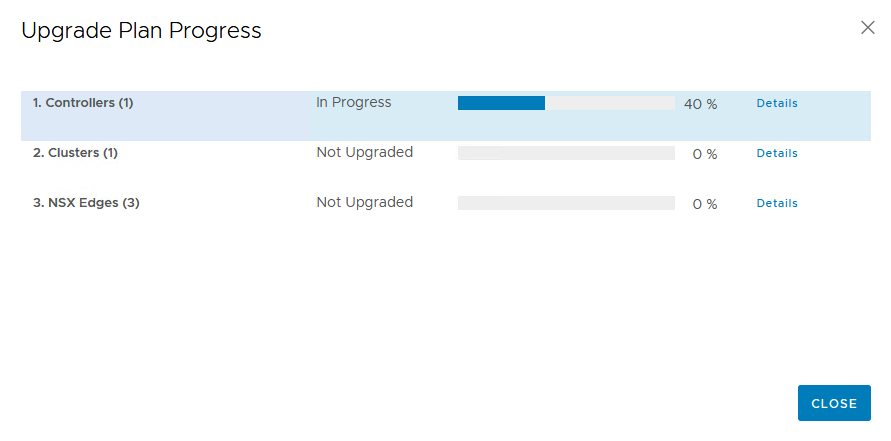
Clicking the ‘View details’ option will give you a little more information on the progress of individual components, but it really doesn’t tell you much about what’s going on behind the scenes. I found myself wanting to keep an eye on the various components in other areas of the flash based Web Client. For example, you can go to the installation tab to watch the controller upgrade steps progress:
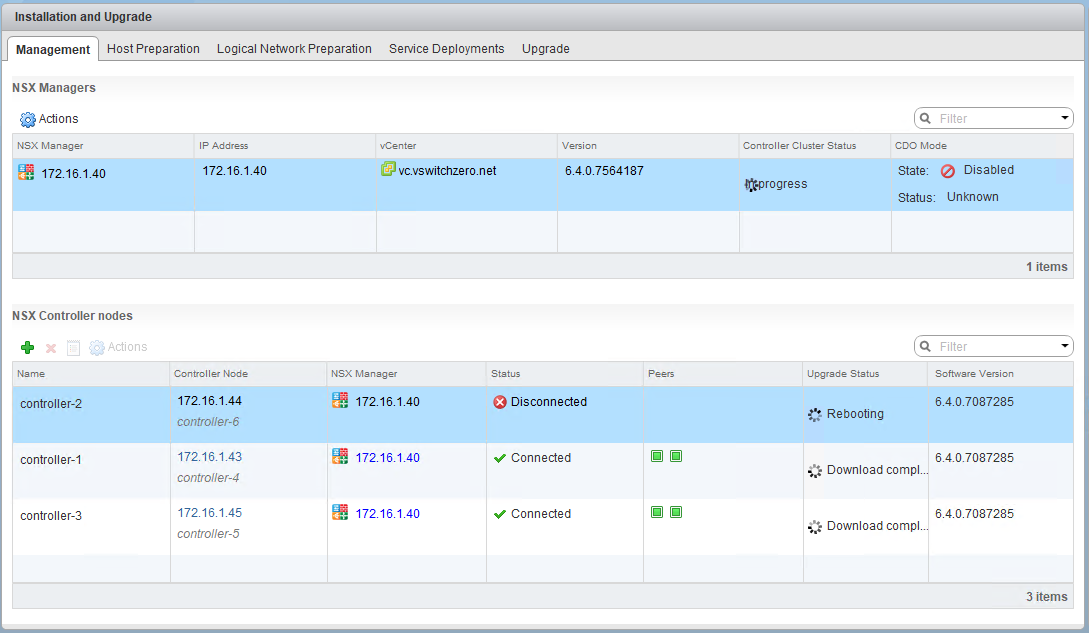
Once the controllers were finished, my upgrade plan was paused. This gave me an opportunity to validate their health and ensure everything was working correctly.
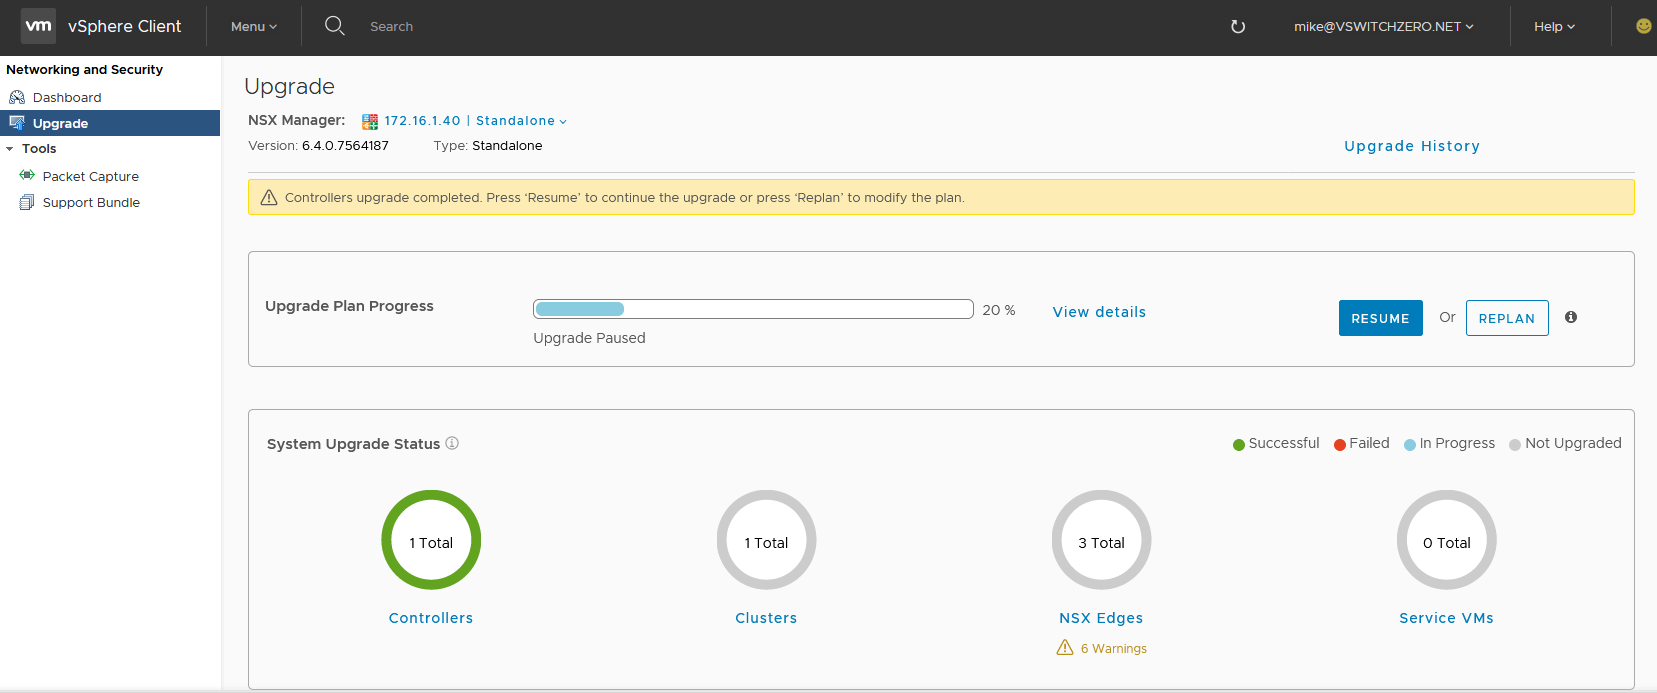
Notice the green ring indicating a successful control cluster upgrade. It’s also worth noting that at this point you could modify your plan by clicking the ‘Replan’ button. I just clicked ‘Resume’ to move on to the host clusters.
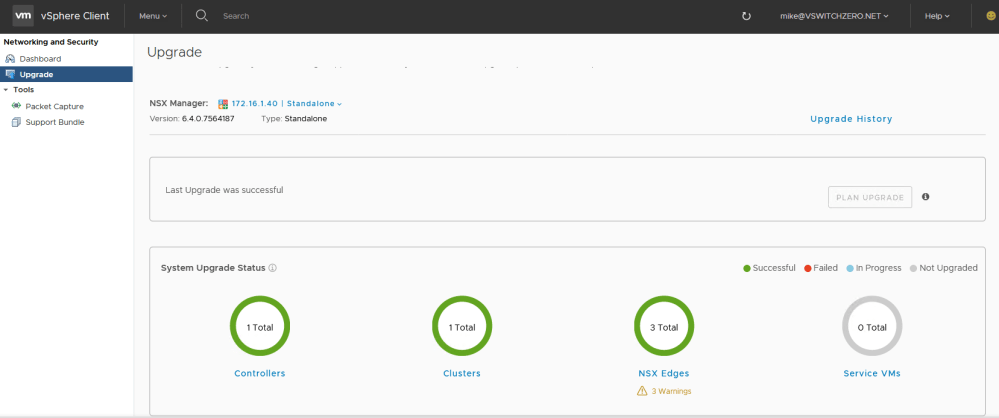
Aside from a VM that refused to evacuate from one of my hosts, the process was uneventful and all components were upgraded successfully.
Understanding Upgrade Order and Upgrade Groups
Since most of the questions I get about the upgrade coordinator are centered around groups and parallel vs. serial upgrade order, I wanted to provide some additional information on this topic.
The important thing to remember is that there is a parallel/serial upgrade order between groups, and a parallel/serial order of the objects within the groups themselves. You can use a combination of these settings to achieve different upgrade goals. Here are a couple of hypothetical scenarios that help to illustrate the use of these options:
Scenario 1: You have two production clusters and two development clusters. You want each cluster to upgrade simultaneously.
In the first scenario, even though you have several clusters, you only need a single upgrade group. You’d simply ensure all four clusters are in the group and then set the group’s upgrade order to parallel. When the upgrade plan executes, all four clusters will upgrade simultaneously. In this case, it makes no difference if parallel/serial is selected for ‘upgrade group order’ as there is only a single group.
Scenario 2: You have two production clusters and two development clusters. You do not want the two production clusters upgrading simultaneously, but one after another. The two development clusters can upgrade simultaneously.
The second scenario will require more than one upgrade group. You’d create two – one for prod and one for development. The production upgrade group would be set to serial, and the development group would be set to parallel. Remember, this is just the order set inside each group’s settings. Once the two groups are configured, you’d then set the upgrade group order to parallel. This way each upgrade group would be upgrading based on their individual order settings at the same time.
Scenario 3: You have one production cluster and one development cluster. You want development to be upgraded before production.
This scenario would also need two upgrade groups. You can’t order clusters within groups, so it’ll be necessary to add each cluster to their own group. You would then order the groups, putting development above production using the up and down buttons. It’ll also be necessary to set the upgrade group order to serial. That way, once development is completed, it’ll move on to production.
Scenario 4: You want to upgrade all ESGs except for a special load balancer ESG that will be done manually later on.
There are a couple of ways you could achieve this. You could either remove the load balancer ESG from the single upgrade group, or you could add it to a new upgrade group and use the exclude button to ensure that group is not upgraded.
Conclusion
The upgrade coordinator was a welcome addition to NSX 6.4. It provides a single dashboard to coordinate all upgrade activities and helps to ensure everything is done in the correct order. Just remember that it’s still very important to plan your upgrades. This tool can help, but there are still many other things you should do to ensure your success.
I personally like the upgrade coordinator, but I still prefer doing things the old fashioned way. I think you get a bit more control and get a better view of what’s happening behind the scenes. If you feel the same way, you’ll be happy to know that the legacy upgrade methods still work perfectly fine in 6.4. That said, having both options is a win-win.

Pausing on error could be a good idea in smaller environments, but if you’ve got hundreds of hosts that need to be upgraded, you may not want to pause if only one has some trouble. ***You could always revisit individual hosts later.*** When you say revisit individual host later, how can we skip this/these host/hosts.
Hi Rohan,
I don’t think there is any way to skip individual hosts using the upgrade coordinator, unfortunately. All of the upgrade plans are configured at the cluster level. If there is a host that couldn’t be upgraded – say due to an error entering maintenance mode – you’d need to resolve that issue using the vSphere Client before the upgrade could proceed.