VXLAN overlay technology is part of what makes software defined networking possible. By encapsulating full frames into UDP datagrams, L2 networks can be stretched across all manners of routed topologies. This breaks down the barriers of physical networking and builds the foundation for the software defined datacenter.
VXLAN or Virtual Extensible LAN is an IETF standard documented in RFC 7348. L2 over routed topologies is made possible by encapsulating entire L2 frames into UDP datagrams. About 50 bytes of outer header data is added to every L2 frame because of this, meaning that for every frame sent on a VXLAN network, both an encapsulation and de-encapsulation task must be performed. This is usually performed by ESXi hosts in software but can sometimes be offloaded to physical network adapters as well.
In a perfect world, this would be done without any performance impact whatsoever. The reality, however, is that software defined wizardry often does have a small performance penalty associated with it. This is unavoidable, but that doesn’t mean there isn’t anything that can be done to help to minimize this cost.
If you’ve been doing some performance testing, you’ve probably noticed that VMware doesn’t post statements like “You can expect X number of Gbps on a VXLAN network”. This is because there are simply too many variables to consider. Everything from NIC type, switches, drivers, firmware, offloading features, CPU count and frequency can play a role here. All these factors must be considered. From my personal experience, I can say that there is a range – albeit a somewhat wide one – of what I’d consider normal. On a modern 10Gbps system, you can generally expect more than 4Gbps but less than 7Gbps with a 1500 MTU. If your NIC supports VXLAN offloading, this can sometimes be higher than 8Gbps. I don’t think I’ve ever seen a system achieve line-rate throughput on a VXLAN backed network with a 1500 MTU regardless of the offloading features employed.
What if we can reduce the amount of encapsulation and de-encapsulation that is so taxing on our hypervisors? Today I’m going to take an in-depth look at just this – using an 8900 MTU to reduce packet rates and increase throughput. The results may surprise you!
The Test
To run through these tests today, I’ll be using my trusty old Supermicro X8SIL systems running Lynnfield based Xeon 3440s. Yeah, I know – I’m way overdue for a home lab upgrade. None the less, old-generation systems present an interesting angle to this testing. It can help to illustrate the role CPU performance has in VXLAN encapsulation.
For 10Gbps networking, these hosts are running Solarflare SFN5122F adapters with the latest firmware and the sfc ESXi driver. These are older NICs that don’t support VXLAN offloading but perform well and have been very solid in my home lab.
For guests, I’m using some Debian Linux 7.4 VMs with a 3.2 kernel. They are minimal install VMs with four vCPUs, VMXNET3 adapters and maxed out RX rings. To benchmark, I used iperf 2.0.5 – a favorite that I use for network performance testing. The benefit of using iperf over other methods – like file copies – is that it does not need to write or read anything from disk for the transfer. It simply sends/receives TCP data to/from memory as quickly as it can.
You’ll notice that I did both single stream tests as well as tests with four simultaneous streams. Additional streams can sometimes result in better throughput if the CPUs can keep up.
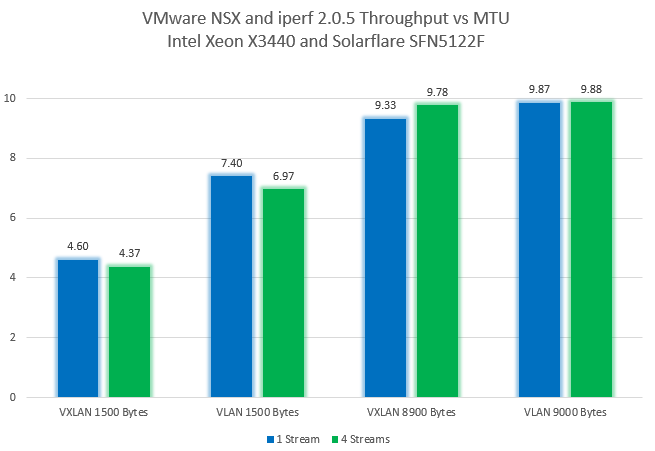
VXLAN – 1500 MTU
To begin, let’s look at standard sized 1500 byte frames:
root@iperf-test-a1:~# iperf -c 172.17.1.21 -i 2 -P 1
------------------------------------------------------------
Client connecting to 172.17.1.21, TCP port 5001
TCP window size: 21.0 KByte (default)
------------------------------------------------------------
[ 3] local 172.17.1.20 port 34115 connected with 172.17.1.21 port 5001
[ ID] Interval Transfer Bandwidth
[ 3] 0.0- 2.0 sec 1.06 GBytes 4.53 Gbits/sec
[ 3] 2.0- 4.0 sec 1.07 GBytes 4.61 Gbits/sec
[ 3] 4.0- 6.0 sec 1.08 GBytes 4.63 Gbits/sec
[ 3] 6.0- 8.0 sec 1.07 GBytes 4.60 Gbits/sec
[ 3] 8.0-10.0 sec 1.08 GBytes 4.64 Gbits/sec
[ 3] 0.0-10.0 sec 5.36 GBytes 4.60 Gbits/sec
At first glance, these results don’t look very good and fall at the very low end of what I’d consider the normal range for VXLAN performance. What’s important to remember here is that we’re dealing with nine-year-old hosts and a CPU architecture that’s many generations old. Since all encapsulation activities here are done in software, these old CPUs show their age here.
root@iperf-test-a1:~# iperf -c 172.17.1.21 -i 2 -P 4 |grep SUM
[SUM] 0.0- 2.0 sec 1.03 GBytes 4.41 Gbits/sec
[SUM] 2.0- 4.0 sec 1.02 GBytes 4.40 Gbits/sec
[SUM] 4.0- 6.0 sec 1.01 GBytes 4.32 Gbits/sec
[SUM] 6.0- 8.0 sec 1.00 GBytes 4.31 Gbits/sec
[SUM] 8.0-10.0 sec 1.03 GBytes 4.42 Gbits/sec
[SUM] 0.0-10.0 sec 5.09 GBytes 4.37 Gbits/sec
Adding the additional simultaneous TCP streams did nothing to help performance here. In fact, it made things worse. Additional sockets merely added to the overhead needed to be processed.
VLAN – 1500 MTU
Now for comparison purposes, let’s look at VLAN backed performance with a 1500 MTU.
root@iperf-test-a3:~# iperf -c 172.16.1.74 -i 2 -P 1
------------------------------------------------------------
Client connecting to 172.16.1.74, TCP port 5001
TCP window size: 21.0 KByte (default)
------------------------------------------------------------
[ 3] local 172.16.1.73 port 47989 connected with 172.16.1.74 port 5001
[ ID] Interval Transfer Bandwidth
[ 3] 0.0- 2.0 sec 1.72 GBytes 7.38 Gbits/sec
[ 3] 2.0- 4.0 sec 1.73 GBytes 7.44 Gbits/sec
[ 3] 4.0- 6.0 sec 1.73 GBytes 7.41 Gbits/sec
[ 3] 6.0- 8.0 sec 1.73 GBytes 7.43 Gbits/sec
[ 3] 0.0-10.0 sec 8.62 GBytes 7.40 Gbits/sec
The result is almost twice that of what was achieved on a VXLAN backed network. But it’s important to remember that there is so much less going on behind the scenes here. A frame is a frame and there is no encapsulation or VTEP communication needed. None the less, these old hosts still fall short of being able to achieve line rate with a 1500 MTU.
root@iperf-test-a3:~# iperf -c 172.16.1.74 -i 2 -P 4 |grep SUM
[SUM] 0.0- 2.0 sec 1.63 GBytes 6.98 Gbits/sec
[SUM] 2.0- 4.0 sec 1.63 GBytes 7.01 Gbits/sec
[SUM] 4.0- 6.0 sec 1.63 GBytes 7.01 Gbits/sec
[SUM] 6.0- 8.0 sec 1.61 GBytes 6.92 Gbits/sec
[SUM] 0.0-10.0 sec 8.11 GBytes 6.97 Gbits/sec
Again, extra parallel streams do not help performance, and we’re stuck at around 7Gbps.
Increasing MTU
Now we’ll repeat the tests with an 8900 MTU. You may be wondering why 8900 and not 9000, which is the traditional jumbo frame size used. Again, it all comes down to the VXLAN UDP header adding additional overhead. Since the distributed switch does not support an MTU larger than 9000 bytes – 9050 bytes would be needed for a 9000 byte frame – we have to limit guests to no more than about 8950 bytes. Anything larger would be dropped by the virtual switch. VMware recommends using a rounded 8900 bytes, so this is what I’m using for these tests.
On my Debian Linux guests, a simple addition to /etc/network/interfaces did the trick.
root@iperf-test-a1:~# cat /etc/network/interfaces
# This file describes the network interfaces available on your system
# and how to activate them. For more information, see interfaces(5).
<snip>
allow-hotplug eth0
iface eth0 inet static
address 172.17.1.20
netmask 255.255.255.0
gateway 172.17.1.1
mtu 8900
Beginning with a single stream:
root@iperf-test-a1:~# iperf -c 172.17.1.21 -i 2 -P 1
------------------------------------------------------------
Client connecting to 172.17.1.21, TCP port 5001
TCP window size: 93.2 KByte (default)
------------------------------------------------------------
[ 3] local 172.17.1.20 port 34134 connected with 172.17.1.21 port 5001
[ ID] Interval Transfer Bandwidth
[ 3] 0.0- 2.0 sec 2.22 GBytes 9.53 Gbits/sec
[ 3] 2.0- 4.0 sec 2.20 GBytes 9.43 Gbits/sec
[ 3] 4.0- 6.0 sec 2.14 GBytes 9.19 Gbits/sec
[ 3] 6.0- 8.0 sec 2.13 GBytes 9.16 Gbits/sec
[ 3] 8.0-10.0 sec 2.18 GBytes 9.35 Gbits/sec
[ 3] 0.0-10.0 sec 10.9 GBytes 9.33 Gbits/sec
What a tremendous difference. Even with these old hosts, we’re now able to achieve nearly line rate with an 8900 MTU.
root@iperf-test-a1:~# iperf -c 172.17.1.21 -i 2 -P 4 |grep SUM
[SUM] 0.0- 2.0 sec 2.27 GBytes 9.76 Gbits/sec
[SUM] 2.0- 4.0 sec 2.29 GBytes 9.82 Gbits/sec
[SUM] 4.0- 6.0 sec 2.26 GBytes 9.70 Gbits/sec
[SUM] 6.0- 8.0 sec 2.28 GBytes 9.81 Gbits/sec
[SUM] 0.0-10.0 sec 11.4 GBytes 9.78 Gbits/sec
Reducing the packet rate also allows a very impressive 9.78Gbps with four parallel streams. You really can’t do any better than this on a 10Gbps NIC. This is pretty much the fabled line rate that everyone strives for.
Let’s repeat the VLAN backed tests, but this time with a 9000 MTU:
root@iperf-test-a3:~# iperf -c 172.16.1.74 -i 2 -P 1
------------------------------------------------------------
Client connecting to 172.16.1.74, TCP port 5001
TCP window size: 94.2 KByte (default)
------------------------------------------------------------
[ 3] local 172.16.1.73 port 47990 connected with 172.16.1.74 port 5001
[ ID] Interval Transfer Bandwidth
[ 3] 0.0- 2.0 sec 2.29 GBytes 9.85 Gbits/sec
[ 3] 2.0- 4.0 sec 2.30 GBytes 9.86 Gbits/sec
[ 3] 4.0- 6.0 sec 2.30 GBytes 9.87 Gbits/sec
[ 3] 6.0- 8.0 sec 2.30 GBytes 9.88 Gbits/sec
[ 3] 8.0-10.0 sec 2.30 GBytes 9.87 Gbits/sec
[ 3] 0.0-10.0 sec 11.5 GBytes 9.87 Gbits/sec
Not surprisingly, we’ve reached line rate without any difficulty. Below is a chart summarizing all the results:
VXLAN Offloading
VXLAN offloading can provide a substantial performance improvement. This is assuming that it works properly, which I’m sorry to say is quite often not the case. When it does, I’ve seen it provide anywhere from a 10% to 25% improvement in throughput. In other cases, I’ve seen it be detrimental to performance, or conflict with other offloading features. At worst, packets go missing. If you do decide to enable VXLAN offloading, be sure your drivers and firmware are up-to-date and that you do thorough testing before declaring your increased bandwidth a success.
To give you an idea of the throughput improvements possible, I did a few tests on a more modern HP blade system. These blades are running Broadcom based adapters with the latest bnx2x drivers and firmware.
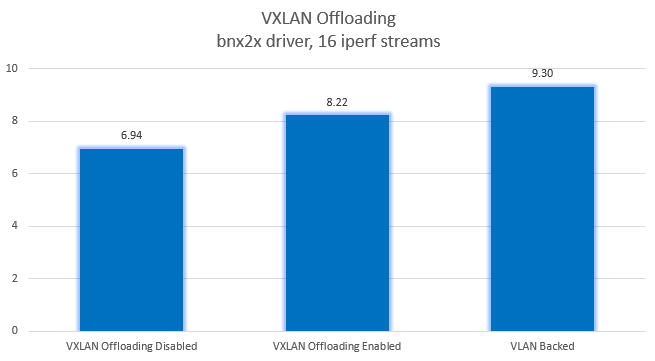
In this case, VXLAN offloading can get you much closer to line rate throughput. With these Broadcom adapters, it provides about a 20% improvement when using a 1500 MTU. Despite this improvement, better throughput could still be achieved by using an 8900 MTU and not having to worry about VXLAN offloading.
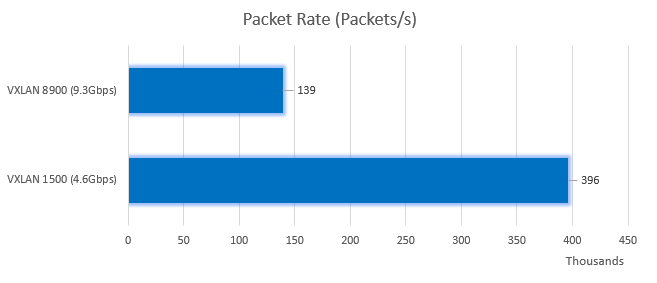
Packet Rate
The big difference between a 1500 MTU and an 8900 or 9000 MTU is the resulting packet rate that needs to be processed by the hypervisor – or encapsulated in the case of VXLAN. People will generally only look at bandwidth or throughput metrics when performance testing. Although this is the ultimate measurement of ‘moving data’, it is not necessarily the best measurement of stress or headroom on a VXLAN network. I’d argue that packet rate is a more important metric when it comes to measuring the stress a transfer is exerting. This is what really matters when it comes to VXLAN and anything else that must do header inspection – like the NSX distributed firewall for example.
With an 8900 MTU, we’re quite literally able to send six times the data with the same amount of encapsulation and header processing that we would normally need to do. That means that a 9.78Gbps transfer at 8900 MTU would equal the same number of frames per second as a 1.65Gbps transfer at 1500 MTU.
Let’s look at what this means for our two VXLAN tests done earlier at 1500 and 8900 MTU:

As you can see from the above esxtop output, with a 1500 MTU and 4.7Gbps we were receiving almost 400,000 frames every second. Without VXLAN offloading, this host had to de-encapsulate this number of frames every second in software. It’s a lot of work to do.
Looking at the same transfer at an 8900 MTU, we see a dramatic difference:

At twice the throughput level, we’re de-encapsulating only one third the number of frames here. Much less processing for the hypervisor to have to do.
Requirements for an 8900 MTU
Unfortunately, using jumbo frames in your guests isn’t quite as simple as just changing the VMXNET3 adapter’s MTU. There are several places in the environment where the appropriate MTU will need to be configured.
- All Physical switches, routers, and other devices in the datapath for VTEP to VTEP communication must be set to 9000 (or larger) MTU.
- The distributed switch must be set to 9000 MTU.
- Your VXLAN host preparation must be set to 9000 MTU. This results in your VTEPs and DVS being set to this value also. This isn’t easy to change after the fact, unfortunately.
- Your ESGs and DLR interfaces will need to be set to a 9000 MTU if you want to allow east/west and north/south routing of large frames. Technically your VXLAN connected ESG/DLR interfaces can also be set to 8900 but this doesn’t matter as your guests shouldn’t send anything larger than 8900 bytes.
- And finally, the guest VMs will need to be set to an MTU of 8900. It’s not necessary to change all guests – only the ones you want using large frames.
If you are already running NSX in your environment, chances are the physical network is already configured for a 9K MTU. People will generally use 9K as opposed to 1600, which is the minimum recommended MTU for NSX.
If you are doing a greenfield deployment of NSX, I’d highly recommend configuring everything for a 9K MTU even if you don’t plan to use large frames initially. It’s much easier to configure it early on than trying to change it after the fact.
Conclusion
Performance can always be a touchy subject. Sure, VXLAN has some overhead but do your applications really need 9.8Gbps of bandwidth on tap? I’d argue that the vast majority of workloads would never feel the difference between VLAN and VXLAN throughput levels with a 1500 MTU. For those that genuinely need the extra throughput, large frames may be a viable option for you and will pretty much guarantee line rate throughput. If I can achieve it on these old hosts, I’m certain that your modern hardware can as well.

Very good study!!! After read this, I will set 9000 MTU on all new vSphere-NSX deployments!!