One of the best features of the DFW is the flexibility it provides in using objects in rules instead of IP addresses or groups of IP addresses. For example, for a source/destination you could use a VM in the inventory, a cluster or a security group containing all sorts of dynamic criteria. Underneath all of this, however, NSX needs to be able to inspect segment and packet headers to enforce the rules. These headers are only going to contain identifying information like IP addresses and TCP ports so it must keep track of which object is associated with which IP address or addresses. And because of the ‘distributed’ nature of the DFW, each of these translations must ultimately reach the ESXi hosts for enforcement.
There are three ways in which NSX can associate IPs with VMs – VMware Tools reporting, ARP snooping and DHCP snooping. The latter two are disabled by default.
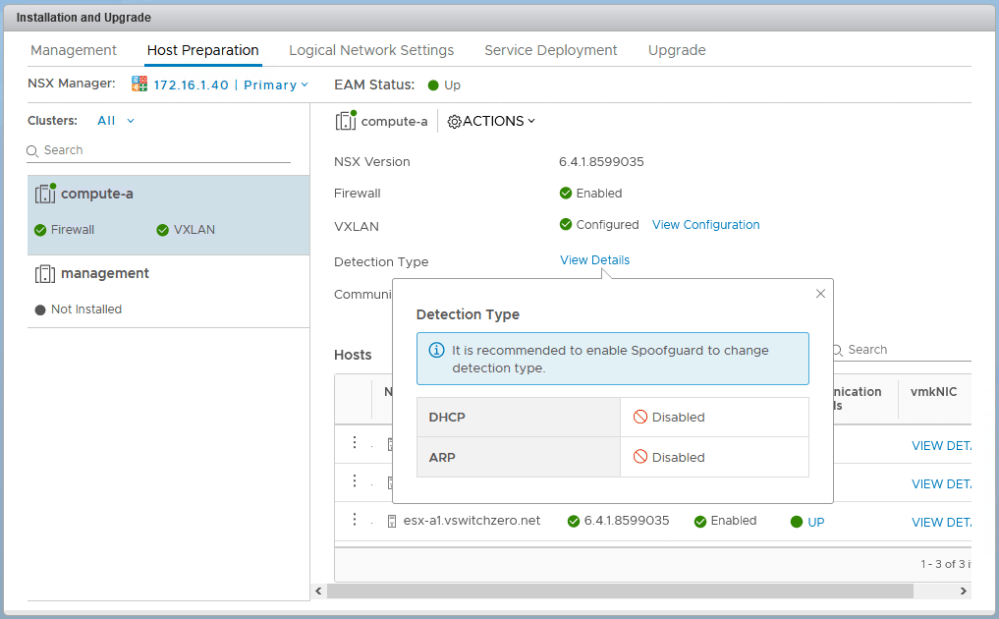
In recent builds of NSX, you can see the detection types enabled in the host preparation section. As can be seen above, DHCP and ARP snooping are disabled by default leaving only VMware Tools address reporting.
VMware Tools Reporting
As you have probably noticed, VMs with VMware Tools installed conveniently report their configured IP addresses in the vSphere Client.
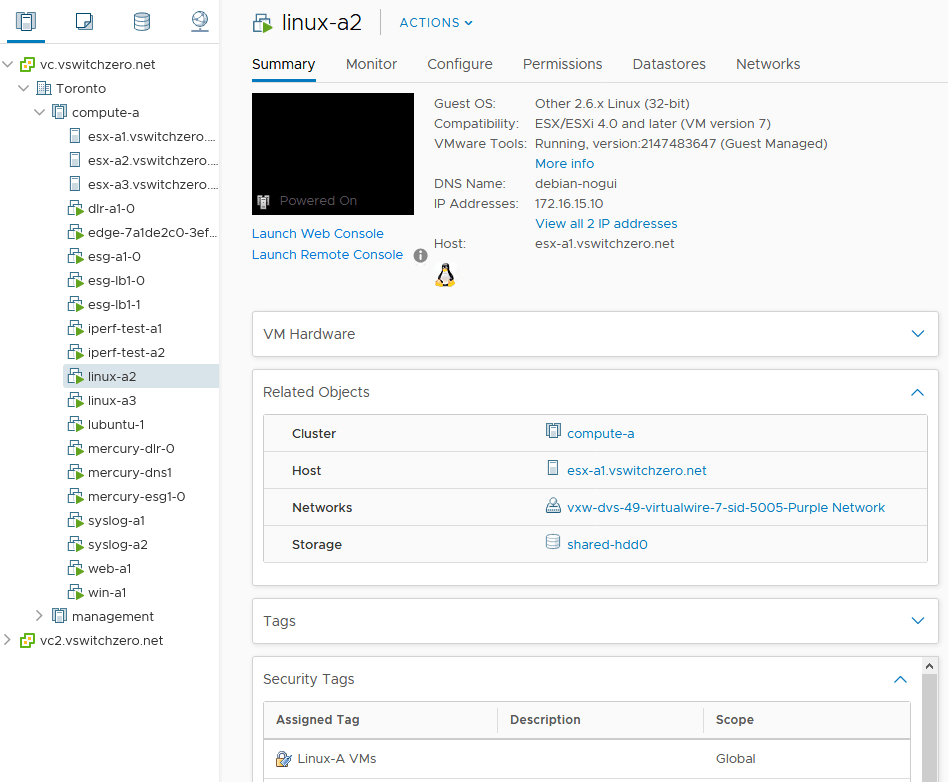
Virtual machine linux-a2 is reporting 172.16.15.10 as well as an IPv6 address on the summary tab in the vSphere Client. This information comes from VMware Tools and will be recorded in the NSX Manager database. Whenever we use a rule that references the VM linux-a2, NSX will look up this IP address for rule enforcement. These rules could contain a parent object, like the cluster compute-a, or a security group, a logical switch – anything that linux-a2 belongs to.
Thankfully there are very few use cases where VMware Tools installation is not feasible. Today, the vast majority of Linux distros include open-vm-tools or it can easily be installed. Companies providing virtual appliances also realize the importance of tools and will ensure it’s included out of the box. On the flip-side, however, you’d be relying on a single method for IP discovery. Things can be missed, or VMware Tools can fail for whatever reason. That’s why it can be a good idea to configure an alternate method of IP discovery – especially in security sensitive environments.
ARP Snooping
ARP snooping can be very effective for IP detection as all VMs communicating at layer-3 will have to ARP out at some point. They’ll either need to ARP for their default gateway’s MAC address, or possibly for other VMs in the same subnet. Either way, the VM won’t be communicating to any IPs on the network until it starts building up its ARP cache. ESXi will intercept these packets and keep track of the IPs. These IPs are then handed back to NSX manager for building a database table of translations.

ARP snooping can be enabled in the spoofguard section of the NSX UI. You’ll need to enable spoofguard to change it as the warning suggests. In recent builds you can specify the maximum number of ARP IPs discoverable per VM as well.
The only unfortunate thing about ARP snooping is that that in many releases of NSX, having more than one IP address per vNIC can cause problems. If you are running a 6.4.x or later release, you should be okay. I’d recommend looking at VMware KB 2147907 for more information on this issue.
DHCP Snooping
DHCP snooping is about what you’d expect. Like the snooping done for ARP packets, ESXi can snoop for DHCP acknowledgement segments received at VM vNIC ports. Because the ethernet frame is unicast, and contains the IP address lease in the payload, it’s safe to assume this is the IP address the VM will begin using. Obviously, the DHCP snooping discovery method has one large disadvantage – it only works if VMs are configured for DHCP. It works well in VDI environments, but it can also be a good fallback method for extra insurance.
Confirming IP Translations
I’d recommend having a read of NSX Troubleshooting Scenario 5 for more information on IP discovery, but let’s look at a quick example here. As you can see below, rule number 1011 is a simple allow ICMP rule for a single VM object. The VM linux-a1 has an object moref identifier of vm-742.
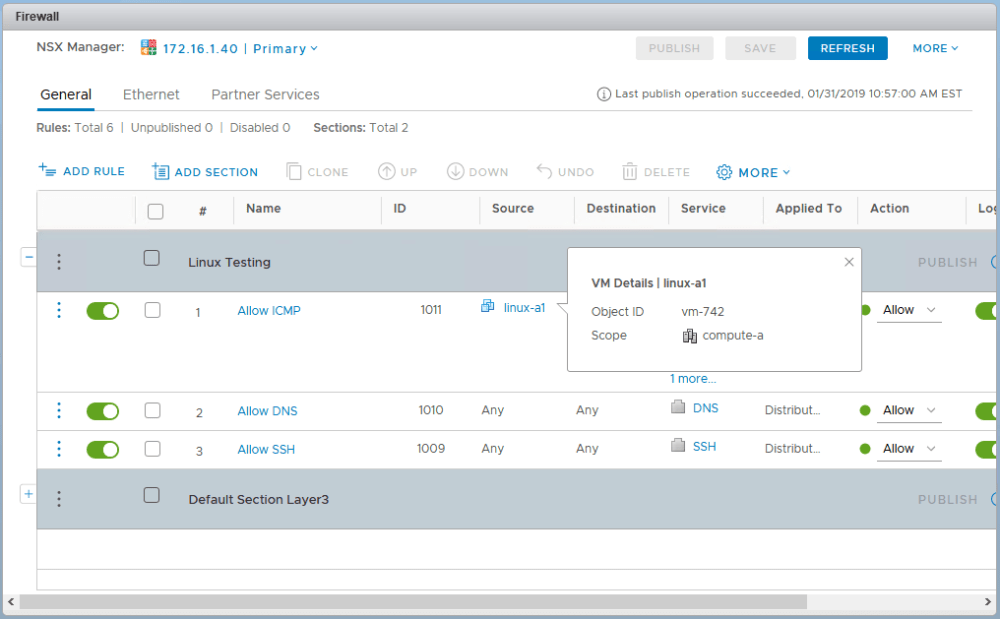
For NSX to be able to enforce this rule it needs to figure out what the IP address is for vm-742. Because this firewall rule is ‘Applied To’ the entire DFW, it then needs to push this discovered IP address out to every single cluster that has the DFW enabled.
The VM linux-a1 is currently on host esx-a1, so I’ll SSH in there to run some commands. In theory, I could log into any host using the DFW, not just esx-a1.
First, I’ll figure out the DFW filter name for the linux-a1 virtual machine. Because the DFW can be thought of as a separate firewall for every single virtual NIC in the environment, we’ll need to look at a specific filter to collect information. Again, I’ll use linux-a1 for convenience, but every VM in the cluster will have the same ruleset and IP translations stored.
[root@esx-a1:~] summarize-dvfilter
<snip>
world 69574 vmm0:linux-a1 vcUuid:'50 2a 34 86 4a 8a b5 f7-1b 01 a0 24 8a b7 2b c2'
 port 67108882 linux-a1.eth0
  vNic slot 2
  name: nic-69574-eth0-vmware-sfw.2
 agentName: vmware-sfw
   state: IOChain Attached
   vmState: Attached
   failurePolicy: failClosed
   slowPathID: 2
   filter source: Dynamic Filter Creation
<snip>
Remember – slot 2 is always the DFW in the summarize dvfilter output. As seen above, the filter name for the linux-a1 VM is nic-69574-eth0-vmware-sfw.2. We’ll be using this moving forward.
Next, we’ll take a quick look at the ruleset that was pushed down to esx-a1. We do this using the vsipioctl getrules command:
[root@esx-a1:~] vsipioctl getrules -f nic-69574-eth0-vmware-sfw.2
ruleset domain-c41 {
  # Filter rules
  rule 1011 at 1 inout protocol icmp icmptype 5 from addrset ip-vm-742 to any accept with log;
  rule 1011 at 2 inout protocol icmp icmptype 3 from addrset ip-vm-742 to any accept with log;
  rule 1011 at 3 inout protocol icmp icmptype 0 from addrset ip-vm-742 to any accept with log;
  rule 1011 at 4 inout protocol icmp icmptype 8 from addrset ip-vm-742 to any accept with log;
  rule 1010 at 5 inout protocol tcp from any to any port 53 accept with log;
  rule 1009 at 6 inout protocol tcp from any to any port 22 accept with log;
  rule 1003 at 7 inout protocol ipv6-icmp icmptype 136 from any to any accept;
  rule 1003 at 8 inout protocol ipv6-icmp icmptype 135 from any to any accept;
  rule 1002 at 9 inout protocol udp from any to any port 67 accept;
  rule 1002 at 10 inout protocol udp from any to any port 68 accept;
  rule 1001 at 11 inout protocol any from any to any accept with log;
}
ruleset domain-c41_L2 {
  # Filter rules
  rule 1004 at 1 inout ethertype any stateless from any to any accept;
}
Notice that rule 1011 references an object and not the translated IP address. In this case, it’s ip-vm-742. To determine if this ESXi host can actually enforce this rule correctly, we’ll need to check ip-vm-742 to see if it contains the discovered IP addresses we expect. We can use the vsipioctl getaddrsets command with the -a parameter:
[root@esx-a1:~] vsipioctl getaddrsets -a ip-vm-742 -f nic-69574-eth0-vmware-sfw.2
addrset ip-vm-742 {
ip 172.17.1.98,
ip fe80::250:56ff:feaa:8133,
}
As you can see above, NSX successfully discovered the IPv4 and IPv6 address associated with the linux-a1 virtual machine. Since VMware Tools is up and running, this was discovered using that method.
Alternatives to IP Discovery
If you have a VM that can’t have its IP discovered via Tools, or perhaps you can’t use ARP/DHCP snooping because of the issue in VMware KB 2147907, there are other options. The easiest workaround is to use good old fashioned IP sets instead.
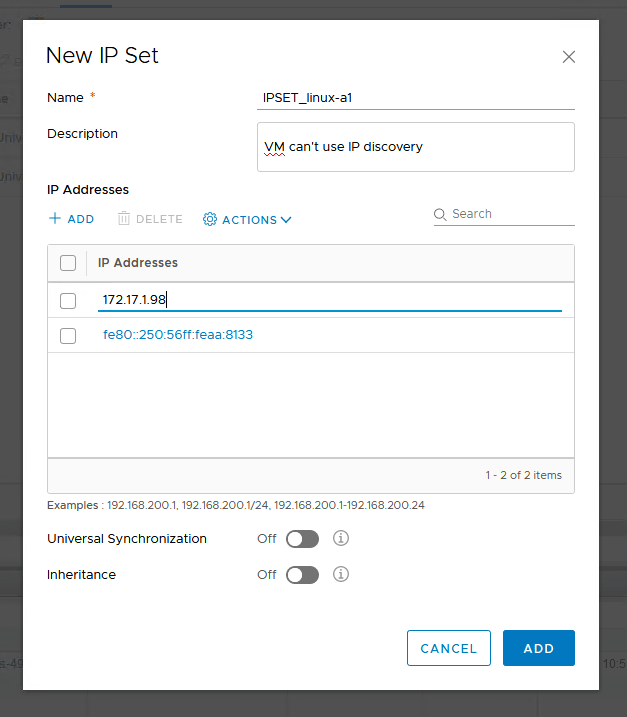
Although there is the obvious disadvantage of having to update the IP set every time the VM’s IP address changes, you can use this IP set in the same way you would a VM object. It can be added to security groups and rules just like a VM object can.
Doing this for your entire environment would probably not be reasonable, but for the odd one-off VMs that can’t run tools, this may be a good workaround.
Conclusion
I hope this post helps to clarify NSX IP discovery. If you have any questions or comments, please feel free to leave them below or on Twitter (@vswitchzero).

Hi Mike,
Great article.. just wondering if you know the order of acceptance if all three options are enabled? For example, VMware tools, Arp Snooping and DHCP Snooping are all enabled?
Hi Chris, I’m pretty sure that VMware Tools will always be used first if it is available. I’m honestly not too sure about the other two but will try to find out.