MikroTik CRS309 Configuration – Part 1

The first in a multi-part series on configuring the CRS309 for a VMware home lab. Part 1 covers 802.1q VLAN trunking.

This will be the first of several posts on configuring the new MikroTik CRS309-1G-8S+IN for use in a VMware home lab. Today’s first post will introduce MikroTik’s RouterOS and will focus on VLAN trunking. Please note that although this was written for the CRS309, this should be applicable to all CRS3xx series switches, including the popular CRS317.

RouterOS vs SwOS

MikroTik’s RouterOS firmware that comes pre-loaded on the switch is very feature rich with loads of L3 functionality. It has everything from BGP/OSPF, to firewalling, NAT, DHCP services – you name it. It’s a multi-purpose firmware that was originally created for MikroTik’s routers. Today, it works with many of their other products, including switches, and wireless devices. Because of this, it feels more like router firmware adapted for use with switches as opposed to something designed especially for them. Configuring RouterOS on the CRS309/CRS317 can be challenging and there is a learning curve to overcome – even for those with a lot of networking experience. Things get easier when you learn the terminology and understand what does and does not apply to a switch within RouterOS.

The CRS309 also includes ‘SwOS’ – a straight-forward L2 firmware that is designed especially for their switches. I found SwOS’s UI to be very intuitive and a lot more like what I’d expect to see on a switch. If you are not looking to use any of the advanced L3 features that RouterOS offers, I’d highly recommend using SwOS instead. There is no need to flash back and forth from RouterOS to SwOS and vice-versa. Both firmware packages coexist in the flash memory and you can easily switch back and forth as required.

Although SwOS could suffice for my needs in the home lab, I’m not one to shy away from a challenge and really want to be able to take advantage of some of the L3 features. If I could get them to work, I could potentially retire one or two virtual machines that I currently use for routing and firewalling.

802.1q VLAN Trunking

One of the first things I tried to do with the CRS309 was get a bunch of VLANs created and all the interfaces configured as 802.1q VLAN trunk ports. This is probably the most common VMware home lab requirement with 10Gbps networking. Each host will have a limited number of interfaces, so VLAN trunks are critical to separate out the various services.

When you get into the RouterOS WebFig interface, you’ll find several places where VLANs can be configured. My first attempt was under ‘Switch’ and ‘VLANs’ – sounds logical enough:

crs309-vlans1

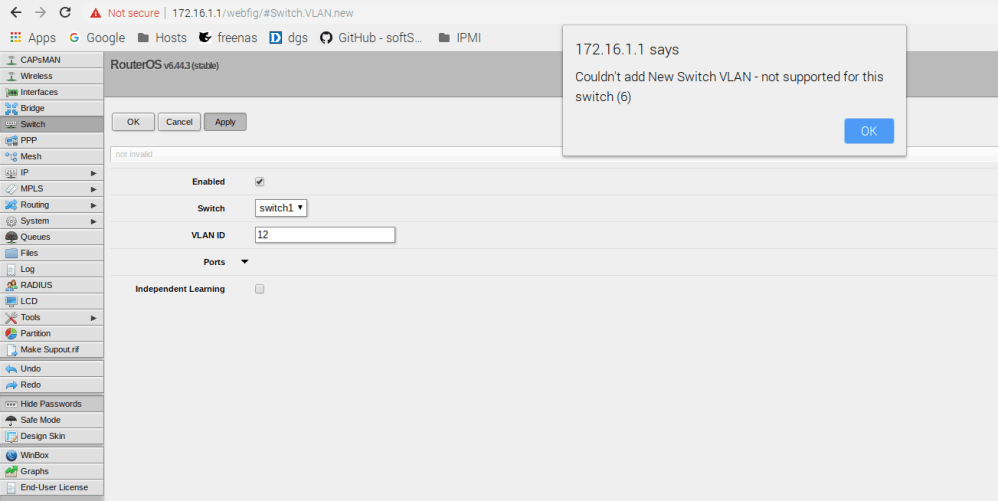
But clearly this doesn’t work. There is also a section for VLANs under ‘Interfaces’, but this is for VLAN interface creation, which I’ll get into later. One of the first things to keep in mind with RouterOS is that a lot of the configuration relating to the switch – including VLAN configuration – is done in the ‘Bridge’ section – not the Switch section.

From the CRS3xx series manual:

“Since RouterOS v6.41 bridges provide VLAN aware Layer2 forwarding and VLAN tag modifications within the bridge. This set of features makes bridge operation more like a traditional Ethernet switch and allows to overcome Spanning Tree compatibility issues compared to configuration when tunnel-like VLAN interfaces are bridged..”

Another important thing to remember is that any VLAN related configuration you do in the bridge does not come into effect until an option called vlan-filtering is set to ‘yes’ for the bridge itself.

Continue reading “MikroTik CRS309 Configuration – Part 1”

MikroTik CRS309-1G-8S+IN

Initial impressions on a very energy efficient 10Gbps SFP+ switch and an excellent choice for a VMware home lab!

A little over a year ago I decided to get my lab 10Gbps capable. At the time, the Quanta LB6M seemed like the obvious choice with 24x SFP+ interfaces, several 1Gbps copper interfaces and a price tag of only $300 USD. It worked well in my lab, but as you can imagine, older 10Gbps technology is far from energy efficient. The switch idled at close to 130W, which wasn’t far off from all three of my compute hosts put together. It was also very loud with seven high-RPM 40mm fans. Even when at their lowest setting, these chassis and PSU fans were painfully loud. There is no doubt that this switch is more at home in a datacenter than a home lab. It wasn’t long before I started keeping an eye out for newer offerings based on more efficient and cost-effective technologies. That’s when I came across MikroTik’s latest 3xx series “Cloud Router Switches”.

The MikroTik CRS309-1G-8S+IN

MikroTik is a technology firm based out of Latvia and is well known for their unique networking products. They sell a range of switches, routers, wireless products and even their caseless RouterBOARD systems for those interested in doing custom routers.

I was originally looking to purchase the CRS309’s bigger brother – the CRS317. Feature-wise they are very similar, but the CRS317 doubles up on SFP+ and 1Gbps copper interfaces. With two SFP+ ports on each of my four ESXi hosts, the CRS309’s eight SFP+ ports seemed to be sufficient. The feature that sold me on the CRS309 as opposed to the CRS317, however, was its completely passive/fanless design. The CRS317’s fans only spin up if the unit gets hot, but I liked the simplicity of a completely fanless solution.

Feature-wise, the CRS309 is a pretty impressive switch. Its state of the art Marvell Prestera 98DX8208 switching chip (98DX8216 in the CRS317) is what makes this such an efficient unit. The 98DX8208 is highly integrated and is good for line rate forwarding on all the SFP+ ports. It also includes an integrated dual core 32-bit ARM based processor running 800MHz. You can find more information on the Marvell Prestera here. The flash storage is a pretty spartan 16MB, but this seems to be plenty for the RouterOS and SwOS firmware to coexist on the switch simultaneously. I’ll get more into the CRS309’s software in a future post.

From a L2 perspective, it’s a perfectly capable unit. It can do line-rate L1 and L2 forwarding at about 81,000Mbps aggregate, or 162,000 Mbps full-duplex. This is because the 98DX8208 has an ASIC switching component and all L2 forwarding is done in hardware. The L3 features of the switch, however, are all done in software and must be processed by the integrated ARM CPU cores. Based on MikroTik’s test results, about 2.5Gbps can be expected when traffic has to go through the CPU. Your mileage may vary though depending on the features you use. This may not sound great, but in a home lab environment, you don’t really need high throughput for inter-VLAN routing or other L3 features. I’m most interested in having 10Gbps line rate throughput for host-to-host VSAN traffic, iSCSI, vMotion etc. If you really do need faster routing, you could always spin up a VyOS VM and use your hypervisor’s horsepower for that purpose. Given the $269 USD price of the unit, I think it’s awesome that you get a full suite of L3 features even if throughput is somewhat limited.

You can find more information and the specifications of the CRS309 at Mikrotik’s site.

Continue reading “MikroTik CRS309-1G-8S+IN”