
Welcome to the third installment of my Building a Retro Gaming Rig series. Today, I’ll be taking a look at another motherboard and CPU combo that I picked up from eBay on a bit of a whim.
In Part 1 of this series, I took an in-depth look at some Slot-1 gear, including the popular Asus P2B and some CPU options. As I was thinking ahead in the build, I got frustrated with the lack of simple and classic-looking ATX tower cases available these days. Everything looks far too modern, has too much bling or is just plain gigantic. Used tower cases from twenty years ago are all yellowed pretty badly and just look bad. On the other hand, there are lots of small, simple and affordable micro ATX cases available.
Micro ATX – or mATX – motherboards were actually pretty uncommon twenty-odd years ago. PC tower cases were pretty large and in those days people really did use lots of expansion cards and needed the extra space. Only very compact systems and OEMs seemed to use the mATX form factor at that time. Many of these boards were heavily integrated, lacked expansion slots and stuck you with some pretty weak onboard video solutions.
MSI MS-6160 Motherboard
In an interesting twist, I came across an MSI MS-6160 mATX board based on the Intel 440LX chipset that seemed to tick many of the right boxes. The combo included a Celeron 400MHz processor and 512MB of SDRAM for only $35 CDN.
Although the 440LX is an older 66MHz FSB platform designed for the earlier Slot-1 Pentium II, MSI outfitted this board with a socket 370 socket for first generation Mendocino based Celeron processors instead. When this board was released, there were no Pentium II or other processors based on the socket 370 socket. Because of this, there is no doubt that this board was designed especially for the Mendocino Celeron.
What makes this board interesting to me is the following:
- It’s an mATX based motherboard with very small dimensions. Even to today’s standards, this is a narrow mATX board.
- It has an AGP slot for plenty of video card options.
- It has an ISA slot for legacy sound cards, which is very important to me.
- It supports socket 370 Mendocino based Celeron processors, which are great performers compared to the Pentium II processors of that era.
On the flip-side, there are some cons as well:
- It’s got an onboard audio solution that may not be ideal for a retro gaming rig.
- It’s limited to Mendocino based Celeron processors. Because of the 66MHz FSB, newer Pentium III based socket 370 processors will not work in this system.
- Because it was built for Celeron processors, it’s a pretty no-frills system with no extra fan headers, no hardware monitoring and only the basics.
Despite the cons, the pros make this a very attractive board for a retro build – especially with it’s small dimensions and mATX form factor.

You can tell that the board was a modified layout based on Slot-1. The CPU socket is positioned where the slot would normally be, and the northbridge is centered toward the top of the board. This layout makes CPU heatsink compatibility pretty poor because of the socket’s location but thankfully these Celerons are so cool running that nothing large is necessary.
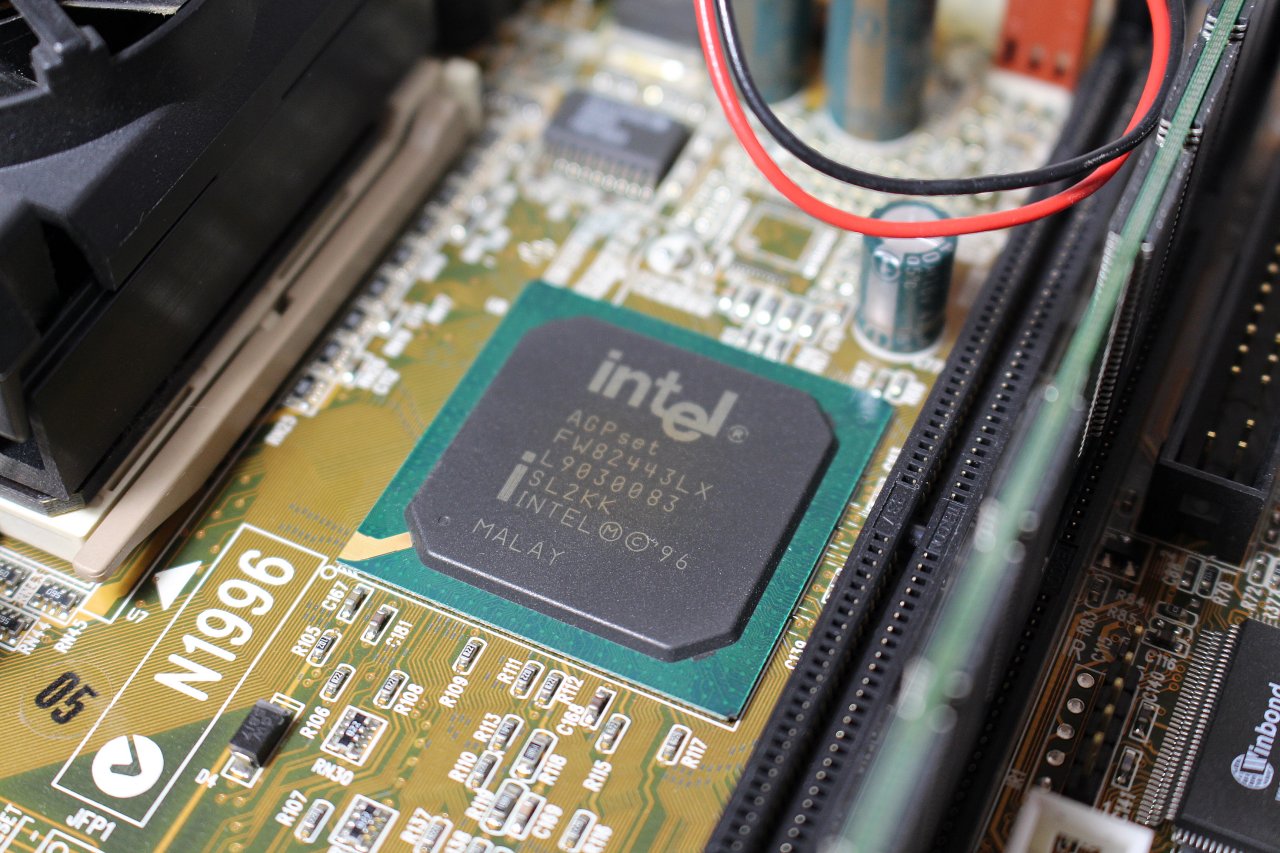
The popular Intel 440LX chipset came out in 1997. It was the second Pentium II chipset released by Intel after the initial 440FX. The 440FX was essentially just a reused Pentium Pro chipset, whereas the 440LX was built especially for the Pentium II and new Celeron. What really set the 440LX chipset apart was that it was Intel’s first to support SDRAM memory.

Many mATX boards of this era had some pitiful onboard video solutions and rarely included an AGP slot. What’s also great is the inclusion of an ISA slot as well. The bottom slot in the system is a combination ISA/PCI slot meaning that either a PCI or ISA card can be used in this position but not both at the same time.
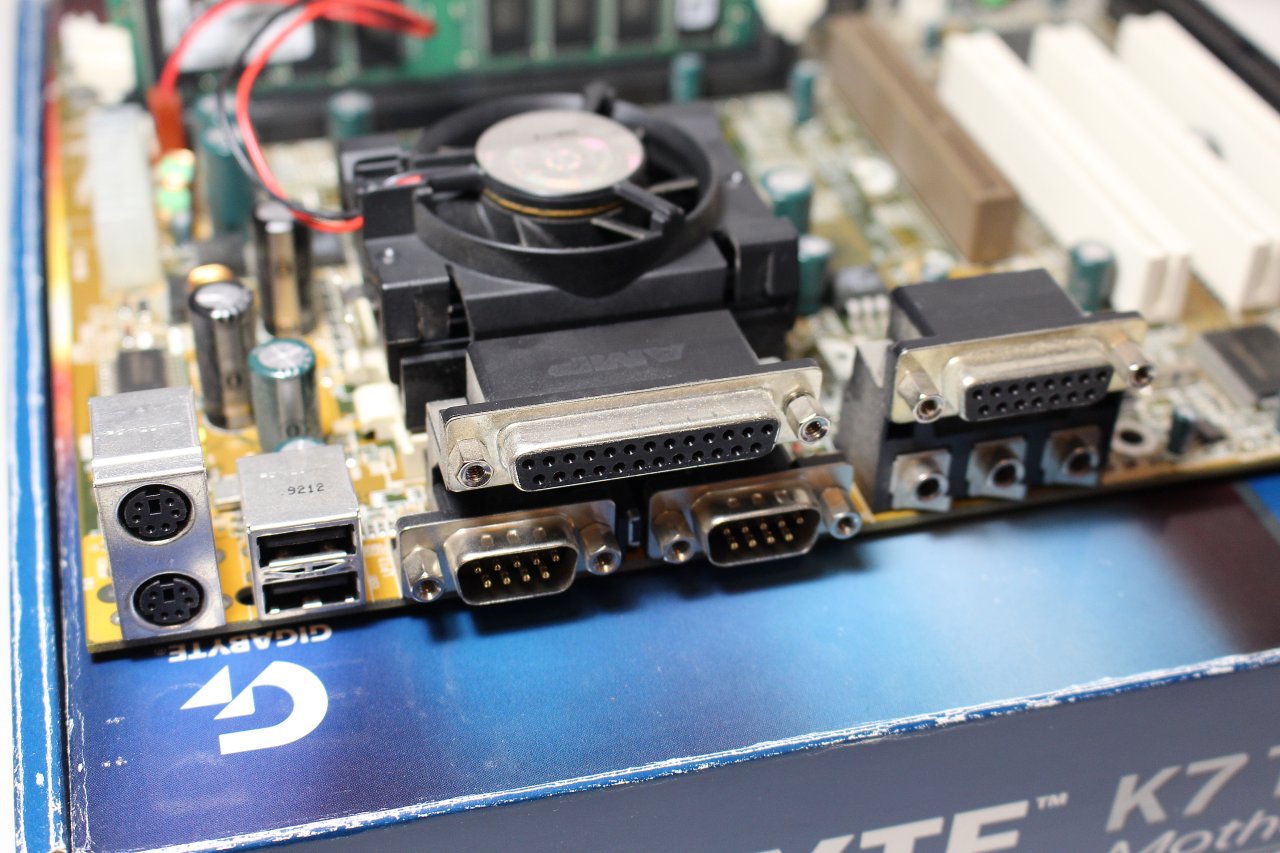
The rear I/O panel includes all of the standard ports of the era – PS2 mouse/keyboard, a pair of USB 1.0 ports and the onboard audio outputs.
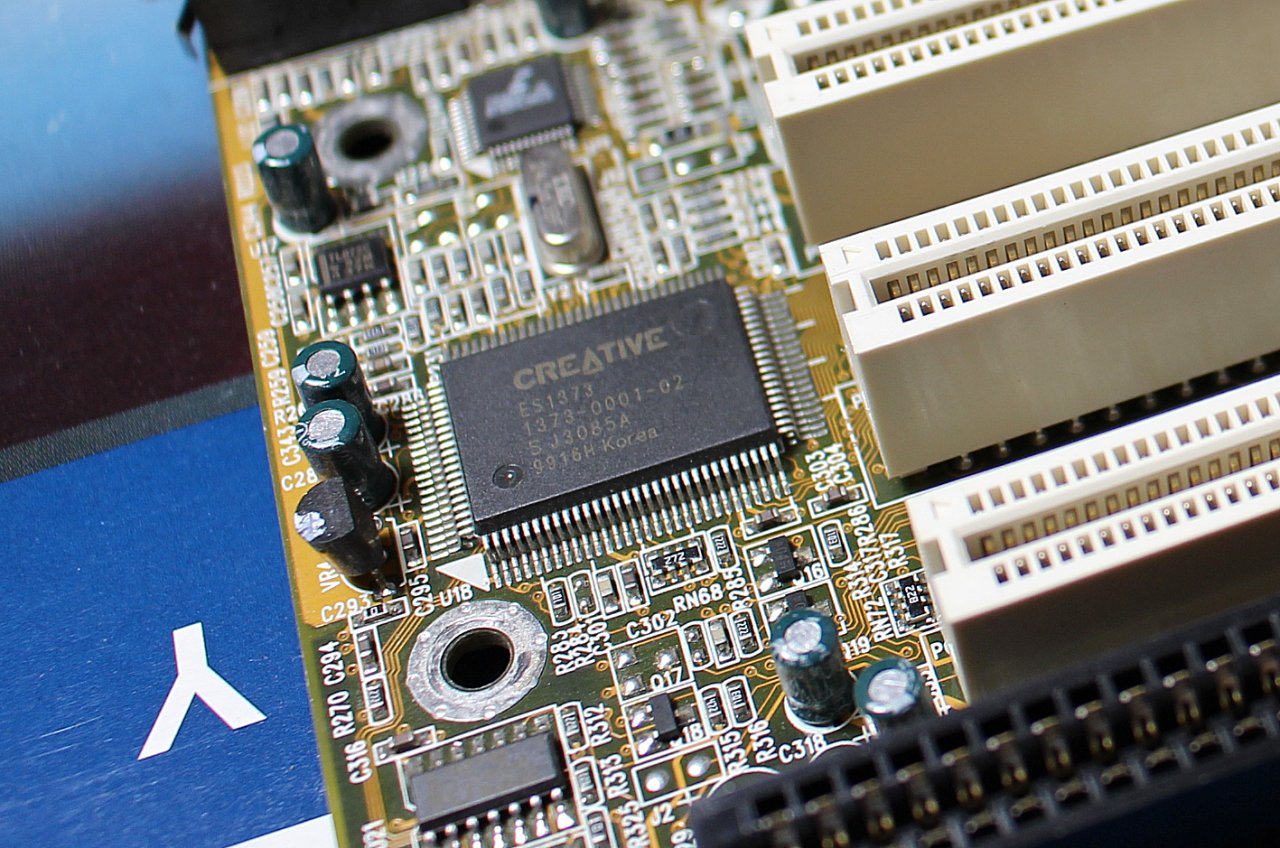
I was surprised to see that the onboard audio solution was bearing a Creative Labs logo. The ES1373 is what used to be Ensoniq’s AudioPCI chipset. Creative bought Ensoniq just before this board was produced, and used this platform on a lot of low-cost motherboards and PCI cards. Despite having good DOS compatibility, I’ll likely be taking a pass on this in favor of a proper sound card. I’ll discuss more about this in a future post.
Taming the Noisy Retail Cooler
During my initial testing of the system, I was surprised at the level of noise from the retail fan. I didn’t expect it to be quiet, but it was just plain loud. Although this board does have a 3-pin CPU fan header, there is no speed control available. The fan simply spins up to it’s full 12V speed, which I’d estimate to be around 6,000RPM or more. Although I’m all for the nostalgic experience, I really want the system to be silent. Even if I did have this system 20 years ago, I’m sure I’d be replacing the heatsink and/or fan back then too.


Finding a replacement heatsink was difficult because of the slot position on this board. Rather than replacing the heatsink, I decided to simply unclip the retail fan and replace it with a quieter model.
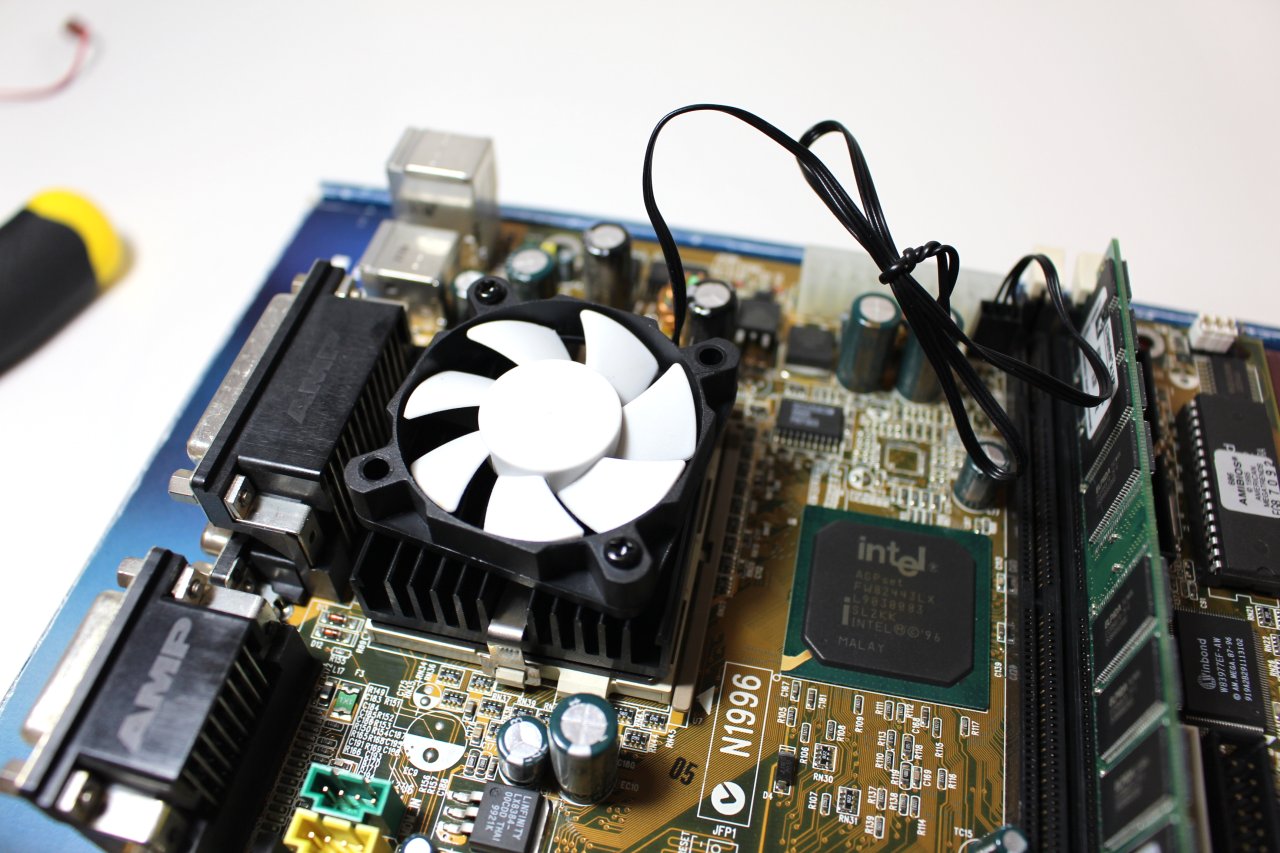
I had initially planned to use this 50mm Fractal Design R3 fan on the Celeron 333 I outlined in Part 1 of this series, but it fit perfectly on the retail socket 370 cooler. The included screws were the right size and length, but I had to angle the fan slightly so that they could be screwed in to the second row of fins that were spaced more tightly together. Even with only two screws the fan is held on very tightly and actually looks pretty good in my opinion.
Despite being 3500RPM, this fan is very quiet and barely noticeable. The 24W TDP of the Celeron 400 is no problem at all for this combination and the heatsink is barely warm to the touch.
BIOS Woes and a Flashing Disaster
After scouring the internet for information on the MSI MS-6160, I discovered that at some point, MSI stopped using the AMI BIOS and instead decided to use an AWARD BIOS on the MS-6160. Interestingly, MSI’s website only has the AWARD version available but manuals were available for both versions in the motherboard’s documentation bundle. The AMI BIOS on this board seemed to have a few quirks and there was no option to disable the onboard sound. Since the AWARD BIOS seemed a bit newer, I figured I’d give it a try.
Interestingly, the AWARD flash utility wouldn’t work and after doing some research, I discovered that I needed to use the AMI tool if the current BIOS on the system was an AMI BIOS version. This seemed to work perfectly, and the AWARD BIOS flashed without a hitch. I copied the old BIOS down from the board too just in case I needed to revert back, which turned out to be a very good idea as I later found out.
My initial impressions of the AWARD BIOS were positive – I could finally disable the onboard audio, and the BIOS layout was a bit more familiar to me. It wasn’t until I started testing some storage devices on the onboard IDE controller that I realized there were some serious problems. Anything older that I tried worked fine, but as soon as I connected something that supported IDE speeds faster than UDMA-2 – like a UDMA 5 CDROM drive for example – that things didn’t work. The drive would be detected, but would not function with DMA mode enabled. I could work around this issue by forcing things into much slower PIO modes but I really didn’t want to lose DMA support.
Because of this, I gave up and decided to go back to the AMI BIOS release that I had backed up before flashing. To do this, I simply reversed the process – using the AWARD flash tool this time since there is an AWARD BIOS currently on the system. Everything seemed to go smoothly and the tool reported that the BIOS was flashed successfully. Then I rebooted… and nothing. No display, no post beep, just spinning fans and a completely dead system. My heart sank and I did an epic face-palm.
Despite all my efforts and research, none of the recovery methods that AWARD and AMI BIOS versions employ seemed to work. For all intents and purposes, my new board was a brick.
Many years back when I was big into the overclocking scene, I had recalled corrupted BIOS issues being recovered by hot-flashing a bad chip in a functional board. Since I basically had nothing to lose at this point, I figured I’d give it a try.
Disclaimer: This process is potentially dangerous. You can damage the pins on the BIOS chip easily, short circuit a component on the motherboard or fry something if the chip is not compatible. You should always contact your motherboard manufacturer for any BIOS issues. Do this at your own risk!
After looking through my collection of parts, I discovered two potential boards I could use for the hot flash process. The first was the ASUS P2B I covered in Part 1 of this series, but I really wasn’t keen on doing something that may damage that board. Thankfully I found an old AMD Athlon board with a similar looking BIOS chip on it.
Despite being AMD based with a VIA chipset, the BIOS turned out to be a 256KB 5V part, just like the MSI MS-6160. If something happened to this AMD board, I may be a tad annoyed, but I’d write it off as a fun experiment and could move on with life. Why not give it a try!
Below is the process I used:
- I first loosened the BIOS chip on both boards to make sure they could be easily removed and re-inserted. This is important as they are held very stiffly.
- I then setup the AMD board on an open bench with only the essentials – a video card, one stick of RAM and a floppy drive.
- I went ahead and booted up the AMD board using a bootable DOS floppy with all of the AWARD and AMI BIOS tools on it.
- Next, I backed up the current AWARD BIOS on the AMD system to confirm it was really 256KB. It was.
- I then went and removed the corrupted BIOS chip from the MS-6160.
- Then came the scary part. Very carefully, I removed the BIOS chip from the socket while the AMD system was up and running.
- Once I had it out, I carefully inserted the bad BIOS chip from the MS-6160 into the AMD board’s socket. I used the notch in the side to determine the correct orientation of the chip.
- Now came time to flash the BIOS again. I initially tried to use a newer version of the AWARD flash tool, but it refused to flash the AMI BIOS to the chip. Instead, I used a newer version of the AMI flash tool. It initially refused to flash saying that the BIOS ID didn’t match. This makes sense as this BIOS file doesn’t belong on this board. Thankfully there is a setting to ignore the BIOS ID and force the flash anyway. The AMI tool detected the BIOS chip correctly and the flash was successful.
- I then powered off the AMD system and removed the MS-6160’s BIOS chip. It’s important not to boot up the system with the wrong BIOS. It definitely won’t work and may have unexpected results.
- Finally, I re-inserted the freshly flashed BIOS chip back into the MS-6160. Again, I had to be careful to ensure the correct orientation of the chip. After getting the MS-6160 board wired up again, I powered the system on. To my surprise and elation, the board booted up and worked perfectly!
It was a scary process, but I was over the moon when the system booted up normally – what a cool experience.
I really wanted this mATX board to work out – and despite the AMI BIOS quirks, it supports DMA just fine and seems stable enough. I’ll simply have to live with disabling the onboard audio via Windows/DOS.
Up next, I’ll be taking a look at some sound card options for the build and seeing if the onboard Ensoniq audio is up to the task!
Part 4 – Choosing a Sound Card >>
Building a Retro Gaming Rig Series
Part 1 – ASUS P2B and Slot-1 CPUs
Part 2 – 3D Video Card Options
Part 3 – The mATX MSI MS-6160 and BIOS Woes
Part 4 – Choosing a Sound Card
Part 5 – Hard Drive/Storage Options
Part 6 – Completed Build!

Hello,
sorry to bother you here, is there a chance you still happen to have a backup of the AMI bios?
My 6160 came with it and I stupidly upgraded to the (even more buggy, IMO) Award release without backing it up. Now I’d like to go back, but multiple internet searches have been fruitless. Not even MSI support has it.
Thank you,
Andrea
Hi Andrea, I’m sure I still do somewhere. In fact, I created a customized version of the AMI BIOS that allows you to disable the onboard audio, overclock the FSB and restores many of the hidden options. I’ll try to find it and post it here when I get a chance (this week has been busy unfortunately).
Wow, thank you Mike!
No worries, I’m not in a hurry. I’ve made this mess more than four years ago, so waiting a bit more is not a problem 🙂
Andrea
Hi Andrea, I created a new page with the download link and lots of information on the flashing process. The ZIP file linked there includes both the original AMI BIOS as well as the modified one I created. The flashing process is the same for both. I hope this is helpful.
https://vswitchzero.com/ms6160/
You really went out of your way to make a more than than helpful article! Thanks again!
Andrea
Not a problem! Please let me know how the BIOS flash goes.