SR-IOV or “Single Root I/O Virtualization” is a very interesting feature that can provide virtual machines shared access to physical network cards installed in the hypervisor. This may sound a lot like what a virtual NIC and a vSwitch does, but the feature works very similarly to PCI passthrough, granting a VM direct access to the NIC hardware. In order to understand SR-IOV, it helps to understand how PCI passthrough works. Here is a quote from a post I did a few years ago:
“PCI Passthrough – or VMDirectPath I/O as VMware calls it – is not at all a new feature. It was originally introduced back in vSphere 4.0 after Intel and AMD introduced the necessary IOMMU processor extensions to make this possible. For passthrough to work, you’ll need an Intel processor supporting VT-d or an AMD processor supporting AMD-Vi as well as a motherboard that can support this feature.
In a nutshell, PCI passthrough allows you to give a virtual machine direct access to a PCI device on the host. And when I say direct, I mean direct – the guest OS communicates with the PCI device via IOMMU and the hypervisor completely ignores the card.”
SR-IOV takes PCI passthrough to the next level. Rather than granting exclusive use of the device to a single virtual machine, the device is shared or ‘partitioned’. It can be shared between multiple virtual machines, or even shared between virtual machines and the hypervisor itself. For example, a single 10Gbps NIC could be ‘passed through’ to a couple of virtual machines for direct access, and at the same time it could be attached to a vSwitch being used by other VMs with virtual NICs and vmkernel ports too. Think shared PCI passthrough.
To make this possible, there are several requirements. First, you’ve got meet the same set of basic requirements for PCI passthrough. You need a CPU that supports Intel VT-d or AMD-Vi. The feature must also be enabled in the BIOS – often it’s disabled by default. Most server grade CPUs that were made in the last seven or eight years should be fine. Secondly, you need to have an SR-IOV capable network card. Not only the hardware/firmware support for SR-IOV, but also an ESXi driver that supports it.
The VMware HCG or “hardware compatibly guide” will list SR-IOV support in the “supported features” list for driver downloads.
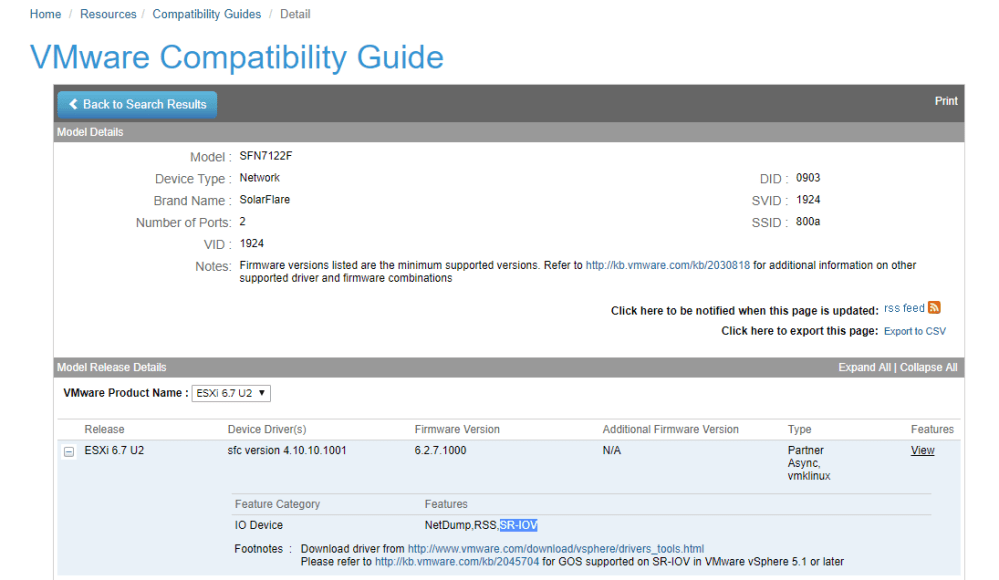
As you can see above, the latest driver for my SolarFlare SFN-7122F cards support SR-IOV. Before you enable SR-IOV, it would be a good idea to make sure your driver and firmware are both up-to-date per your manufacturer’s guidelines.
Another important thing to keep in mind is that your NIC may need to have certain features enabled in the firmware before you can enable SR-IOV. This was the case with my SolarFlare SFN-7122F cards. Turning it on is not always a trivial exercise. I’ll be documenting this process for SolarFlare cards in a future post for those who are interested.
Enabling SR-IOV in vSphere
Turning on SR-IOV in vSphere is not at all difficult. The first thing you’ll want to do is ensure your card is being detected as supporting SR-IOV correctly. In the “Physical Adapters” section of the Web Client or H5 client, you’ll see a column reading “SR-IOV Status”. Before its been turned on there are two possibilities – disabled or not supported.
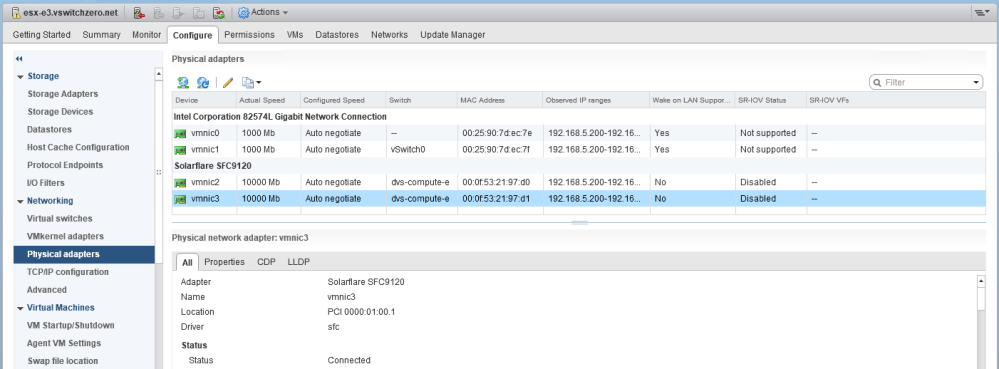
My SolarFlare NICs are listed as “Disabled”, which is good. This tells me that SR-IOV is supported, but not yet turned on. The two 1Gbps NICs based on the Intel 82574L chipset are listed as “Not Supported”.
In my example, I will enable SR-IOV on vmnic3. Simply select the NIC and click the pencil icon to edit it.
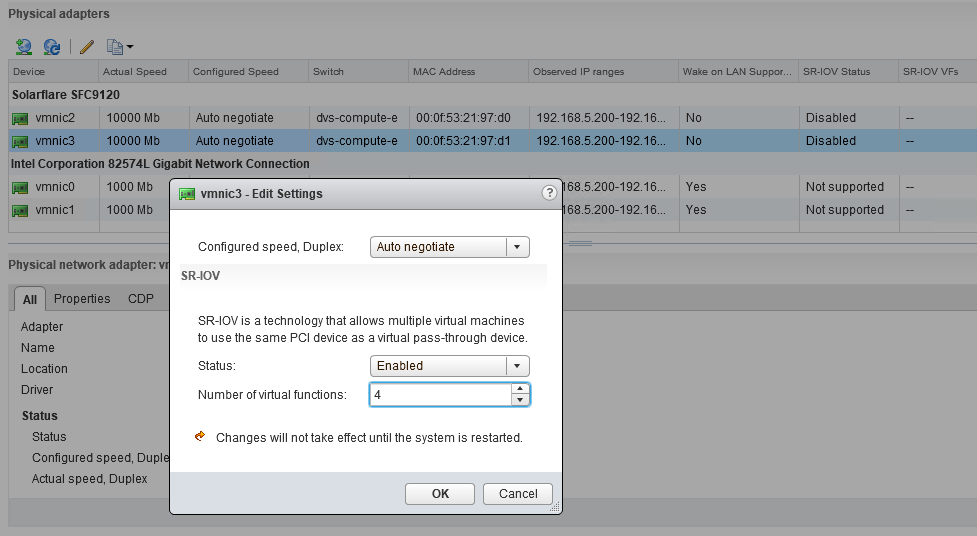
To enable the feature, you change the status to “Enabled” and then specify a number of virtual functions greater than or equal to one. The number of virtual functions specified here equate to how many times this NIC can be virtually partitioned. If set to 4, it can be assigned to four different VMs – or fewer VMs with multiple SR-IOV NICs. As mentioned in the window, you’ll need to reboot your host for the virtual functions to be available to VMs.
If you get an error after clicking OK, there is a possibility that the NIC’s driver/firmware doesn’t support the number of virtual functions you have selected. If even a value of 1 is throwing an error, it’s possible that the number of VFs needs to be configured in the NIC’s firmware before you can start using the feature. I ran into this problem with the SFN-7122Fs as I’ll outline in greater detail in a future post. Here is the type of error you may see in the hostd.log file if that occurs:
2019-06-17T23:16:54.040Z info hostd[2100171] [Originator@6876 sub=Solo.Vmomi opID=EditPnicViewMediator-apply-15927-ngc:70002564-44-5e-43ad user=vpxuser:VSWITCHZERO\mike] Result:
--> (vim.fault.PlatformConfigFault) {
--> faultCause = (vmodl.MethodFault) null,
--> faultMessage = <unset>,
--> text = "Requested number of virtual functions, 1, for device 0000:01:00.1 is not in a valid range of 1 - 0"
--> msg = ""
--> }
Once the host has rebooted, you can use the SR-IOV virtual functions. I settled with two VFs on hosts esx-e1 and esx-e2.
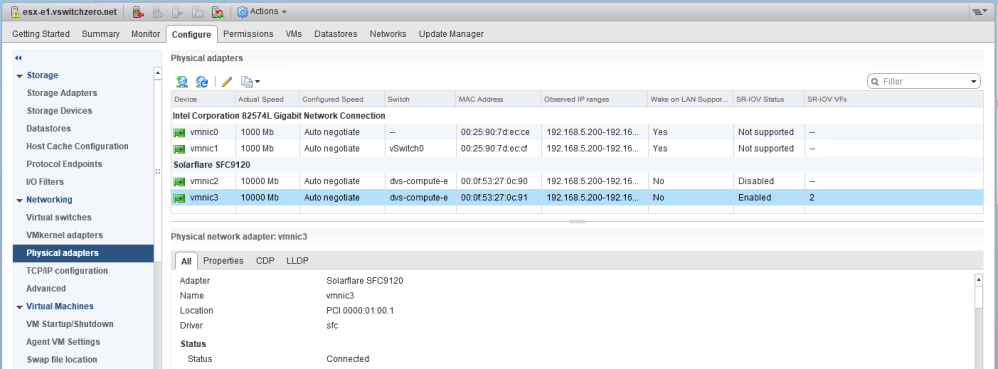
After the reboot, in the physical adapters section we now see two SR-IOV VFs and the status is listed as “Enabled”. We’re now ready to configure our VMs.
Configuring VMs for SR-IOV Passthrough
I’ll be configuring two VMs to use SR-IOV – lubuntu-1 and lubuntu-2. The NIC with SR-IOV enabled, vmnic3, is currently connected to a distributed switch called dvs-compute-e. It’s currently being used for VM traffic as well as ESXi management, vSAN replication etc. It’s connected to a switchport with 802.1q trunking enabled. This is important because the virtual function “sees” the network from the same perspective as the physical adapter.
The first thing we’ll need to do is go to “Edit Settings” for a virtual machine and add an additional network card. In this situation, I’ve disconnected the old vNIC that connected to a dvPortgroup and added an additional one for SR-IOV purposes. Keep in mind here that the VM has to be powered off to add an SR-IOV NIC. It can not be hot-added.
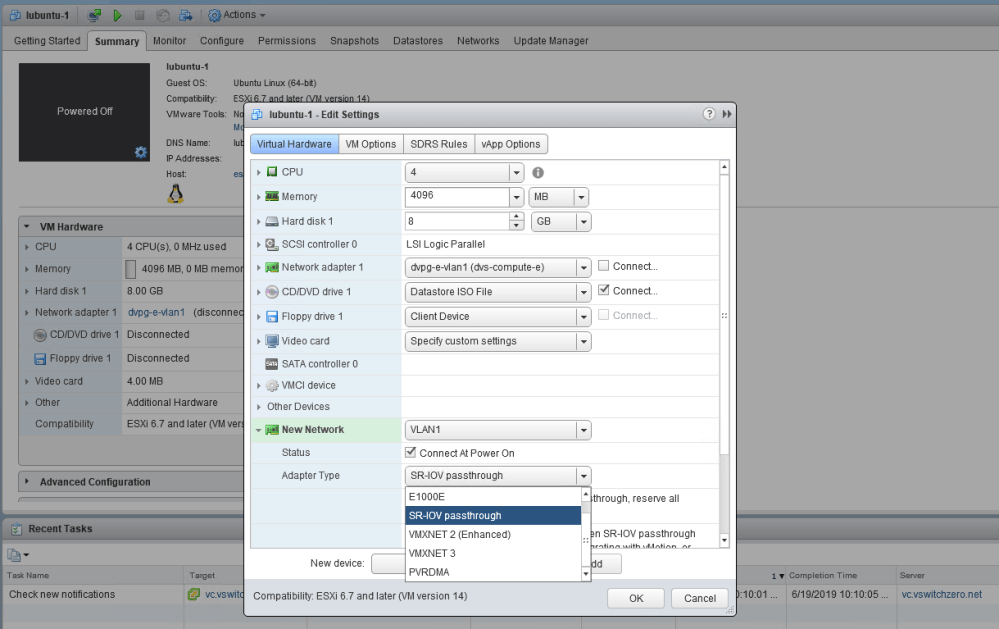
Rather than adding a “PCI Device” as you would for traditional passthrough, a standard vNIC is added to the VM. The magic happens after you select “SR-IOV passthrough” from the list of adapter types.
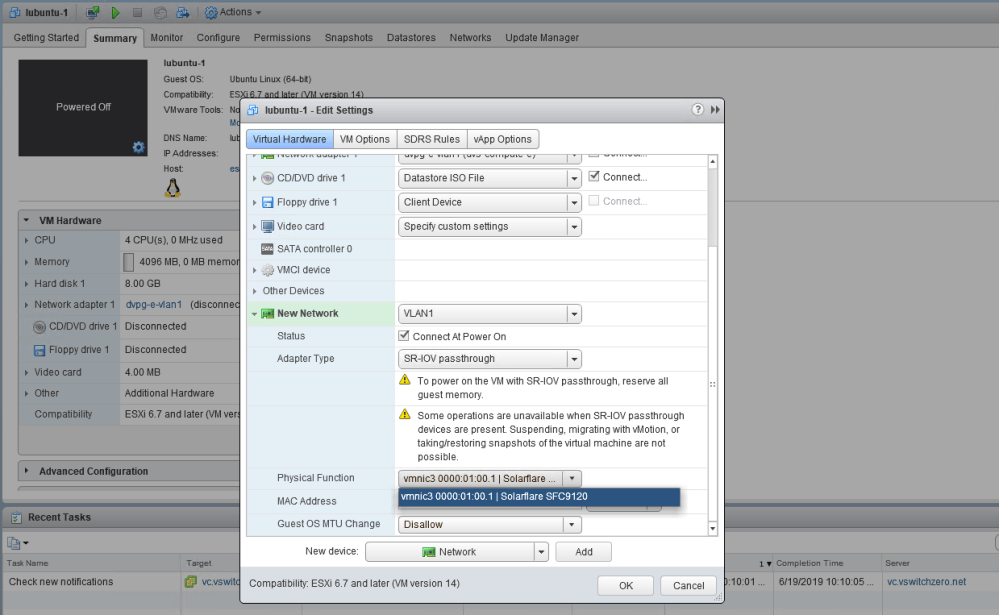
If SR-IOV was enabled correctly on the host, you should see the NIC listed under the “Physical Function” drop down. If you don’t see a physical function listed, make sure your VM is currently registered on an ESXi host with SR-IOV enabled. You’ll also see an option to allow or disallow the guest to change the MTU. Because the physical adapter is shared, you may not want someone modifying the MTU, which could impact the NIC’s operation.
Now comes the most confusing part – you’d think that the portgroup connection drop down box would be grayed out here. After all, a virtual function of the physical NIC is being passed directly to the VM. There are no portgroups or vSwitches to connect to. This threw me off initially, but with SR-IOV NICs, ESXi will use the VLAN tagging configuration applied to the selected portgroup for the virtual function. For example, the “VLAN1” portgroup I have selected is a standard switch portgroup configured with a VLAN tag of 1. This means that any VM connected to it would not need an in-guest VLAN tag configured and would simply be in the broadcast domain associated with VLAN 1. If you wanted your virtual function to accept VLAN tags from the guest, you’d select a distributed portgroup with VLAN trunking configured or a vSS portgroup with a VLAN of 4095.
Once you’ve got your new SR-IOV enabled NIC attached to the VM, you’ll need to reserve all guest memory. This is done by editing the resource settings for the VM:
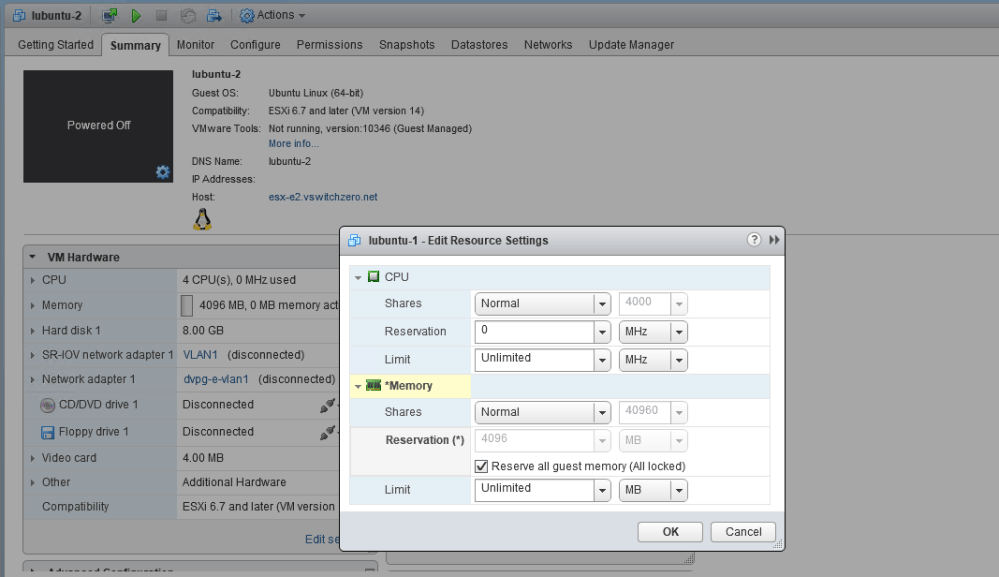
This is nothing new, and is the same requirement for any VM with PCI passthrough enabled. PCI device access requires consistent and reliable access to the hypervisor’s RAM – swap usage and ballooning will cause it to fail.
Once the reservation is set, the VMs should power on successfully!
Looking at SR-IOV Inside the VM
Once my SR-IOV enabled VMs booted up, I went straight to the CLI to see what my new NIC looks like:
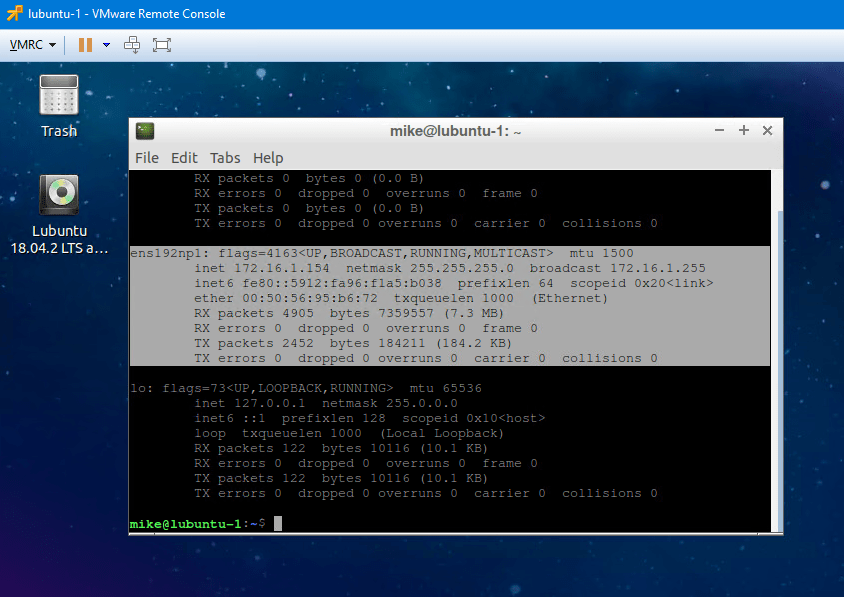
In Linux, my new SR-IOV NIC is listed as ens192np1. It was also able to get a DHCP address in the 172.16.1.0/24 subnet, which tells me that it is successfully communicating on VLAN 1. There is no VLAN tag/interface configured on this guest, so we know that ESXi is correctly interpreting the portgroup VLAN configuration and applying it to the virtual function.
You’ll also notice that the MAC address associated with the SR-IOV adapter has a VMware OUI of 00:50:56. Unlike physical NIC partitioning, virtual functions rely on the hypervisor to assign L2 addresses.
Let’s take a look at the driver that the Linux kernel is using for this SR-IOV NIC:
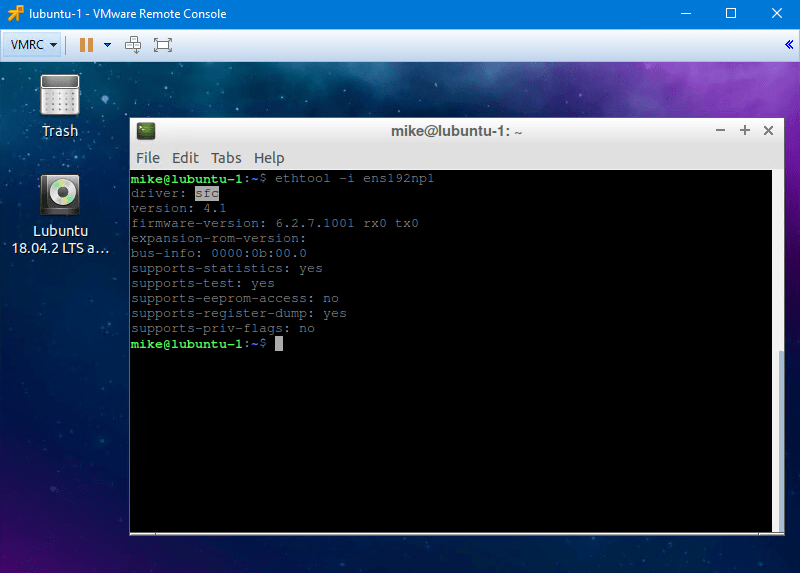
As you can see, ens192np1 is using SolarFlare’s “sfc” Linux driver – not the VMXNET3 driver. This means that all of the offloading features, tweaks etc will all need to be done within the parameters and allowances of the sfc driver.
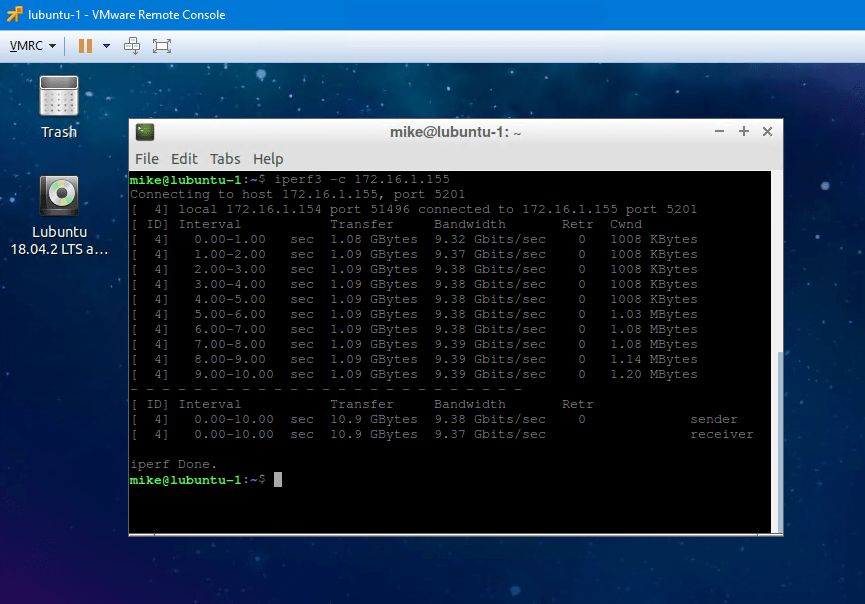
Without any tweaking at all, these two guests were able to do 9.4Gbps through SR-IOV. Although I can probably achieve similar results on VMXNET3 adapters with a bit of tweaking, this result would only improve with large frames. Latency is another factor to consider – there is a lot less in the packet processing path with SR-IOV. For extremely latency sensitive applications, this may also be a good use case.
Conclusion
SR-IOV is a very interesting feature that can allow PCI passthrough functionality without having to sacrifice a dedicated physical network adapter. ESXi hosts these days have fewer, high bandwidth NICs as opposed to many 1Gbps adapters as in years past. This makes SR-IOV much more attractive than traditional VT-d passthrough. Higher bandwidth and lower latency are certainly the primary consideration for using SR-IOV, but there are some glaring limitations that need to be considered too.
Using any form of PCI passthrough – including SR-IOV – pins a VM to a specific ESXi host. This means that vMotion is not possible, nor is vSphere HA failover. Taking snapshots are also not possible, so many backup solutions won’t be able to protect the VM. That said, if the performance and latency benefits of SR-IOV are critical to your workload, this may outweigh the limitations.
Do you use SR-IOV in a production deployment? I’d be curious to hear from you. Please feel free to leave a comment below or reach out to me on Twitter (@vswitchzero).

Only one security concern/question with SR-IOV nic virtualization, could not a rogue virtual machine or some aspect of hyper-v be hijacked by a rogue administrator or malware and utilize its own NIC in a manner undetectable to security software such as wireshark?
Hi Zed, Using an SR-IOV virtual NIC would give the guest direct access to a ‘share’ of the physical adapter via a VIF. Although the VM’s traffic would completely bypass any vSwitch policies and the vSwitch itself, its traffic would still be visible on the physical wire along with that of all other VMs and hypervisor traffic coming from that particular host. Wireshark or an IDS system should still be able to see/act on the traffic, but tracking down the MAC address of the offending VM (once you trace it to a specific host) may be a little tricky if someone isn’t familiar with how SR-IOV works.
I mean rather, its own virtual ethernet adapter…
One thing I noticed when I set up SR-IOV passthrough on my cluster is that in vSphere I set the physical function and I manually set the MAC address I want to use, but on the VM the hypervisor appears to use the MAC address of one of the SR-IOV virtual functions, and picks one at random. This means the network interface has a semi-random MAC address when the VM reboots. I was using systemd’s interface renaming and assign-IP-by-MAC features, but now I can’t use either of those and have to rely on whatever the OS decides to call the interface name.
Are you aware of any way to lock the VM’s network interface to a specific VF and MAC address?
Hi Earl, good question. I don’t remember noticing this but I wasn’t really paying too much attention to the MAC addresses selected. I wonder if it could be NIC-driver specific, or if it’s a vSphere issue. If I get a chance to revisit SR-IOV I’ll give it a shot with my Intel X520s. I don’t have the solar flare cards any more, unfortunately.
“Another important thing to keep in mind is that your NIC may need to have certain features enabled in the firmware before you can enable SR-IOV. This was the case with my SolarFlare SFN-7122F cards. Turning it on is not always a trivial exercise. I’ll be documenting this process for SolarFlare cards in a future post for those who are interested.”
–
I have those exact cards, and am struggling through how to enable SR-IOV in ESXi 6.7 on them. If you’ve got the “secret sauce” you’re willing to share, I’d be greatly interested!
Thanks for pointing me in the correct direction.
–Randy
Hi Randy, It’s been a while, and I don’t have these cards any more I’m afraid. From what I recall, there is a bootable ISO you can get from solarflare with a tool called sfboot. You’ll need to change the ‘mode’ the card operates in and allow VIF creation. The SFN-7122F user guide has some information on how to do this, but it isn’t terribly intuitive from what I remember. Hopefully this gets you in the right direction – best of luck.