No NSX Managers Listed in the Web Client

If you are new to NSX or looking to evaluate it in the lab, there is one very common issue that you may run into. After going through the initial steps of deploying and registering NSX Manager with vCenter, you may be surprised to find that there are no manageable NSX managers listed under ‘Networking and Security’ in the Web Client. Although the registration and Web Client plugin installation appears successful, there is often an extra step needed before you can manage things.

One of the first tasks involved in deploying NSX is to register NSX Manager with a vCenter Server. This is done for inventory management and synchronization purposes. The NSX Manager can be optionally registered with SSO as well.

nsx-icon-1
In my lab, I’ve used the SSO administrator account for registration.

The vCenter user that is used for registration needs to have the highest level of privileges for NSX to work correctly. The NSX install guide clearly states that this must be the vCenter ‘Administrator’ role.

From the NSX Install Guide:

“You must have a vCenter Server user account with the Administrator role to synchronize NSX Manager with the vCenter Server. If your vCenter password has non-ASCII characters, you must change it before synchronizing the NSX Manager with the vCenter Server.”

Because of these requirements, it’s quite common to use the SSO administrator account – usually administrator@vsphere.local. A service account is also often created for this purpose to more easily identify and distinguish NSX tasks. Either way, these are not normally accounts that you’d use for day-to-day administration in vSphere.

By default, NSX will only assign its ‘Enterprise Administrator’ role to the user account that was used to register it with vCenter Server. This means that by default, only that specific vCenter user will have access to the NSX manager from within the Web Client.

That said, if you are experiencing this problem, you are probably not logged in with the vCenter user that was used for registration purposes. To grant access to other users, you’ll need to log into the vSphere Web Client using the registration user account, and then add additional users and groups.

In my lab, I’ve just logged in with an active directory user called ‘test@lab.local’. This user has full administrator privileges in vCenter, but has no access to any NSX Managers:

nsx-icon-3
No managers to manage!

If I log out, and log back in with the administrator@vsphere.local account that was used for vCenter registration, I can see the NSX managers that were registered.

nsx-icon-4

In my lab, I’ve got a secondary deployed as well, but we’ll focus only on 172.16.10.40. If I click on that manager in the list, I’m able to go to the ‘Users’ tab to see what the default permissions look like:

nsx-icon-5

As you can see, only one user – the SSO administrator account used for registration – has the requisite role for administrator via the Web Client. In my lab, I want to provide full access to an AD group called ‘VMware Admins’ and an individual user called ‘Test’.

nsx-icon-6

Both vCenter users and groups can be specified here. As long as vCenter can authenticate them – either via SSO, local authentication or even AD – they are fair game.

nsx-icon-7

Another common mistake made is selecting the NSX Administrator role rather than Enterprise Administrator. NSX Administrator sounds like the highest privilege level, but it’s actually Enterprise Administrator that gives you all the keys to the kingdom. You won’t be able to administer certain things – including user permissions – unless Enterprise Administrator is chosen.

nsx-icon-8

Once this is done, you’ll see the users and groups listed and should now have the correct permissions to administer the NSX deployment!

Keep in mind that if you’ve got more than one NSX manager deployed, you’ll need to set this on each independently.

Have any questions or want more information? Please feel free to leave a comment below or reach out to me on Twitter (@vswitchzero)


The NSX DLR and ARP Suppression

ARP suppression is one of the key fundamental features in NSX that helps to make the product scalable. By intercepting ARP requests from VMs before they are broadcast out on a logical switch, the hypervisor can do a simple ARP lookup in its own cache or on the NSX control cluster. If an ARP entry exists on the host or control cluster, the hypervisor can respond directly, avoiding a costly broadcast that would likely need to be replicated to many hosts.

ARP Suppression has existed in NSX since the beginning, but it was only available for VMs connected to logical switches. Up until NSX 6.2.4, the DLR kernel module did not benefit from ARP suppression and every non-cached entry needed to be broadcast out. Unfortunately, the DLR – like most routers – needs to ARP frequently. This can be especially true due to the easy L3 separation that NSX allows using logical switches and efficient east-west DLR routing.

Despite having code in the 6.2.4 and later version DLRs to take advantage of ARP suppression, a large number of deployments are likely not actually taking advantage of this feature due to a recently identified problem.

VMware KB 51709 briefly describes this issue, and makes note of the following conditions:

“DLR ARP Suppression may not be effective under some conditions which can result in a larger volume of ARP traffic than expected. ARP traffic sent by a DLR will not be suppressed if an ESXi host has more than one active port connected to the destination VNI, for example the DLR port and one or more VM vNICs.”

What isn’t clear in the KB article, but can be inferred based on the solution is that the problem is related to VLAN tagging on logical switch dvPortgroups. Any dvPortgroup associated with a logical switch with a VLAN ID specified is impacted by this problem.

Continue reading “The NSX DLR and ARP Suppression”

NSX Troubleshooting Scenario 2 – Solution

Welcome to the second installment of a new series of NSX troubleshooting scenarios. This is the second half of scenario two, where I’ll perform some troubleshooting and resolve the problem.

Please see the first half for more detail on the problem symptoms and some scoping.

Getting Started

As mentioned in the first half, the problem is limited to a host called esx-a1. As soon as a guest moves to that host, it has no network connectivity. If we move a guest off of the host, its connectivity is restored.

tshoot2b-1

We have one VM called win-a1 on host esx-a1 for testing purposes at the moment. As expected, the VM can’t be reached.

To begin, let’s have a look at the host from the CLI to figure out what’s going on. We know that the UI is reporting that it’s not prepared and that it doesn’t have any VTEPs created. In reality, we know a VTEP exists but let’s confirm.

To begin, we’ll check to see if any of the VIBs are installed on this host. With NSX 6.3.x, we expect to see two VIBs listed – esx-vsip and esx-vxlan.

Continue reading “NSX Troubleshooting Scenario 2 – Solution”

NSX Troubleshooting Scenario 2

I got some overwhelmingly positive feedback after posting the first troubleshooting scenario and solution recently. Thanks to everyone who reached out to me via Twitter with feedback and suggestions! Please keep those suggestions and comments coming.

Today, I’m going to post a similar but more brief scenario. This is something that we see regularly in GSS – issues surrounding host preparation!

NSX Troubleshooting Scenario 2

Let’s begin with the usual vague customer problem description:

“We took a host out of the compute-a cluster to do some hardware maintenance. Now it’s been added back and when VMs move to this host, they have no connectivity! We’re using NSX 6.3.2”

This is a fictional scenario of course, but let’s assume that we’ve started taking a look at the environment and collecting some additional data.

As the customer mentioned, they are running NSX 6.3.2 and have a cluster called compute-a:

tshoot2a-1

The host that was taken out of the cluster for maintenance was esx-a1.lab.local. Similar to the previous scenario, the L3 design is pretty much the same:

Continue reading “NSX Troubleshooting Scenario 2”

NSX Troubleshooting Scenario 1 – Solution

Welcome to the second half of ‘NSX Troubleshooting Scenario 1’ . For detail on the problem and some initial scoping, please see the first part of the scenario that I posted a few days ago. In this half, I’ll walk through some of the troubleshooting I did to find the underlying cause of this problem as well as the solution.

Where to Start?

The scoping done in the previous post gives us a lot of useful information, but it’s not always clear where to start. In my experience, it’s helpful to make educated ‘assertions’ based on what I think the issue is – or more often what I think the issue is not.

I’ll begin by translating the scoping observations into statements:

  • It’s clear that basic L2/L3 connectivity is working to some degree. This isn’t a guarantee that there aren’t other problems, but it looks okay at a glance.
  • We know that win-b1 and web-a1 are both on the same VXLAN logical switch. We also know they are in the same subnet, so that eliminates a lot of the routing as a potential problem. The DLR and ESGs should not really be in the picture here at all.
  • The DFW is enabled, but looks to be configured with the default ‘allow’ rules only. It’s unlikely that this is a DFW problem, but we may need to prove this because the symptoms seem to be specific to HTTP.
  • We also know that VMs in the compute-b cluster are having the same types of symptoms accessing internet based web sites. We know that the infrastructure needed to get to the internet – ESGs, physical routers etc– are all accessed via the compute-a cluster.
  • It was also mentioned by the customer that the compute-b cluster was newly added. This may seem like an insignificant detail, but really increases the likelihood of a configuration or preparation problem.

Based on the testing done so far, the issue appears to be impacting a TCP service – port 80 HTTP. ICMP doesn’t seem impacted. We don’t know if other protocols are seeing similar issues.

Before we start health checking various NSX components, let’s do a bit more scoping to see if we can’t narrow this problem down even further. Right off the bat, the two questions I want answered are:

  1. Are we really talking to the device we expect from a L2 perspective?
  2. Is the problem really limited to the HTTP protocol?

Continue reading “NSX Troubleshooting Scenario 1 – Solution”

NSX Troubleshooting Scenario 1

Welcome to the first of what I hope to be many NSX troubleshooting posts. As someone who has been working in back-line support for many years, troubleshooting is really the bread and butter of what I do every day. Solving problems in vSphere can be challenging enough, but NSX adds another thick layer of complexity to wrap your head around.

I find that there is a lot of NSX documentation out there but most of it is on to how to configure NSX and how it works – not a whole lot on troubleshooting. What I hope to do in these posts is spark some conversation and share some of the common issues I run across from day to day. Each scenario will hopefully be a two-part post. The first will be an outline of the symptoms and problem statement along with bits of information from the environment. The second will be the solution, including the troubleshooting and investigation I did to get there. I hope to leave a gap of a few days between the problem and solution posts to give people some time to comment, ask questions and provide their thoughts on what the problem could be!

NSX Troubleshooting Scenario 1

As always, let’s start with a somewhat vague customer problem description:

“Help! I’ve deployed a new cluster (compute-b) and for some reason I can’t access internal web sites on the compute-a cluster or at any other internet site.”

Of course, this is really only a small description of what the customer believes the problem to be. One of the key tasks for anyone working in support is to scope the problem and put together an accurate problem statement. But before we begin, let’s have a look at the customer’s environment to better understand how the new compute-b cluster fits into the grand scheme of things.

Continue reading “NSX Troubleshooting Scenario 1”

NSX Transport Zone Cluster Removal Issues

Ever remove a cluster from your NSX transport zone only to see it reappear on the list of clusters available for disconnection? Unfortunately, the task likely failed but NSX doesn’t always do a very good job of telling you why in the UI.

I was recently attempting to remove a cluster called compute-b from my transport zone so that I could remove and rebuild the hosts within. Needless to say, I ran into some difficulties and wanted to share my experience.

If you are interested in some more detailed instructions on how to decommission NSX prepared hosts, you can check out my post on Completely Removing NSX. From a high level, the steps I wanted to do were the following:

  1. Disconnect all VMs from logical switches in the cluster to be removed.
  2. Remove the cluster from the transport zone. This will remove all port groups associated with the logical switches (assuming no other clusters are connected to the same distributed switch)
  3. ‘Unconfigure’ VXLAN from the ‘Logical Network Preparation’ tab to remove all VTEPs.
  4. Uninstall the NSX VIBs from the Host Preparation Tab.

To begin, I used the ‘Remove VM’ button from the Logical Switches view in NSX. I removed all four of the VMs attached to the only Logical Switch being used at the moment. I saw a bunch of VM reconfigure tasks complete, and assumed it had completed successfully.

I then went to disconnect compute-b from the transport zone called Primary TZ. After removing the cluster and clicking OK, the dialog closed giving the impression that the task was successful. Oddly though, I didn’t see the tasks related to port group removal that I expected to see.

tzremove-1

Sure enough, I went back into the ‘Disconnect Clusters’ dialog and saw the compute-b cluster still in the list. Unfortunately, NSX doesn’t appear to report failures for this particular workflow in the UI.

Having worked in support for many years, I followed my first instinct and checked the NSX Manager vsm.log file for detail on why the operation failed. I received the below failure details:

2017-11-24 18:50:13.016 GMT+00:00 INFO taskScheduler-8 JobWorker:243 - Updating the status for jobinstance-101742 to EXECUTING
2017-11-24 18:50:13.022 GMT+00:00 INFO taskScheduler-8 SchedulerQueueServiceImpl:64 - [TF] Created a new bucket for module default_module and total number of buckets 1
2017-11-24 18:50:13.022 GMT+00:00 INFO taskScheduler-8 SchedulerQueueServiceImpl:80 - The task ShrinkVdnScope-vdnscope-1 (1511549412299) [id:task-102755] is added to the SchedulerQueue
2017-11-24 18:50:13.022 GMT+00:00 INFO pool-10-thread-1 ScheduleSynchronizer:48 - Start executing task: task-102755 and running executor threads 1
2017-11-24 18:50:13.042 GMT+00:00 INFO TaskFrameworkExecutor-3 VdnScopeServiceImpl$2:995 - New VDS (count: 1) is being removed when shrinking scope vdnscope-1. Shrinkingwires.
2017-11-24 18:50:13.061 GMT+00:00 ERROR TaskFrameworkExecutor-3 VirtualWireServiceImpl:1577 - validation failed at delete backing for dvportgroup-815 in the scope: vdnscope-1
2017-11-24 18:50:13.061 GMT+00:00 ERROR TaskFrameworkExecutor-3 VdnScopeServiceImpl$2:1015 - Shrink operation failed on TZ vdnscope-1
2017-11-24 18:50:13.061 GMT+00:00 ERROR TaskFrameworkExecutor-3 Worker:219 - BaseException thrown while executing task instance taskinstance-166334
com.vmware.vshield.vsm.vdn.exceptions.XvsException: core-services:819:Transport zone vdnscope-1 contraction error.
 at com.vmware.vshield.vsm.vdn.service.VirtualWireServiceImpl.validateShrink(VirtualWireServiceImpl.java:1578)
 at com.vmware.vshield.vsm.vdn.service.VdnScopeServiceImpl$2.doTask(VdnScopeServiceImpl.java:1001)
 at com.vmware.vshield.vsm.vdn.service.task.AbstractVdnRunnableTask.run(AbstractVdnRunnableTask.java:80)
 at com.vmware.vshield.vsm.task.service.Worker.runtask(Worker.java:184)
 at com.vmware.vshield.vsm.task.service.Worker.executeAsync(Worker.java:122)
 at com.vmware.vshield.vsm.task.service.Worker.run(Worker.java:99)
 at java.util.concurrent.ThreadPoolExecutor.runWorker(ThreadPoolExecutor.java:1145)
 at java.util.concurrent.ThreadPoolExecutor$Worker.run(ThreadPoolExecutor.java:615)
 at java.lang.Thread.run(Thread.java:745)
2017-11-24 18:50:13.068 GMT+00:00 INFO TaskFrameworkExecutor-3 JobWorker:243 - Updating the status for jobinstance-101742 to FAILED

There is quite a bit there, but the key takeaways are that the task clearly failed and that the reason was: “validation failed at delete backing for dvportgroup-815 in the scope: vdnscope-1

This doesn’t tell us why exactly, but it seems clear that the operation can’t delete dvportgroup-815 and fails. In my experience, 99% of the time this is because there is still something connected to the portgroup.

Since there were only four VMs in the cluster, and no ESGs or DLRs – I wasn’t sure what could possibly be connected. I even shut down all four disconnected VMs and put all three hosts in maintenance mode just to be sure. None of these actions helped.

I then navigated to the Networking view in vCenter to have a look at the DVS associated with the compute-b cluster. In the ‘Ports’ view, you can get a good idea of what exactly is still connected to the distributed switch. To my surprise a VM called win-b1 was actually still showing as ‘Active’ and ‘Connected’ to the dvPortgroup associated with a Logical Switch!

tzremove-3

This dvPort state is clearly wrong – first of all, the VM was powered off so it could not be ‘Link Up’. Secondly I thought I had removed the VM. Or did I?

tzremove-4

Although I didn’t see any failures, it doesn’t appear that this VM was removed from the Logical Switch. Maybe I missed it, or perhaps it was a quirk due to the bug outlined in KB 2145889 where DirectPath I/O is enabled on VMs created with the vSphere Web Client. This was the only VM that had this option checked off, but despite my best efforts I could not reproduce the problem. Regardless, knowing what the problem was, I could simply disconnect the NIC and add it to another temporary portgroup.

This adjustment appeared to refresh the DVS port state and then I was able to remove the cluster from the Transport Zone successfully. 

When in doubt, don’t hesitate to dig into the NSX Manager logging. If the UI doesn’t tell you why something didn’t work or is light on details, the logging can often set you in the right direction!

NSX Engineering Mode ‘root shell’ Access Now Available to Customers

In an interesting move, VMware has released public KB 2149630 on September 29th, providing information on how to access the root shell of the NSX Manager appliance.

If you’ve been on an NSX support call with VMware dealing with a complex issue, you may have seen your support engineer drop into a special shell called ‘Engineering Mode’. This is sometimes also referred to as ‘Tech Support Mode’. Regardless of the name used, this is basically a root bash shell on the underlying Linux based appliance. From here, system configuration files and scripts as well as most normal Linux functions can be accessed.

Normally, when you open a console or SSH session to NSX manager, you are dropped into a restricted ‘admin’ shell with a hierarchical system of commands like Cisco’s IOS. For the majority of what an administrator needs to do, this is sufficient. It’s only in more complex cases – especially when dealing with issues in the Postgres DB – or issues with the underling OS that this may be required.

There are several important statements and disclaimers that VMware makes in this KB article that I want to outline below:

“Important: Do not make any changes to the underlying system without the help of VMware Technical Support. All such changes are not supported and as a result, your system may no longer be supportable by GSS.”

In NSX 6.3.2 and later, you’ll also be greeted by the following disclaimer:

“Engineering Mode: The authorized NSX Manager system administrator is requesting a shell which is able to perform lower level unix commands/diagnostics and make changes to the appliance. VMware asks that you do so only in conjunction with a support call to prevent breaking your virtual infrastructure. Please enter the shell diagnostics string before proceeding.Type Exit to return to the NSX shell. Type y to continue:”

And finally, you’ll want to ensure you have a full backup of NSX Manager should anything need to be modified:

VMware recommends to take full backup of the system before performing any changes after logging into the Tech Support Mode.

Although it is very useful to take a ‘read only’ view at some things in the root shell, making any changes is not supported without getting direct assistance from VMware support.

A few people have asked whether or not making the root shell password public is a security issue, but the important point to remember is that you cannot even get to a position where you can enter the shell unless you are already logged in as an NSX enterprise administrator level account. For example, the built-in ‘admin’ account. For anyone concerned about this, VMware does allow the root password to be changed. It’s just critical that this password not be lost in case VMware support requires access to the root shell for troubleshooting purposes. More information on this can be found in KB 2149630.

To be honest, I’m a bit torn on this development. As someone who does backline support, I know what kind of damage that can be done from the root shell – even with the best intentions. But at the same time, I see this as empowering. It gives customers additional tools to troubleshoot and it also provides some transparency into how NSX Manager works rather than shielding it behind a restricted shell. I think that overall, the benefits outweigh the risks and this was a positive move for VMware.

When I think back to VI 3.5 and vSphere 4.0 when ESXi was shiny and new, VMware initially took a similar stance. You had to go so far as to type ‘UNSUPPORTED’ into the console to access a shell. Today, everyone has unrestricted root access to the hypervisor. The same holds true for the vCenter appliance – the potential for destruction is no different.

I’d welcome any comments or thoughts. Please share them below!

Using FreeNAS for NSX FTP Backups

FreeNAS is a very powerful storage solution and is quite popular with those running vSphere and NSX home labs. I recently built a new FreeNAS 9.10 system and wanted to share some of my experiences getting NSX FTP backups going.

To get this configured, I found the FTP section of the FreeNAS 9.10 documentation to be very useful. I’d definitely recommend giving it a read through as well.

Before Getting Started

Before enabling the FTP service in FreeNAS, you’ll want to decide where to put your NSX backups. In theory, you can dump them in any of your volumes or datasets but you may want to set aside a specific amount of storage space for them. To do this in my lab, I created a dedicated dataset with a 60GB quota for FTP purposes. I like to separate it out to ensure nothing else competes with the backups and the amount of space available is predictable.

FreeNASNSXbackups-1

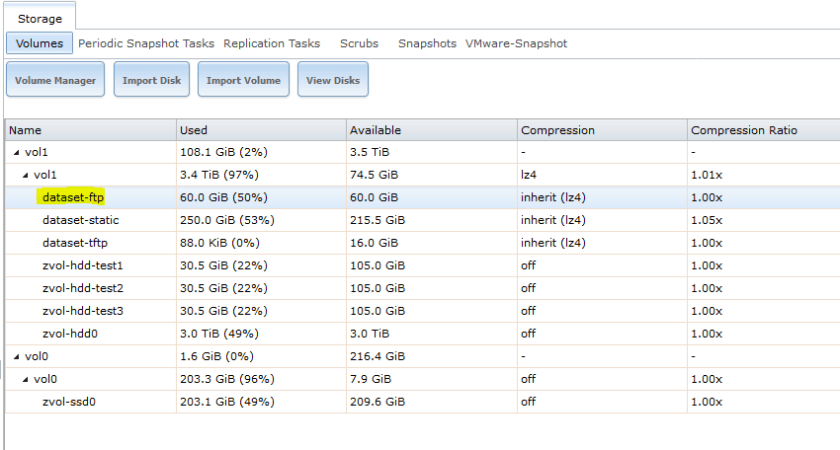
If you plan to use FTP for more than just NSX, it would be a good idea to create a subdirectory in the dataset or other location you want them to reside. In my case, I created a directory called ‘NSX’ in the dataset:

[root@freenas] ~# cd /mnt/vol1/dataset-ftp
[root@freenas] /mnt/vol1/dataset-ftp# mkdir NSX
[root@freenas] /mnt/vol1/dataset-ftp# ls -lha
total 2
drwxr-xr-x 3 root wheel 3B Sep 7 09:23 ./
drwxr-xr-x 5 root wheel 5B Sep 5 16:13 ../
drwxr-xr-x 2 root wheel 2B Sep 7 09:23 NSX/
[root@freenas] /mnt/vol1/dataset-ftp#

Setting Permissions

One step that is often missed during FreeNAS FTP configuration is to set the appropriate permissions. The proftpd service in FreeNAS uses the built in ftp user account. If that user does not have the appropriate permissions to the location you intend to use, backups will not write successfully.

Since I used a dedicated dataset for FTP called dataset-ftp, I can easily set permissions recursively for this location from the UI:

FreeNASNSXbackups-2

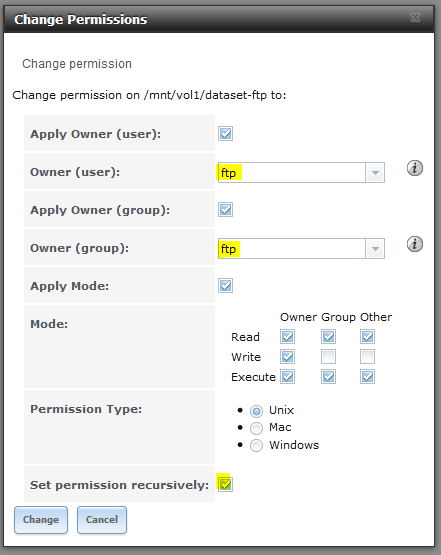
As shown above, we want to set both the owner user and group to ftp. Because I created the NSX directory within the dataset, I’ll be setting permission recursively as well.

If I log into FreeNAS via SSH or console again, I can confirm that this worked because the dataset-ftp mount is now owned by ftp as is the NSX subdirectory within.

[root@freenas] /mnt/vol1# ls -lha
total 14
drwxrwxr-x  5 root  wheel     5B Sep  5 16:13 ./
drwxr-xr-x  4 root  wheel   192B Sep  5 16:09 ../
drwxr-xr-x  3 ftp   ftp       3B Sep  7 09:23 dataset-ftp/
drwxrwxr-x  5 root  wheel    13B Jul 29 16:23 dataset-static/
drwxrwxr-x  2 root  wheel     2B Sep  5 16:13 dataset-tftp/
[root@freenas] /mnt/vol1# ls -lha dataset-ftp
total 2
drwxr-xr-x  3 ftp   ftp       3B Sep  7 09:23 ./
drwxrwxr-x  5 root  wheel     5B Sep  5 16:13 ../
drwxr-xr-x  2 ftp   ftp       2B Sep  7 13:46 NSX/

The Easy Option – Anonymous FTP Access

Setting up anonymous FTP access requires the least amount of effort and is usually sufficient for home lab purposes. I would strongly discourage the use of anonymous access in a production or security sensitive environment as anyone on the network can access the FTP directory configured.

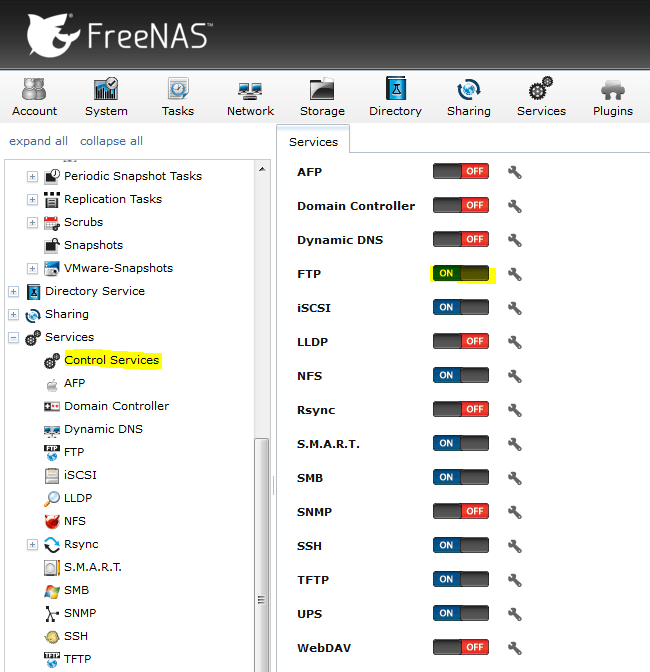
First, configure FTP under services in the FreeNAS UI:

FreeNASNSXbackups-4

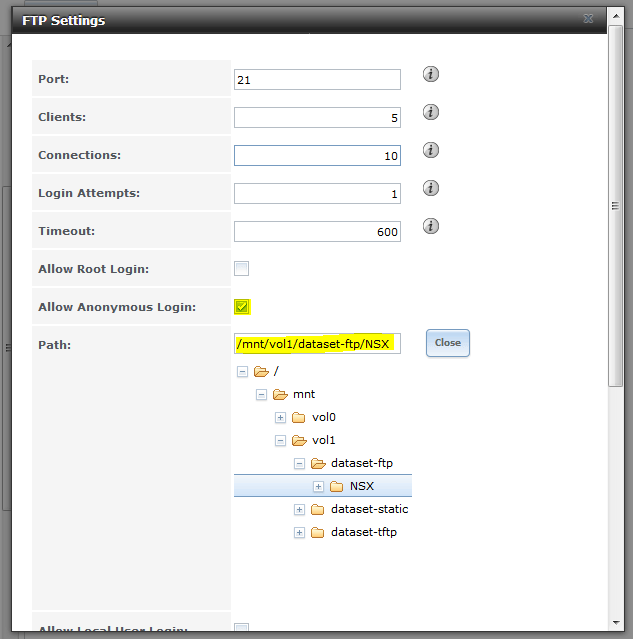
As you’d obviously expect, the ‘Allow Anonymous Login’ option needs to be checked off in order for anonymous FTP to work. The ‘Allow Local Users Login’ option should be unchecked if you don’t want to use authentication. It’s also important to select the ‘Path’ to the FTP root directory you wish to use. In my example above, any anonymous FTP logins will go directly into the NSX subdirectory I created earlier.

If you want to use FTP for more than just NSX backups, you can make the path the root of the dataset and NSX can be configured to use a specific subdirectory within as I’ll show later.

Once that’s done, you can enable the FTP service. It’ll be off by default:

FreeNASNSXbackups-5

Now we can do some basic tests to ensure FTP is functional. You can use an FTP client like FileZilla if you like, but I’m just going to use the good old Windows FTP command line utility. First, let’s make sure we can login anonymously:

C:\Users\mike.LAB\Desktop>ftp freenas.lab.local
Connected to freenas.lab.local.
220 ProFTPD 1.3.5a Server (freenas.lab.local FTP Server) [::ffff:172.16.10.17]
User (freenas.lab.local:(none)): anonymous
331 Anonymous login ok, send your complete email address as your password
Password:
230 Anonymous access granted, restrictions apply

A return status of 230 is what we’re looking for here and this seems to work fine. Keep in mind that it technically doesn’t matter what password you enter for the anonymous username. You can just hit enter, but I usually just re-enter the username. It’s not necessary to enter anything that resembles an email address.

Next, let’s make sure we have permission to write to this location. I’ll do an FTP ‘PUT’ of a small text file:

ftp> bin
200 Type set to I
ftp> put C:\Users\mike.LAB\Desktop\test.txt
200 PORT command successful
150 Opening BINARY mode data connection for test.txt
226 Transfer complete
ftp: 14 bytes sent in 0.00Seconds 14000.00Kbytes/sec.
ftp> dir
200 PORT command successful
150 Opening ASCII mode data connection for file list
-rw-r----- 1 ftp ftp 14 Sep 7 13:56 test.txt
226 Transfer complete
ftp: 65 bytes received in 0.01Seconds 10.83Kbytes/sec.
ftp>

As seen above, the file was written successfully with a 226 return code. The last step I’d recommend doing before configuring NSX is to confirm the relative path after login from the FTP server’s perspective. Because I stayed in the FTP root directory, it simply lists a forward slash as shown below:

ftp> pwd
257 "/" is the current directory
ftp>

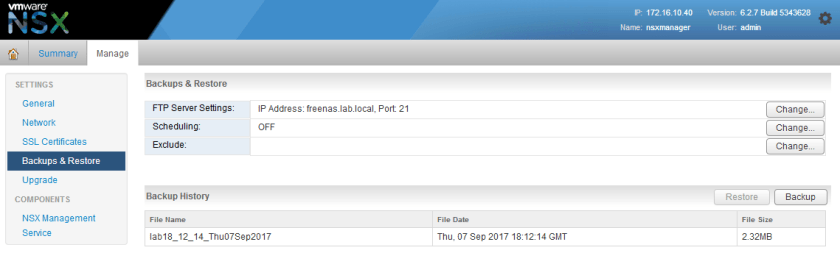
NSX expects this path as you’ll see shortly. Now that we know anonymous FTP is working, we can configure the FTP server from the NSX appliance UI:

FreeNASNSXbackups-3

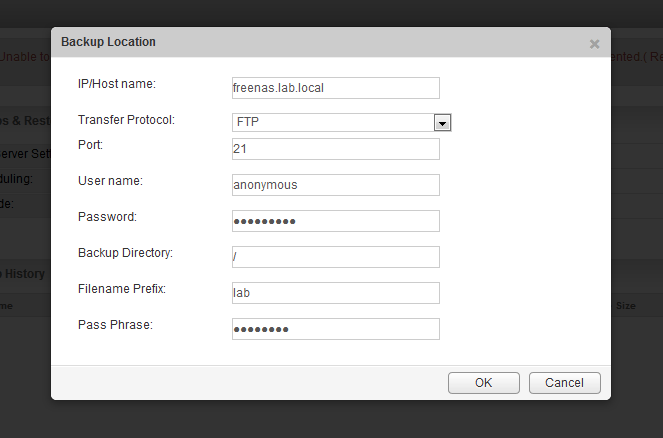
As you can see above, I’ve entered ‘anonymous’ as the user name, and entered the same as the password string. The backup directory is the location you want NSX to write backups to. If you had a specific directory you wanted to use within the FTP root directory that was configured, you could enter it here. For example, /backups. As mentioned earlier, my FTP root directory is the NSX directory so it’s not necessary in my case.

Two other pieces of information are mandatory in NSX – the filename prefix and the pass phrase. The filename prefix is just that – a string that is appended to the beginning of the filename. It usually makes sense to identify the environment or NSX manager by name here. This is especially important if you have multiple NSX managers all backing up to one location. The pass phrase is a password used to encrypt the backup binary file generated. Be sure not to lose this or you will not be able to restore your backups.

After hitting OK, we can then do a quick backup to ensure it can connect and write to the location configured.

FreeNASNSXbackups-6

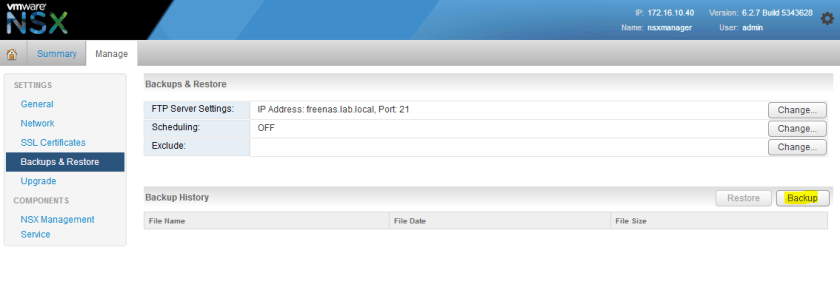
If everything was successful, you should then see your file listed in the backup history pane at the bottom of the view:

FreeNASNSXbackups-7

FTP User Authentication

Anonymous FTP may be sufficient for most home lab purposes, but there are several advantages to configuring users and authentication. FTP by nature transmits in plain text and is not secure, but adding authentication provides a bit more control over who can access the backups and allows the direction of users to specific FTP locations. This can be useful if you plan to use your FTP server for more than just NSX.

Before we begin, let’s create a user in FreeNAS that we’ll use for NSX backups:

FreeNASNSXbackups-8

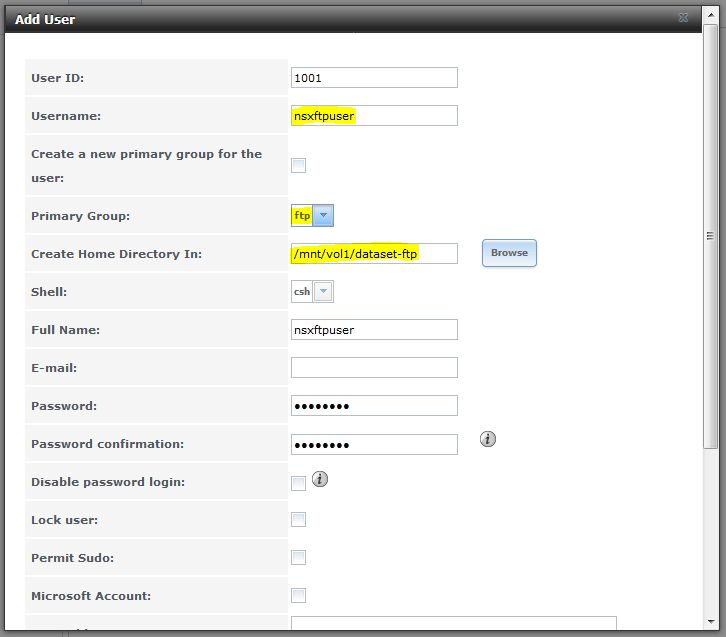
Some of the key things you’ll need to ensure is that the user’s primary group is the built-in ftp group used by proftpd and that the user’s home directory is where you want them to land after log in. In my example above, I’m creating a user called nsxftpuser with a home directory of the FTP root directory I configured earlier.

Keep in mind that by default FreeNAS will create a new home directory hence the wording “Create Home Directory In:”. I expect the home directory to actually be /mnt/vol1/dataset-ftp/nsxftpuser and not /mnt/vol1/dataset-ftp/.

Next, we need to modify the FTP settings slightly:

FreeNASNSXbackups-9

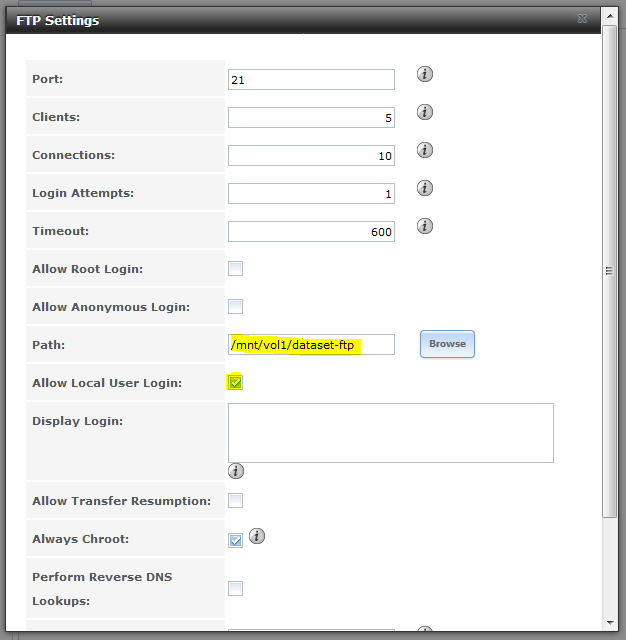
Since we want to use local user authentication, we need to check ‘Allow Local User Login’. I’ve also unchecked ‘Allow Anonymous Login’ to ensure only authenticated users can now login.

In order to test that we’re dumped into the user’s home directory after login, I changed the FTP default path one level back to the root of the dataset.

As a last step, it’s necessary to stop and start the FTP service again for the changes to take effect.

Before we test this new user, let’s double check that the home directory is located where we want it:

[root@freenas] /mnt/vol1/dataset-ftp# ls -lha
total 18
drwxr-xr-x  4 ftp         ftp       4B Sep  7 14:42 ./
drwxrwxr-x  5 root        wheel     5B Sep  5 16:13 ../
drwxr-xr-x  2 ftp         ftp       5B Sep  7 14:43 NSX/
drwxr-xr-x  2 nsxftpuser  ftp      10B Sep  7 14:42 nsxftpuser/

As you can see above, we now have a home directory matching the username in the FTP root location.

Now let’s try to log in using the nsxftpuser account:

C:\Users\mike.LAB\Desktop>ftp freenas.lab.local
Connected to freenas.lab.local.
220 ProFTPD 1.3.5a Server (freenas.lab.local FTP Server) [::ffff:172.16.10.17]
User (freenas.lab.local:(none)): nsxftpuser
331 Password required for nsxftpuser
Password:
230-Welcome to FreeNAS FTP Server
230 User nsxftpuser logged in
ftp>

So far so good, now let’s PUT a file to ensure we have write access to this location:

ftp> bin
200 Type set to I
ftp> put C:\Users\mike.LAB\Desktop\test.txt
200 PORT command successful
150 Opening BINARY mode data connection for test.txt
226 Transfer complete
ftp: 14 bytes sent in 0.00Seconds 14000.00Kbytes/sec.
ftp> dir
200 PORT command successful
150 Opening ASCII mode data connection for file list
-rw-r----- 1 nsxftpuser ftp 14 Sep 7 14:45 test.txt
226 Transfer complete
ftp: 67 bytes received in 0.00Seconds 22.33Kbytes/sec.

Success! The last thing we need to do is modify the NSX configuration slightly to use the new user account:

FreeNASNSXbackups-10

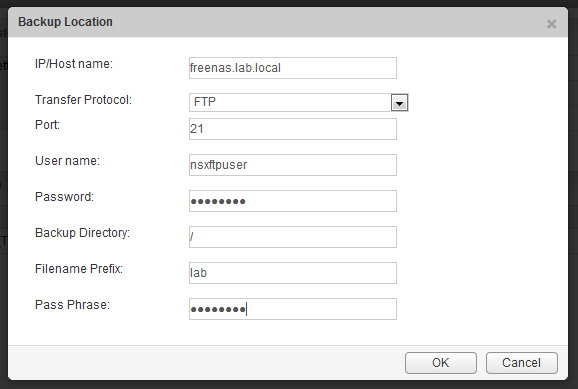
And sure enough, the backup was successful at 18:47 GMT:

FreeNASNSXbackups-11

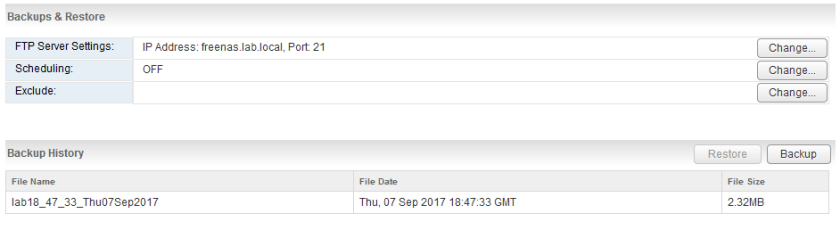
If I look at the files from the FreeNAS SSH session, I can see both the encrypted backup binary and metadata properties file located in the user’s home directory:

[root@freenas] /mnt/vol1/dataset-ftp/nsxftpuser# ls -lha lab*
-rw-r-----  1 nsxftpuser  ftp   2.4M Sep  7 14:47 lab18_47_33_Thu07Sep2017
-rw-r-----  1 nsxftpuser  ftp   227B Sep  7 14:47 lab18_47_33_Thu07Sep2017.backupproperties

Scheduling Backups

Once we know NSX backups are functional, it’s a good idea to get them going on a schedule.

An important consideration to keep in mind when deciding when to schedule is when your vCenter backups are done. Because NSX relies heavily upon the state of the vCenter Server inventory and objects, it’s a good idea to try to schedule your backups at around the same time. That way, if you ever need to restore, you’ll have vCenter and NSX objects in sync as closely as possible.

FreeNASNSXbackups-12

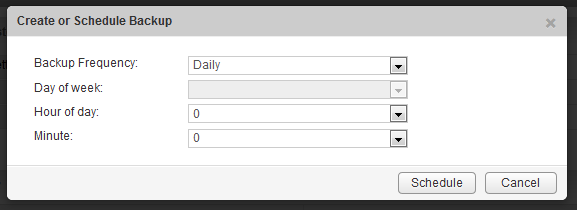
In my lab, I have it backing up every night at midnight, but depending on how dynamic your environment is, you may want to do it more frequently.

Another important point to note is that NSX Manager doesn’t handle large numbers of backups very well in the backup directory. The UI will throw a warning once you get up to 100 backups and eventually you’ll get a slow or non-responsive UI in the Backup and Restore section. To get around this, you can manually archive older backups to another location outside of the FTP root directory or create a script to move older files to another location.

The only piece that I haven’t gotten to work with FreeNAS yet is SFTP encrypted backups using TLS. Once I get that going well, I’ll hopefully write up another post on the topic.

Thanks for reading! If you have any questions please leave a comment below.

Removing Stale IP Pool Assignments in NSX

NSX uses the concept of IP pools for IP address assignment for several components including controllers, VTEPs and Guest Introspection. These are normally configured during the initial deployment of NSX and it’s always a good idea to ensure you’ve got some headroom in the pool for future growth.

NSX usually does a good job of keeping track of IP Pool address allocation, but in some situations, stale entries may be wasting IPs. There are a few ways you could get yourself into this situation – most commonly this is due to the improper removal of objects. For example, if an ESXi host is removed from the vCenter inventory while still in an NSX prepared cluster, its VTEP IP address allocation will remain. NSX can’t release the allocation, because the VIBs were never uninstalled and it has no idea what the fate of the host was. If the allocation was released and someone deployed a new host while the old one was still powered on, you’d likely get IP conflicts.

Just this past week, I assisted two separate customers who ran into similar situations – one had a stale IP in their controller pool, and the other had stale IPs in their VTEP pool. Both had removed controllers or ESXi hosts using a non-standard method.

If you have a look in the NSX UI, you’ll notice that there is no way to add, modify or remove allocated IPs. You can only modify or expand the pool. Thankfully, there is a way to remove allocated IPs from a pool using an NSX REST API call.

To simulate a scenario where this can happen, I went ahead and improperly removed one of the NSX controllers and did some manual cleanup afterward. As you can see below, the third controller appears to have been removed successfully.

ippoolAPI-2

When I try to deploy the third controller again, I’m unable to because of a shortage of IPs in the pool:

ippoolAPI-1

If I look at the IP Pool called ‘Controller Pool’ in the grouping objects, I can see that there are only three IPs available and one of them belongs to the old controller than no longer exists:

ippoolAPI-3

So in order to get my third controller re-deployed, I’ll need to either remove the stale 172.16.10.45 entry or expand my pool to have a total of four or more addresses. If this were a production environment, expanding the pool may be a suitable workaround to get things running again quickly. If you are at all like me, simply having this remnant left behind would bother me and I’d want to get it cleaned up.

Releasing IPs Using REST API Calls

Now that we’ve confirmed the IP address we want to nuke from the pool, we can use some API calls to gather the required information and release the address. The API calls we are interested in can be found in the NSX 6.2 and 6.3 API guides. My lab is currently running 6.2.7, so I’ll be using calls found on page 110-114 in the NSX 6.2 API guide.

Before we begin, there are two key pieces of information we’ll need to do this successfully:

  1. The IP address that needs to be released.
  2. The moref identifier of the IP pool in question.

First, we’ll use an API call to query all IP pools on the NSX manager. This will provide an output that will include the moref identifier of the pool in question:

GET https://NSX-Manager-IP-Address/api/2.0/services/ipam/pools/scope/scopeID

As you can see above, the ‘scope ID’ is also required to run this GET call. In every instance I’ve seen, using globalroot-0 as the scopeID works just fine here.

ippoolAPI-4

The various IP pools will be separated by <ipamAddressPool> XML tags. You’ll want to identify the correct pool based on the IP range listed or by the text in the <name> field. The relevant controller pool was identified by the following section in the output in my example:

<ipamAddressPool>
<objectId>ipaddresspool-1</objectId>
<objectTypeName>IpAddressPool</objectTypeName>
<vsmUuid>4226CDEE-1DDA-9FF9-9E2A-8FDD64FACD35</vsmUuid>
<nodeId>fa4ecdff-db23-4799-af56-ae26362be8c7</nodeId>
<revision>1</revision>
<type>
<typeName>IpAddressPool</typeName>
</type>
<name>Controller Pool</name>
<scope>
<id>globalroot-0</id>
<objectTypeName>GlobalRoot</objectTypeName>
<name>Global</name>
</scope>
<clientHandle/>
<extendedAttributes/>
<isUniversal>false</isUniversal>
<universalRevision>0</universalRevision>
<totalAddressCount>3</totalAddressCount>
<usedAddressCount>3</usedAddressCount>
<usedPercentage>100</usedPercentage>
<prefixLength>24</prefixLength>
<gateway>172.16.10.1</gateway>
<dnsSuffix>lab.local</dnsSuffix>
<dnsServer1>172.16.10.10</dnsServer1>
<dnsServer2>172.16.10.11</dnsServer2>
<ipPoolType>ipv4</ipPoolType>
<ipRanges>
<ipRangeDto>
<id>iprange-1</id>
<startAddress>172.16.10.43</startAddress>
<endAddress>172.16.10.45</endAddress>
</ipRangeDto>
</ipRanges>
<subnetId>subnet-1</subnetId>
</ipamAddressPool>

As you can see above, the IP pool is identified by the moref identifier ipaddresspool-1.

As an optional next step, you may wish to view the IP addresses allocated within this pool. The following API call will obtain this information:

GET https://NSX-Manager-IP-Address/api/2.0/services/ipam/pools/poolId/ipaddresses

In my example, I used the following call:

GET https://nsxmanager.lab.local/api/2.0/services/ipam/pools/ipaddresspool-1/ipaddresses

Below is the output I received:

<allocatedIpAddresses>
<allocatedIpAddress>
<id>13</id>
<ipAddress>172.16.10.44</ipAddress>
<gateway>172.16.10.1</gateway>
<prefixLength>24</prefixLength>
<dnsServer1>172.16.10.10</dnsServer1>
<dnsServer2>172.16.10.11</dnsServer2>
<dnsSuffix>lab.local</dnsSuffix>
<subnetId>subnet-1</subnetId>
</allocatedIpAddress>
<allocatedIpAddress>
<id>14</id>
<ipAddress>172.16.10.43</ipAddress>
<gateway>172.16.10.1</gateway>
<prefixLength>24</prefixLength>
<dnsServer1>172.16.10.10</dnsServer1>
<dnsServer2>172.16.10.11</dnsServer2>
<dnsSuffix>lab.local</dnsSuffix>
<subnetId>subnet-1</subnetId>
</allocatedIpAddress>
<allocatedIpAddress>
<id>15</id>
<ipAddress>172.16.10.45</ipAddress>
<gateway>172.16.10.1</gateway>
<prefixLength>24</prefixLength>
<dnsServer1>172.16.10.10</dnsServer1>
<dnsServer2>172.16.10.11</dnsServer2>
<dnsSuffix>lab.local</dnsSuffix>
<subnetId>subnet-1</subnetId>
</allocatedIpAddress>
</allocatedIpAddresses>

Each allocated address in the pool will have its own <id> tag. I can see that 172.16.10.45 is indeed still there. Now let’s remove it using the following API call:

DELETE https://NSX-Manager-IP-Address/api/2.0/services/ipam/pools/poolId/ipaddresses/allocated-ip-address

In my example, the exact call would be:

DELETE https://nsxmanager.lab.local/api/2.0/services/ipam/pools/ipaddresspool-1/ipaddresses/172.16.10.45

ippoolAPI-5

If the call was successful, you should see a Boolean value of ‘true’ returned. Next you can validate again using the previous API call. In my case I used:

GET https://nsxmanager.lab.local/api/2.0/services/ipam/pools/ipaddresspool-1/ipaddresses

And got the following output:

<allocatedIpAddresses>
<allocatedIpAddress>
<id>13</id>
<ipAddress>172.16.10.44</ipAddress>
<gateway>172.16.10.1</gateway>
<prefixLength>24</prefixLength>
<dnsServer1>172.16.10.10</dnsServer1>
<dnsServer2>172.16.10.11</dnsServer2>
<dnsSuffix>lab.local</dnsSuffix>
<subnetId>subnet-1</subnetId>
</allocatedIpAddress>
<allocatedIpAddress>
<id>14</id>
<ipAddress>172.16.10.43</ipAddress>
<gateway>172.16.10.1</gateway>
<prefixLength>24</prefixLength>
<dnsServer1>172.16.10.10</dnsServer1>
<dnsServer2>172.16.10.11</dnsServer2>
<dnsSuffix>lab.local</dnsSuffix>
<subnetId>subnet-1</subnetId>
</allocatedIpAddress>
</allocatedIpAddresses>

As you can see above, the IP with an <id> tag of 15 has been removed. Next, I’ll confirm in the UI that the IP has indeed been released:

ippoolAPI-6

After a refresh of the vSphere Web Client view, the total used decreased to 2 for the Controller Pool and I could deploy my third controller successfully.

Although this process is straight forward if you are familiar with running NSX API calls, I do have to provide a word of caution. NSX will not stop you from releasing an IP if it is genuinely being used. Therefore, it’s important to make 100% sure that whatever object was using the stale IP is indeed off the network. Some basic ping tests are a good idea before proceeding.

Thanks for reading! If you have any questions, please feel free to leave a comment below.