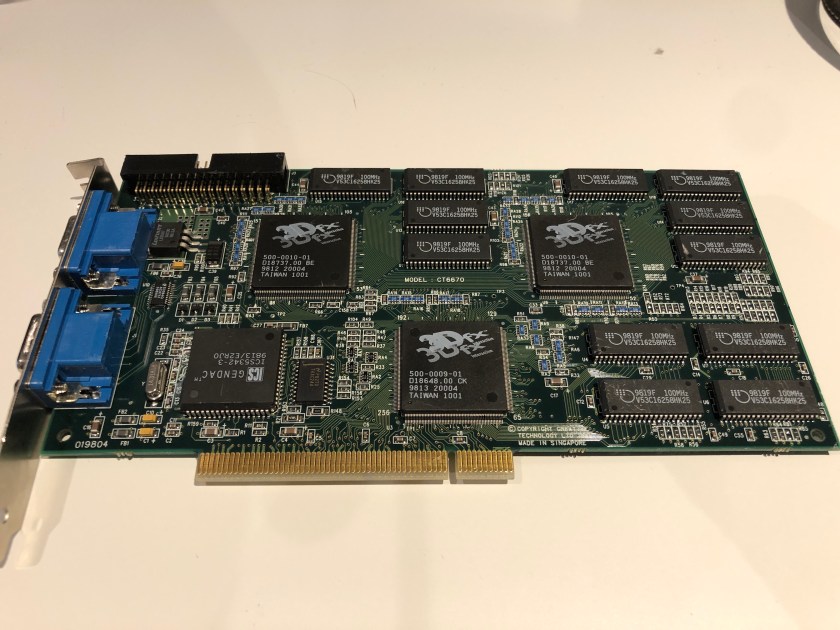
I’m always keeping an eye out for old parts on eBay. One of my saved searches, of course, is for the string “3dfx”. I’ve always had a soft spot for the original king of 3D gaming, but just about everything made by 3dfx is collectable and commands a hefty price premium these days. I usually try to steer clear of things marked “untested” or “for repair” but sometimes a deal is just too good to pass up.
When I came across this as-is, untested 3dfx Voodoo 2 for a great price, I decided to take a chance on it. It did show some obvious signs damage in the eBay listing pictures, including some visible scratches and a bent PCI bracket. I could also see some of the chip legs were bent, which can sometimes be tricky to get straightened out. I knew it would probably not work without a repair or two, but maybe I’d get lucky?
TLDR: Modify your power plan to ensure your VM isn’t going to sleep!
I had recently deployed a new Windows 10 based VM that would serve as an RDP jump box to access lab resources. Initially RDP worked fine, but I noticed that after a while I couldn’t connect any more. The only way to rouse it from this state was to open a direct console window from the vSphere Client, or to reboot the VM.
The exact error message from the Remote Desktop for Mac window is:
“We couldn’t connect to the remote PC. Make sure the PC is turned on and connected to the network, and that remote access is enabled.
Error code: 0x204”
In addition to the 0x204 error, I also saw “Error code: 0x4” numerous times as well.
The two error codes I kept getting (0x204 and 0x4) were not helpful and just led me on a wild goose chase. These codes were only reported on the Mac RDP client and Windows was more generic:
Clearly the message “Make sure the PC is turned on” garnered no attention from a seasoned IT professional like me, but in the end turned out to be relevant. The issue was that the Windows 10 VM was going to sleep.
I only noticed this when I saw a blacked-out screen in the console preview and the lack of a hostname or IP address listed. This tells me that VMware tools hasn’t checked in for a period of time.
I’m not sure if an incoming RDP connection attempt would wake a physical machine in this state, but sleep isn’t very beneficial to a VM. I simply modified the power settings to prevent sleep and hibernation and the issue hasn’t happened again.
Windows Server varieties don’t behave this way, but because Windows 10 is primarily intended for bare-metal laptop and desktop use cases, power saving features are enabled by default.
This is a pretty basic problem, but I thought I’d do a post just in case it helps someone else who overlooked the obvious like I did and instead tried chasing up hexadecimal error codes 🙂
If you are attempting to upgrade your vCenter Server and are getting stuck in stage one while connecting to the source appliance, a simple password change may get you going again. In my case, I was upgrading from vCenter 6.7 U2 to 7.0 but this could certainly occur with other upgrade paths as well. I got the following error:
“A problem occurred while getting data from the source vCenter Server.”
The error message is pretty non-descript, but we do get the option to download some logging. In the log file downloaded, it seems pretty clear that this is an authentication problem:
2020-04-12T20:13:55.435Z - info: VM Identifier for Source VC: vm-16
2020-04-12T20:13:55.568Z - debug: initiateFileTransferFromGuest error: ServerFaultCode: Failed to authenticate with the guest operating system using the supplied credentials.
2020-04-12T20:13:55.568Z - debug: Failed to get fileTransferInfo:ServerFaultCode: Failed to authenticate with the guest operating system using the supplied credentials.
2020-04-12T20:13:55.568Z - debug: Failed to get url of file in guest vm:ServerFaultCode: Failed to authenticate with the guest operating system using the supplied credentials.
<snip>
2020-04-12T20:13:55.569Z - error: Failed to read the nodetype, Error: Failed to authenticate with the guest operating system using the supplied credentials.
2020-04-12T20:13:55.569Z - info: Checking if password expired
<snip>
2020-04-12T20:13:58.915Z - info: Stream :: close
2020-04-12T20:13:58.915Z - info: Password not expired
2020-04-12T20:13:58.917Z - error: sourcePrecheck: error in getting source Info: ServerFaultCode: Failed to authenticate with the guest operating system using the supplied credentials.
Despite double checking that my credentials were correct, the logging insisted that there was something wrong with them. The logging also states that the password was not expired. Despite this, I decided to check anyway:
root@vc [ ~ ]# chage -l root
You are required to change your password immediately (root enforced)
chage: PAM: Authentication token is no longer valid; new one required
Well, that’ll do it. Looks like the root password was expired after all. I found it odd that it allowed me to login via SSH without any kind of password expiry warning. I changed the password using the ‘passwd’ root shell command.
root@vc [ ~ ]# passwd
New password:
BAD PASSWORD: it is based on a dictionary word
Retype new password:
passwd: password updated successfully
root@vc [ ~ ]# chage -l root
Last password change                                    : Apr 12, 2020
Password expires                                        : Jul 11, 2020
Password inactive                                       : never
Account expires                                         : never
Minimum number of days between password change          : 0
Maximum number of days between password change          : 90
Number of days of warning before password expires       : 7
After changing the password from the CLI, the upgrade progressed normally! Hopefully this tip may help others that get stuck on this step as well.
Great cooling performance and low noise. An excellent heatsink for the AMD Ryzen 3000 Series.
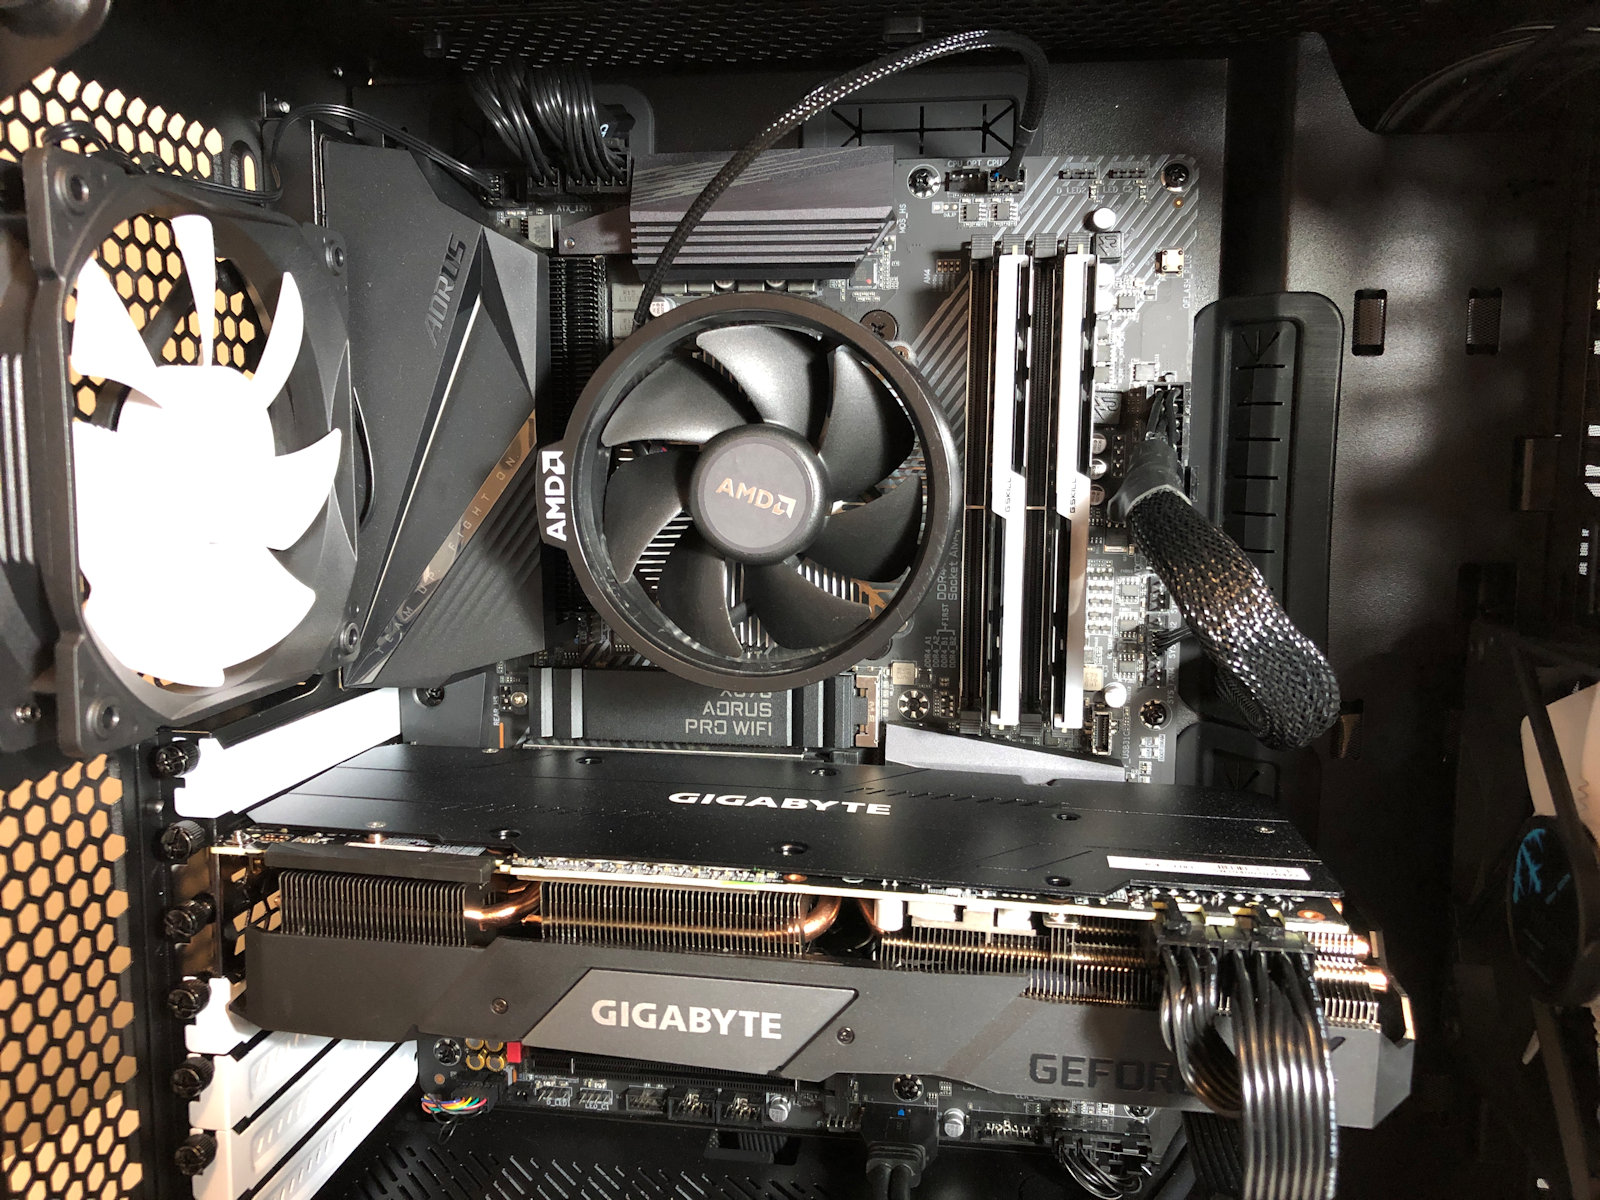
After over six years of use, it was time to put my faithful desktop gaming system out to pasture and to build a new one. Like many others building systems recently, I decided to step back over to the red team and put together a Ryzen 3000/X570 system this time around.
All the rave reviews of AMD’s new Zen 2 architecture were not exaggerated in my opinion – The new system is very responsive and feels much faster than the second generation Intel i7 processor it replaced.
My initial impressions of AMD’s new heatsinks were positive as they are quite impressive looking – much taller and heftier than Intel’s boxed heatsinks. Even their screw and spring based mounting system is far superior to stock heatsinks of the past. This heatsink seemed so promising that this was one of the first builds I have ever done where I had no plans to replace the stock cooler.
When I powered on the system for the first time, I was appalled by the terrible acoustic profile of the wraith spire fan. At its full 3000 RPM it’s unbearably loud and to make matters worse, Gigabyte’s default PWM fan profile had the fan constantly spinning up and down in response to temperature changes. I was so annoyed by the fan cycling that I just gave up and created a custom profile forcing the fan to about 50% until the CPU reaches a very high temperature. I actually preferred the constant annoyance of 50% to the horrible spinning up and down that would happen all the time. The cooling performance wasn’t horrible, but I just couldn’t handle the fan. I think I used the system for about an hour before I was determined that I needed an aftermarket cooler.
Noctua was kind enough to provide me with a review sample of their NH-U12S chromax.black edition heatsink to try out today.
Noctua
Noctua is an Austrian company well known for their low noise fans and high-end heatsinks. I’ve been using Noctua heatsinks for ages. In fact, I reviewed some of their original heatsinks and fans many years ago when I used to write hardware reviews. This included their original NH-U12P, the NH-C12P and the smaller NH-U9B. Back then, I praised them for their high-quality construction, near silent operation, excellent mounting hardware and most importantly – excellent cooling performance. That was over ten years ago, and it seems that Noctua is still very well respected for all the same reasons today.
Their gear has always been pricey compared to the competition, but when it comes to Noctua, you get what you pay for.
Noctua NH-U12S chromax.black
Noctua’s NH-U12S has been out for some time now, and it seemed to tick all of the right boxes for me. It is what Noctua calls a “classic sized” 120mm tower heatsink, designed to be somewhat slim and and sized to ensure compatibility with a variety of systems and motherboard layouts.
For this new Ryzen system, I wanted to try Noctua’s new chromax.black edition of the NH-U12S. Although I don’t mind Noctua’s signature beige/brown fans, I was excited to see their new all-black chromax version. Given the tempered glass window on my Fractal Design C case, I thought the all-black heatsink and fan would look pretty slick and match the look of the system beautifully.
With a matte black coating on the entire heatsink as well as a black NF-F12 fan, the NH-U12S chromax.black heatsink would look at home in any modern system.
I noticed that my Windows 10 VM kept becoming inaccessible after shutting down and powering up my lab. As part of the power down process, I was cutting power to the MikroTik CRS309 switch, which is the default gateway for the VMs in VLAN 1. After opening a console to the Windows VM I discovered that the network discovery feature was detecting a new network and prompting whether it was trusted. This discovery is based upon the MAC address of the default gateway – sure enough it seemed to be changing after each power up of the CRS309.
After doing some research it seems that this is expected behaviour. The bridge MAC is auto-selected based on one of the bridge ports at boot-up. Because of this, there is a good chance the MAC will change after each boot. If I left my switch up 24/7, this wouldn’t be a problem, but since I don’t, I need keep things consistent.
The MikroTik wiki mentions two options – admin-mac and auto-mac. These two can be used to force the bridge to use a static MAC address. I just selected the current auto-generated MAC to use for this purpose.
You can get the current bridge configuration using the following command:
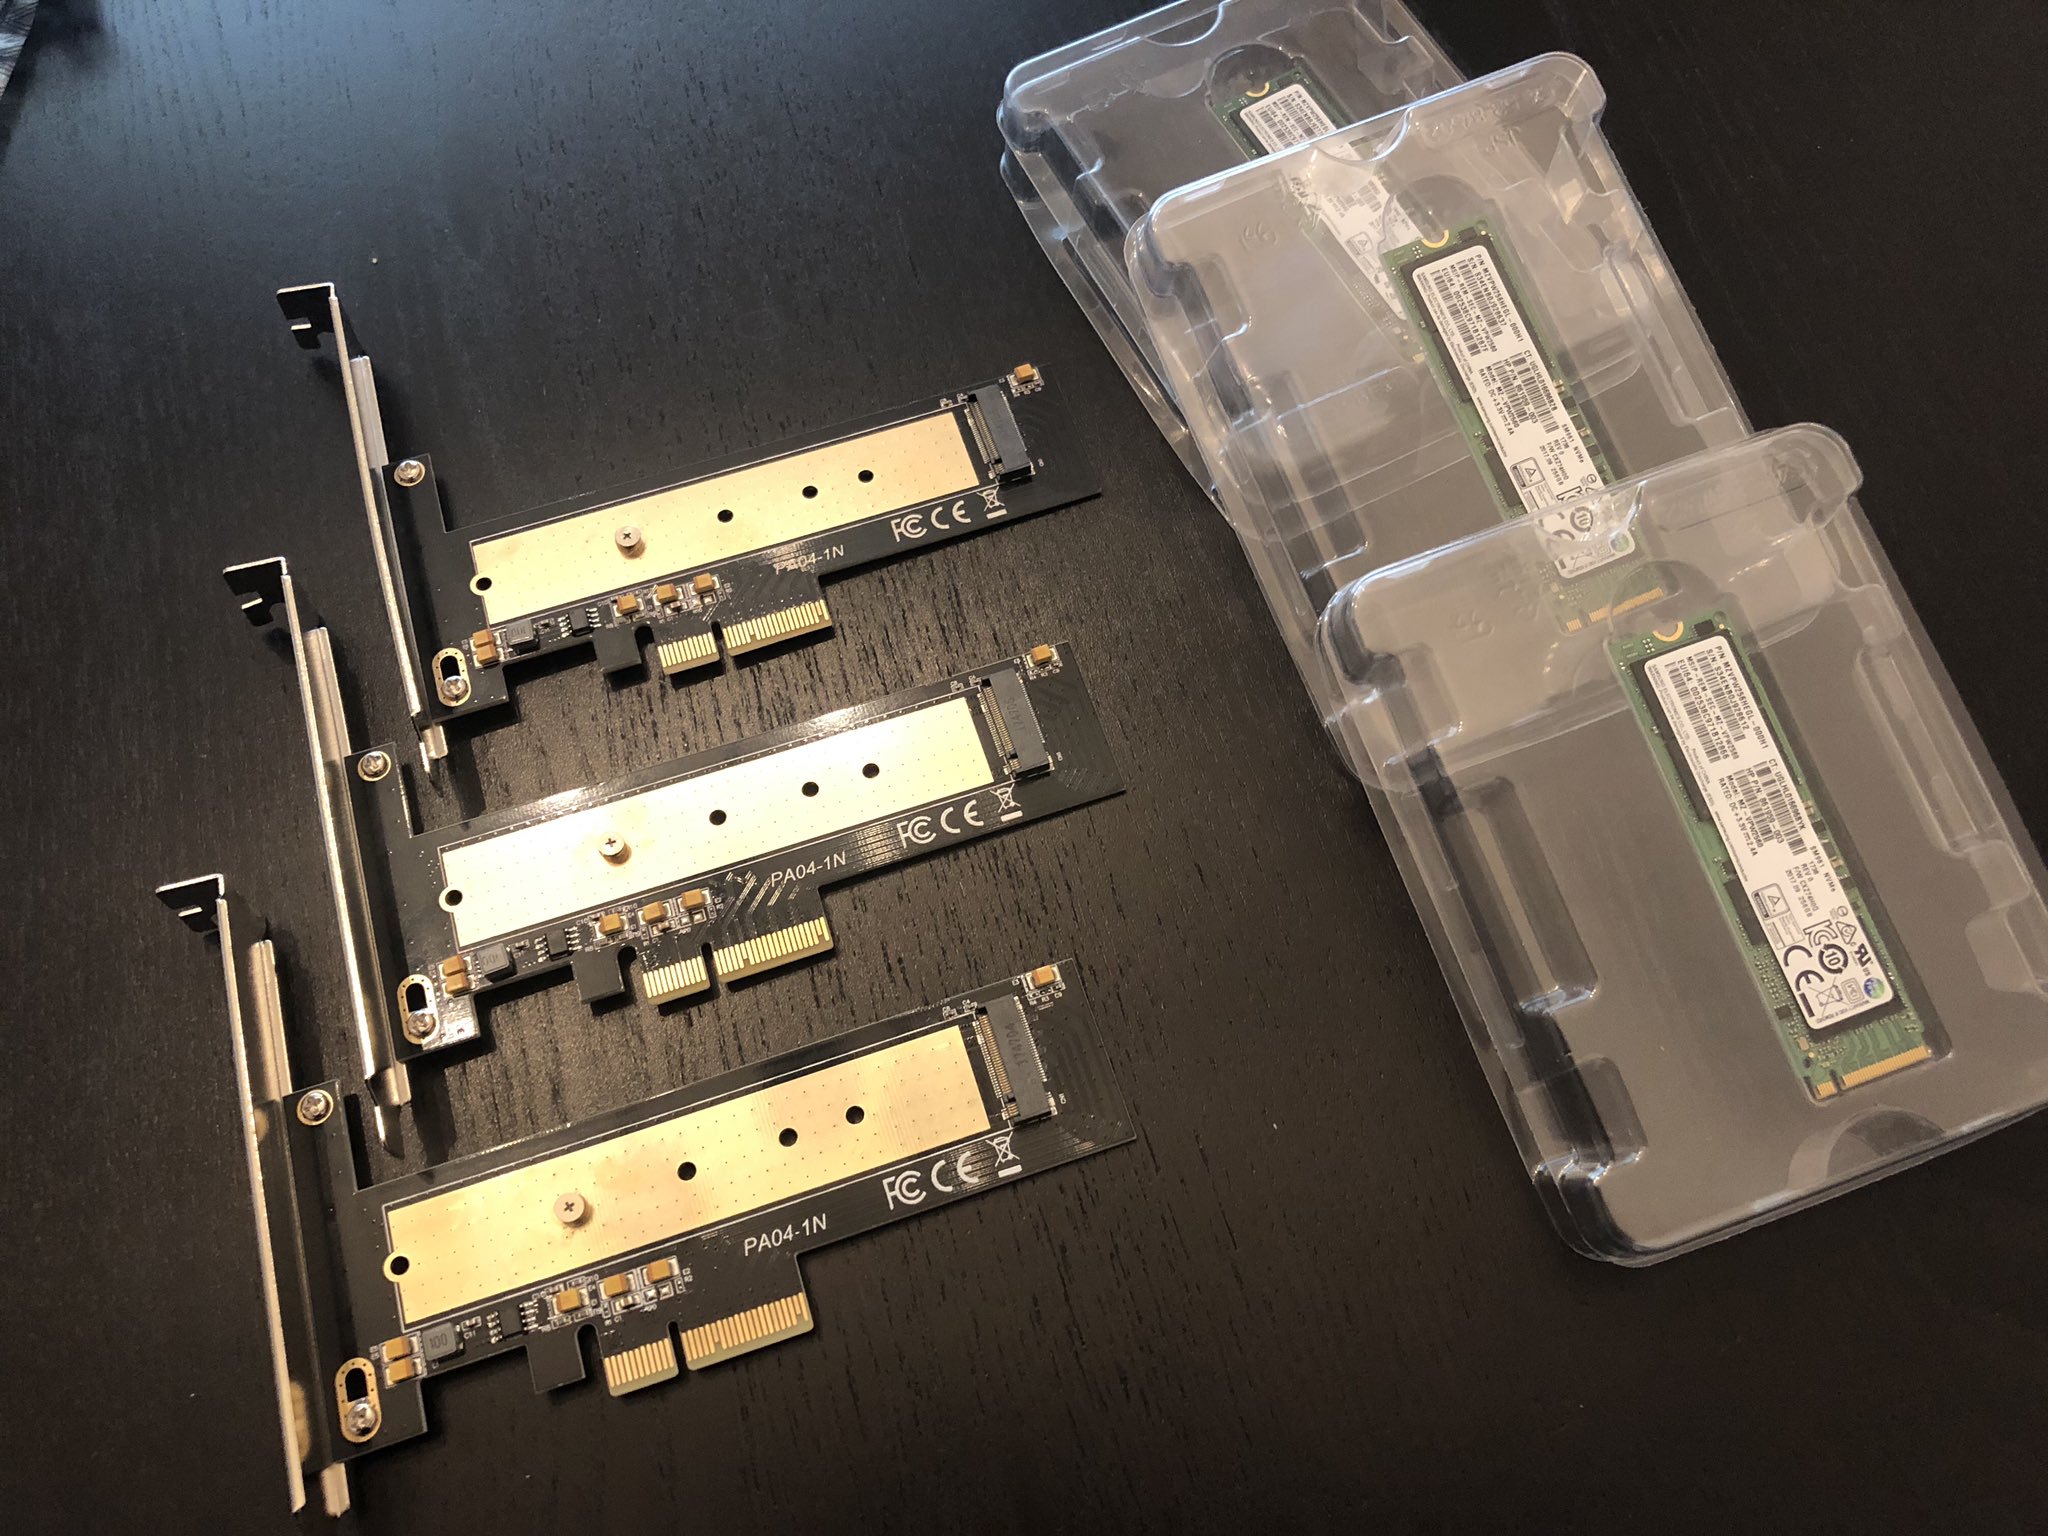
I recently deployed an all-NVMe based vSAN configuration in my home lab. I’ll be posting more information on my setup soon, but I decided to use OEM Samsung based SSDs. I’ve got 256GB SM961 MLC based drives for my cache tier, and larger 1TB enterprise-grade PM953s for capacity. These drives are plenty quick for vSAN and can be had for great prices on eBay if you know where to look.
The Samsung Polaris based SM961 is similar to the 960 Pro and well suited for vSAN caching.
Being OEM drives, they don’t have any heatsinks and are pretty bare. As I started running some performance tests using synthetic tools like Crystal Disk Mark and ATTO, I began to see instability. My guest running the test would completely hang after a few minutes of testing and I’d be forced to reboot the ESXi host to recover.
Looking through the logs, it became clear what had happened:
2019-08-16T15:43:26.083Z cpu0:2341677)nvme:AsyncEventReportComplete:3050:Smart health event: Temperature above threshold
2019-08-16T15:43:26.087Z cpu9:2097671)nvme:NvmeExc_ExceptionHandlerTask:317:Critical warnings detected in smart log [2], failing controller
2019-08-16T15:43:26.087Z cpu9:2097671)nvme:NvmeExc_RegisterForEvents:370:Async event registration requested while controller is in Health Degraded state.
One of my nvme drives had overheated! The second time I tried the test, I watched more closely.
Sure enough, it wasn’t the older PM953s overheating, but the newer Polaris based SM961 cache drives. As soon as the heavy writes started, the drive’s temperature steadily increased until it approached 70’C. The moment it hit 70, the guest hung. Looking more closely in ESXi, I could see that the drive completely disappeared. I.e. it was no longer listed as a NVMe device or HBA in the system. It appears that this is safety measure to stop the controller from cooking itself to the point of permanent damage. Since I had no idea it was running so hot, I’d say I’m thankful for this feature – but none the less, I’d have to figure out some way to keep these drives cooler.
ESXi has a limited implementation of SMART monitoring and can pull a few specific metrics. Thankfully, drive temperature is one of them. First, I needed to get the t10 identifier for my nvme drives:
[root@esx-e1:~] esxcli storage core device list |grep SAMSUNG
t10.NVMe____SAMSUNG_MZVPW256HEGL2D000H1______________6628B171C9382499
Display Name: Local NVMe Disk (t10.NVMe____SAMSUNG_MZVPW256HEGL2D000H1______________6628B171C9382499)
Devfs Path: /vmfs/devices/disks/t10.NVMe____SAMSUNG_MZVPW256HEGL2D000H1______________6628B171C9382499
Model: SAMSUNG MZVPW256
t10.NVMe____SAMSUNG_MZ1LV960HCJH2D000MU______________1505216B24382888
Display Name: Local NVMe Disk (t10.NVMe____SAMSUNG_MZ1LV960HCJH2D000MU______________1505216B24382888)
Devfs Path: /vmfs/devices/disks/t10.NVMe____SAMSUNG_MZ1LV960HCJH2D000MU______________1505216B24382888
Model: SAMSUNG MZ1LV960
Running a four second refresh interval using ‘watch’ is a useful way to monitor the drive under stress.
[root@esx-e1:~] watch -n 4 "esxcli storage core device smart get -d t10.NVMe____SAMSUNG_MZVPW256HEGL2D000H1______________6628B171C9382499"
Parameter Value Threshold Worst
---------------------------- ----- --------- -----
Health Status OK N/A N/A
Media Wearout Indicator N/A N/A N/A
Write Error Count N/A N/A N/A
Read Error Count N/A N/A N/A
Power-on Hours 974 N/A N/A
Power Cycle Count 62 N/A N/A
Reallocated Sector Count 0 95 N/A
Raw Read Error Rate N/A N/A N/A
Drive Temperature 35 70 N/A
Driver Rated Max Temperature N/A N/A N/A
Write Sectors TOT Count N/A N/A N/A
Read Sectors TOT Count N/A N/A N/A
Initial Bad Block Count N/A N/A N/A
As you can see, the maximum temperature is listed as 70’C. This isn’t a suggestion as I’ve come to learn the hard way.
To get things cooler I decided to move my fans around in my Antec VSK4000 cases. My lab is geared toward silence more than cooling so the airflow near the PCIe slots is pretty poor. I’ve now got a 120mm fan on the side-panel cooling the slots directly. This benefits my Solarflare 10Gbps NICs as well, which can get quite toasty. This helped significantly, but if I leave a synthetic test running long enough, it will eventually get to 70’C again. Clearly, I’ll need to add passive heatsinks to the SM961s if I want to keep them cool in these systems.
Realistically, it’s only synthetic and very heavy write tests that seem to get the temperature climbing to those levels. It’s unlikely that day-to-day use would cause a problem. None the less, I’m going to look into heatsinks for the drives. They can be had for $5-10 on Amazon, so it seems like a small investment for some extra peace of mind.
The morale of the story – keep an eye on your NVMe controller temps!
Run ipmitool directly from the ESXi command line instead of having to boot to Linux.
I just created a packaged vib that includes ipmitool 1.8.11 that can be run directly from the ESXi CLI. I needed to be able to modify fan thresholds to keep my slow-spinning fans from triggering critical alarms on my hosts. These fan thresholds aren’t exposed in the web UI and I have to modify them using ipmitool. Normally, to do this I’d have to shut down the host, and boot it up using an install of Debian on a USB stick – a bit of a pain. Why not just run ipmitool from directly within ESXi instead?
You can find the vib download, some background, installation instructions and example uses on the static page here.
Welcome to the third instalment of a new series of NSX-T troubleshooting scenarios. Thanks to everyone who took the time to comment on the first half of the scenario. Today I’ll be performing some troubleshooting and will show how I came to the solution.
Please see the first half for more detail on the problem symptoms and some scoping.
Getting Started
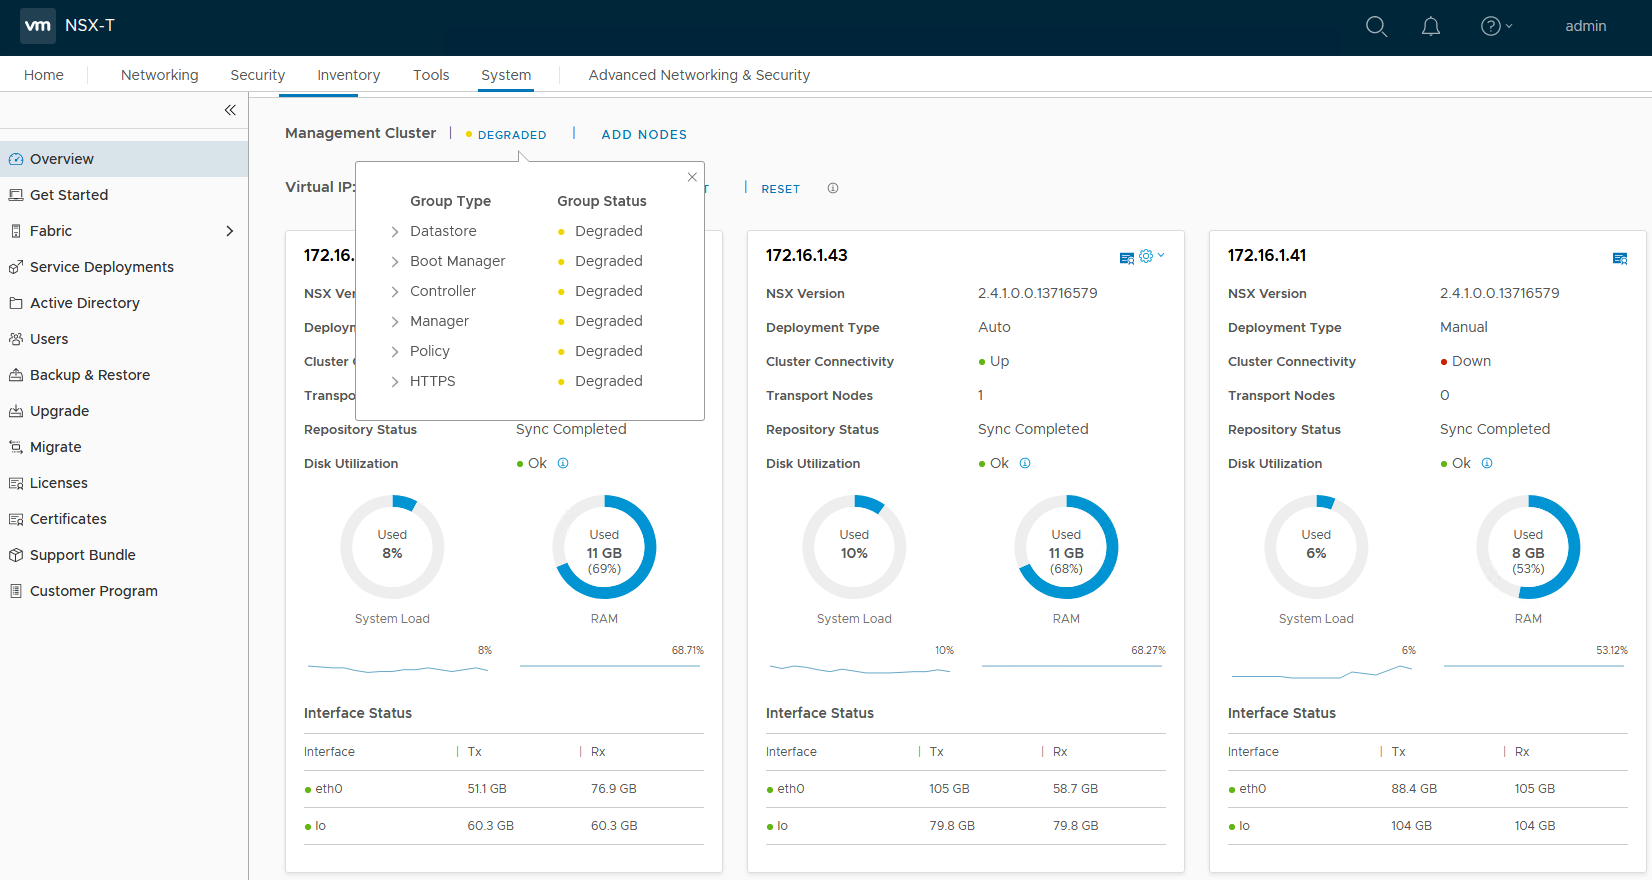
As we saw in the first half, the customer’s management cluster was in a degraded state. This was due to one manager – 172.16.1.41 – being in a wonky half-broken state. Although we could ping it, we could not login and all of the services it was contributing to the NSX management cluster were down.
What was most telling, however, was the screenshot of the VM’s console window.
The most important keyword there was “Read-only file system”. As many readers had correctly guessed, this is a very common response to an underlying storage problem. Like most flavors of Linux, the Linux-based OS used in the NSX appliances will set their ext4 partitions to read-only in the event of a storage failure. This is a protective mechanism to prevent data corruption and further data loss.
When this happens, the guest may be partially functional, but anything that requires write access to the read-only partitions will obviously be in trouble. This is why we could ping the manager appliance, but all other functionality was broken. The manager cluster uses ZooKeeper for clustering services. ZooKeeper requires consistent and low-latency write access to disk. Because this wasn’t available to 172.16.1.41, it was marked as down in the cluster.
After discussing this with our fictional customer, we were able to confirm that an ESXi host esx-e3 experienced a total storage outage for a few minutes and that it had since been fixed. They had assumed it was not related because the appliance was on esx-e1, not esx-e3.
It’s been a while since I’ve posted anything, so what better way to get back into the swing of things than a troubleshooting scenario! These last few months I’ve been busy learning the ropes in my new role as an SRE supporting NSX and VMware Cloud on AWS. Hopefully I’ll be able to start releasing regular content again soon.
Welcome to the third NSX-T troubleshooting scenario! What I hope to do in these posts is share some of the common issues I run across from day to day. Each scenario will be a two-part post. The first will be an outline of the symptoms and problem statement along with bits of information from the environment. The second will be the solution, including the troubleshooting and investigation I did to get there.
The Scenario
As always, we’ll start with a fictional customer problem statement:
“I’m not experiencing any problems, but I noticed that my NSX-T 2.4.1 manager cluster is in a degraded state. One of the unified appliances appears to be down. I can ping it just fine, but I can’t seem to login to the appliance via SSH. I’m sure I’m putting in the right password, but it won’t let me in. I’m not sure what’s going on. Please help!”
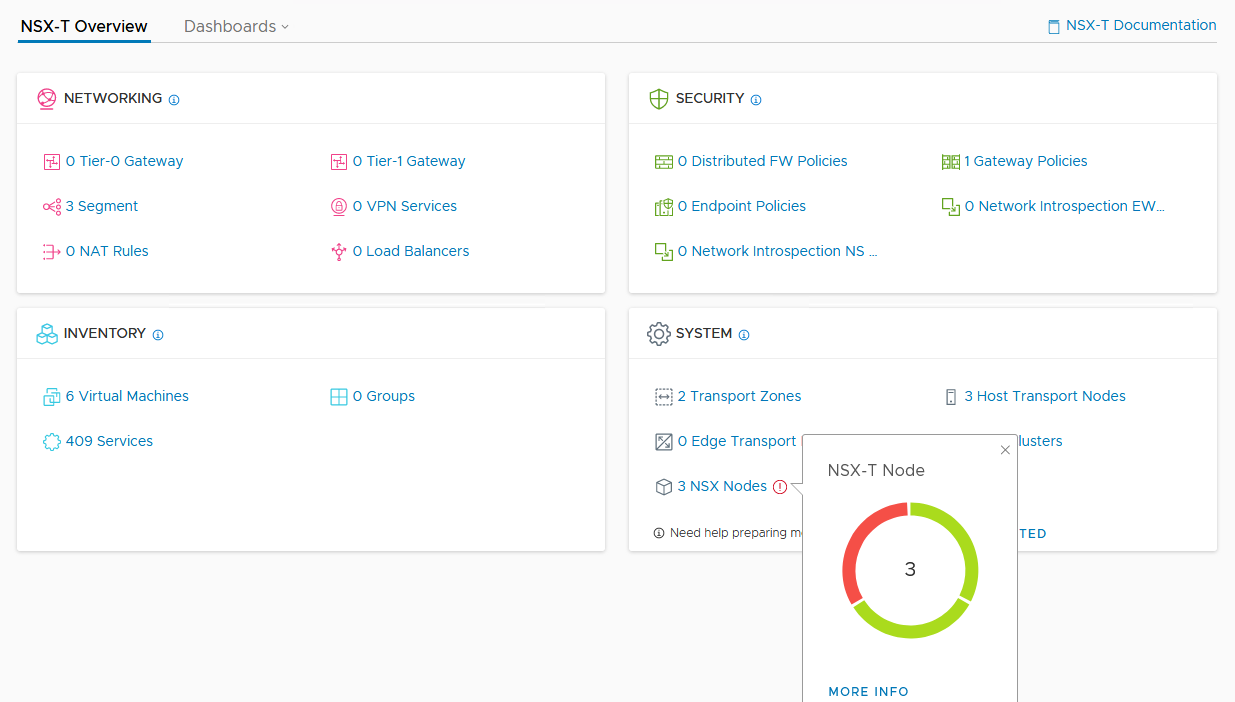
From the NSX-T Overview page, we can see that one appliance is red.
Let’s have a look at the management cluster in the UI:
The problematic manager is 172.16.1.41. It’s reporting its cluster connectivity as ‘Down’ despite being reachable via ping. It appears that all of the services including controller related services are down for this appliance as well.
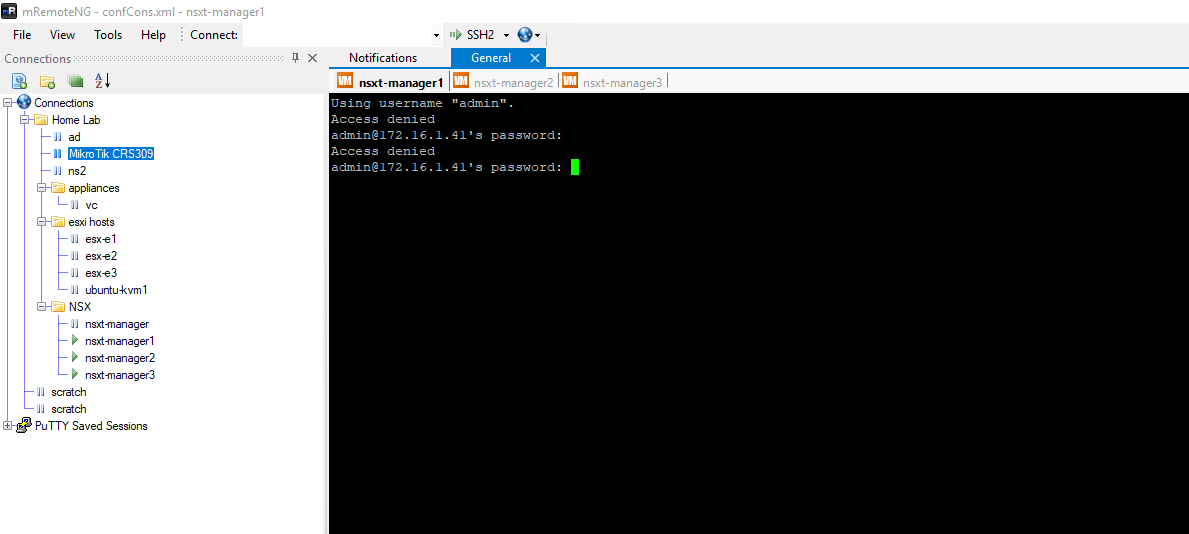
Strangely, it doesn’t appear to be accepting the admin or root passwords via SSH. We always get an ‘Access Denied’ response. We can login successfully to the other two appliances without issue using the same credentials.
Opening a console window to 172.16.1.41 greets us with the following:
Error messages appear to continually scroll by from system-journald mentioning “Failed to write entry”. Hitting enter gives us the login prompt, but we immediately get the same error messages and can’t login.
What’s Next
It seems pretty clear that there is something wrong with 172.16.1.41, but what may have caused this problem? How would you fix this and most importantly, how can you root cause this?
I’ll post the solution in the next day or two, but how would you handle this scenario? Let me know! Please feel free to leave a comment below or via Twitter (@vswitchzero).
SR-IOV or “Single Root I/O Virtualization” is a very interesting feature that can provide virtual machines shared access to physical network cards installed in the hypervisor. This may sound a lot like what a virtual NIC and a vSwitch does, but the feature works very similarly to PCI passthrough, granting a VM direct access to the NIC hardware. In order to understand SR-IOV, it helps to understand how PCI passthrough works. Here is a quote from a post I did a few years ago:
“PCI Passthrough – or VMDirectPath I/O as VMware calls it – is not at all a new feature. It was originally introduced back in vSphere 4.0 after Intel and AMD introduced the necessary IOMMU processor extensions to make this possible. For passthrough to work, you’ll need an Intel processor supporting VT-d or an AMD processor supporting AMD-Vi as well as a motherboard that can support this feature.
In a nutshell, PCI passthrough allows you to give a virtual machine direct access to a PCI device on the host. And when I say direct, I mean direct – the guest OS communicates with the PCI device via IOMMU and the hypervisor completely ignores the card.”
SR-IOV takes PCI passthrough to the next level. Rather than granting exclusive use of the device to a single virtual machine, the device is shared or ‘partitioned’. It can be shared between multiple virtual machines, or even shared between virtual machines and the hypervisor itself. For example, a single 10Gbps NIC could be ‘passed through’ to a couple of virtual machines for direct access, and at the same time it could be attached to a vSwitch being used by other VMs with virtual NICs and vmkernel ports too. Think shared PCI passthrough.


 Noctua is an Austrian company well known for their low noise fans and high-end heatsinks. I’ve been using Noctua heatsinks for ages. In fact, I reviewed some of their original heatsinks and fans many years ago when I used to write hardware reviews. This included their original NH-U12P, the NH-C12P and the smaller NH-U9B. Back then, I praised them for their high-quality construction, near silent operation, excellent mounting hardware and most importantly – excellent cooling performance. That was over ten years ago, and it seems that Noctua is still very well respected for all the same reasons today.