Testing NSX VTEP Communication

An in-depth look at the VXLAN network stack and VTEP to VTEP communication testing.

Virtual Extensible LAN – or VXLAN – is the key overlay technology that makes a lot of what NSX does possible. It abstracts the underlying L2/L3 network and allows logical switches to span vast networks and datacenters. To achieve this, each ESXi hypervisor has one or more VTEP vmkernel ports bound the the host’s VXLAN network stack instance.

Your VTEPs are created during VXLAN preparation – normally after preparing your hosts with the NSX VIBs. Doing this in the UI is a straight forward process, but there are some important pre-requisites that must be fulfilled before VXLAN networking will work. Most important of these are:

  1. Your physical networking must be configured for an end-to-end MTU of 1600 bytes. In theory it’s 1550, but VMware usually recommends a minimum of 1600.
  2. You must ensure L2 and L3 connectivity between all VTEPs.
  3. You need to prepare for IP address assignment by either configuring DHCP scopes or IP pools.
  4. If your replication mode is hybrid, you’ll need to ensure IGMP snooping is configured on each VLAN used by VTEPs.
  5. Using full Multicast mode? You’ll need IGMP snooping in addition to PIM multicast routing.

This can sometimes be easier said than done – especially if you have hosts in multiple locations with numerous hops to traverse.

Testing VXLAN VTEP communication is a key troubleshooting skill that every NSX engineer should have in their toolbox. Without healthy VTEP communication and a properly configured underlay network, all bets are off.

I know this is a pretty well covered topic, but I wanted to dive into this a little bit deeper and provide more background around why we test the way we do, and how to draw conclusions from the results.

The VXLAN Network Stack

Multiple network stacks were first introduced in vSphere 6.0 for use with vMotion and other services. There are several benefits to isolating services based on network stacks, but the most practical is a completely independent routing table. This means you can have a different default gateway for vMotion – or in this case VXLAN traffic – than you would for all other management services.

Each vmkernel port that is created on an ESXi host must belong to one and only one network stack. When your cluster is VXLAN prepared, the created kernel ports are automatically assigned to the correct ‘vxlan’ network stack.

Using the esxcfg-vmknic -l command will list all kernel ports including their assigned network stack:

[root@esx-a1:~] esxcfg-vmknic -l
Interface  Port Group/DVPort/Opaque Network        IP Family IP Address                              Netmask         Broadcast       MAC Address       MTU     TSO MSS NetStack
vmk0       7                                       IPv4      172.16.1.21                             255.255.255.0   172.16.1.255    00:25:90:0b:1e:12 1500    65535   defaultTcpipStack
vmk1       13                                      IPv4      172.16.98.21                            255.255.255.0   172.16.98.255   00:50:56:65:59:a8 9000    65535   defaultTcpipStack
vmk2       22                                      IPv4      172.16.11.21                            255.255.255.0   172.16.11.255   00:50:56:63:d9:72 1500    65535   defaultTcpipStack
vmk4       vmservice-vmknic-pg                     IPv4      169.254.1.1                             255.255.255.0   169.254.1.255   00:50:56:61:7a:23 1500    65535   defaultTcpipStack
vmk3       52                                      IPv4      172.16.76.22                            255.255.255.0   172.16.76.255   00:50:56:6b:e4:94 1600    65535   vxlan

Notice that all kernel ports belong to the ‘defaultTcpipStack’ except for vmk3, which lists vxlan. You can view the netstacks currently enabled on your host using the esxcli network ip netstack list command:

[root@esx-a1:~] esxcli network ip netstack list
defaultTcpipStack
   Key: defaultTcpipStack
   Name: defaultTcpipStack
   State: 4660

vxlan
   Key: vxlan
   Name: vxlan
   State: 4660

Continue reading “Testing NSX VTEP Communication”

NSX Troubleshooting Scenario 14 – Solution

Welcome to the fourteenth installment of a new series of NSX troubleshooting scenarios. Thanks to everyone who took the time to comment on the first half of the scenario. Today I’ll be performing some troubleshooting and will show how I came to the solution.

Please see the first half for more detail on the problem symptoms and some scoping.

Getting Started

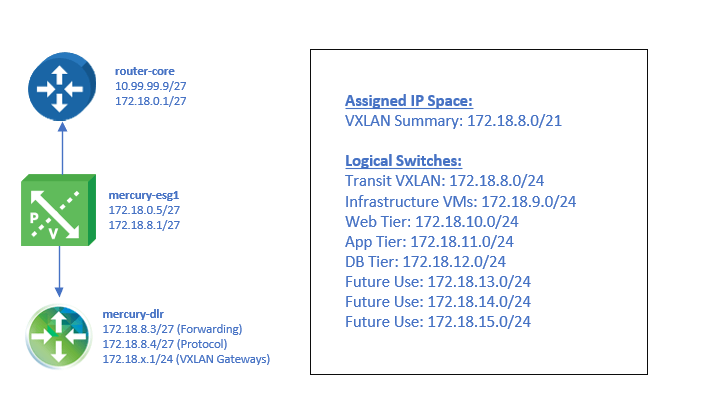
In the first half, our fictional customer was trying to prevent a specific summary route from being advertised to a DLR appliance using a BGP filter. Every time they added the filter, all connectivity to VMs downstream from that DLR was lost.

tshoot14a-4

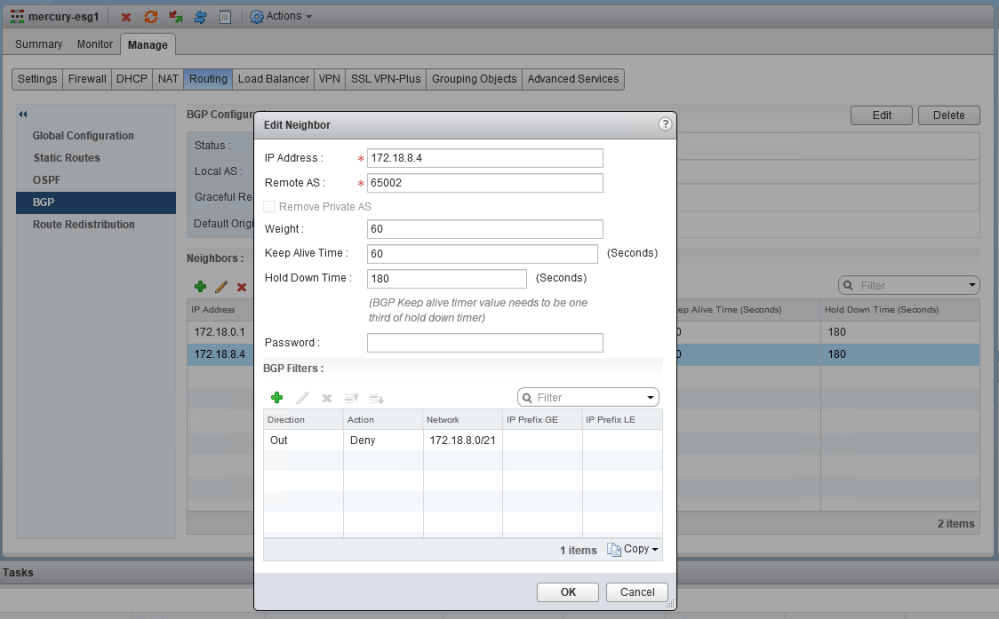
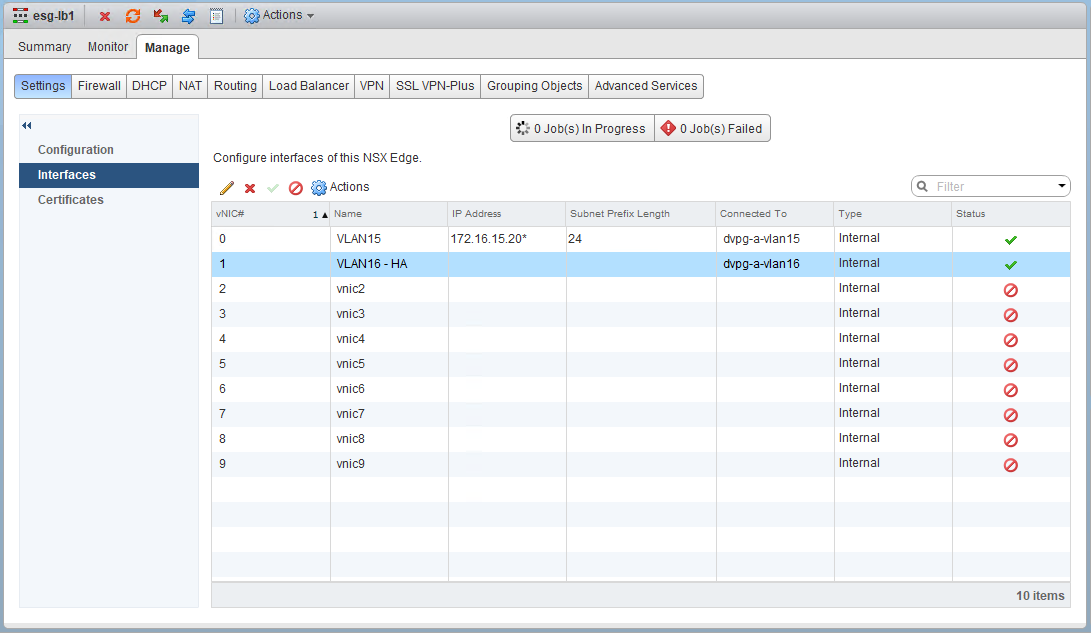
The filter appears correct. The summary route is a /21 network that comprises all eight /24s that were assigned to logical switches. You can also see that GE and LE (greater than/less than) values were not specified, so the specific summary route should be matched exactly.

tshoot14a-5

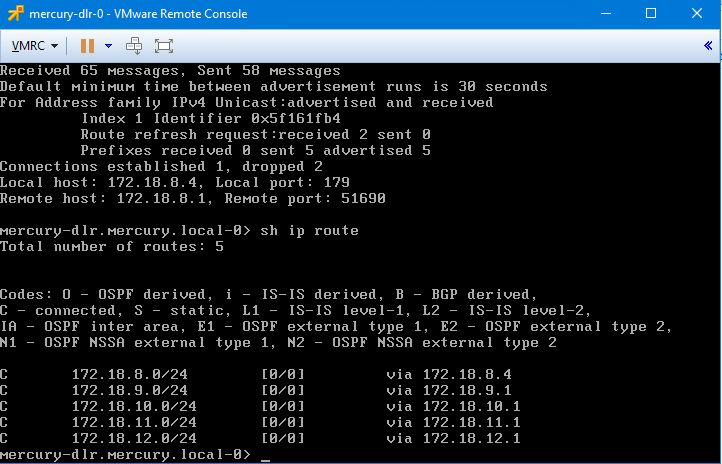
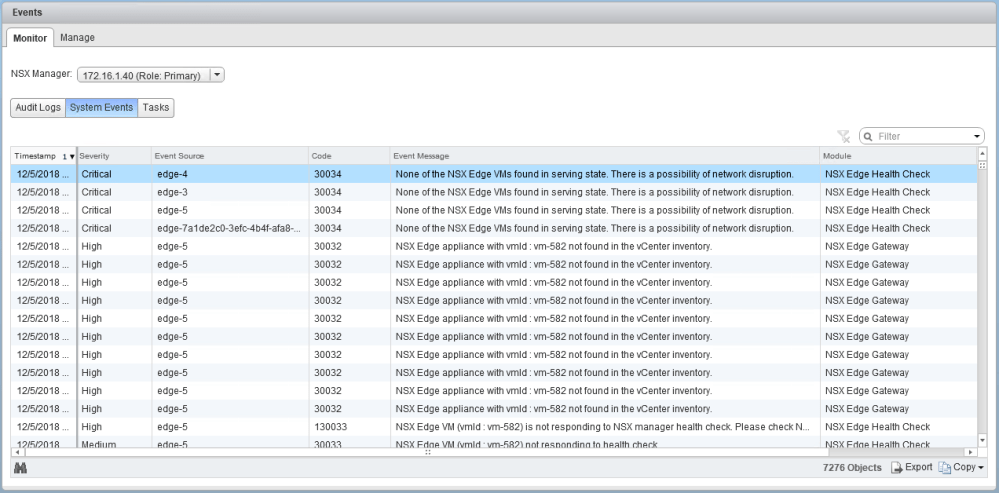
After publishing the changes, we saw that all BGP routes were removed from the DLR. It’s almost as if the filter stopped ALL route prefixes from making it to the DLR rather than just the one specified. Wait, did it?

Let’s refer to the NSX documentation on BGP filters. Under the Configure BGP section, the relevant steps are the following:

Continue reading “NSX Troubleshooting Scenario 14 – Solution”

NSX Troubleshooting Scenario 14

Welcome to the fourteenth installment of my NSX troubleshooting series. What I hope to do in these posts is share some of the common issues I run across from day to day. Each scenario will be a two-part post. The first will be an outline of the symptoms and problem statement along with bits of information from the environment. The second will be the solution, including the troubleshooting and investigation I did to get there.

The Scenario

As always, we’ll start with a brief problem statement:

“I’m trying to prevent some specific BGP routes from being advertised to my DLR, but the route filters aren’t working properly. Every time I try to do this, I get an outage to everything behind the DLR!”

Let’s have a quick look at what this fictional customer is trying to do with BGP.

tshoot14a-0

The design is simple – a single ESG peered with a single DLR appliance. The /21 address space assigned to this environment has been split out into eight /24 networks.

tshoot14a-3

The mercury-esg1 appliance has two neighbors configured – the physical router (172.18.0.1) and the southbound DLR protocol address (172.18.8.4). Both the ESG and DLR are in the same AS (iBGP).

tshoot14a-1

As you can see, on mercury-esg1 a summary static route has been created with the DLR forwarding address as the next hop. This /21 summarizes all eight /24 subnets that will be assigned to the logical switches in this environment. Because the customer wants more specific /24 BGP routes to be advertised by the DLR, this is what is referred to as a floating static route. Because it’s less specific, it’ll only take effect as a backup should BGP peering go down. This is a common design consideration and provides a bit of extra insurance should the DLR appliance go down unexpectedly.

Continue reading “NSX Troubleshooting Scenario 14”

NSX Troubleshooting Scenario 13 – Solution

Welcome to the thirteenth installment of a new series of NSX troubleshooting scenarios. Thanks to everyone who took the time to comment on the first half of the scenario. Today I’ll be performing some troubleshooting and will show how I came to the solution.

Please see the first half for more detail on the problem symptoms and some scoping.

Getting Started

As you’ll recall in the first half, our fictional customer was having issues re-deploying ESGs and DLRs that had been removed from the vCenter inventory. This was all part of a cleanup activity that occurred due to a SAN outage.

tshoot13a-5
Not a very informative error message. We’ll need to refer to the logging to find out more.

To begin, we’ll really need more information on exactly why NSX is failing to re-deploy these ESGs and DLRs. The message in the UI is not very informative. As mentioned, there are no failed tasks in the vCenter recent tasks pane when an attempt is made, so we’ll need to go digging into the logging to find out more.

Taking a look at the vsm.log file on the NSX Manager appliance, we can see a backtrace occur at the same time as the deployment attempt:

2018-12-06 23:43:17.681 GMT+00:00 ERROR TaskFrameworkExecutor-19 Worker:219 - - [nsxv@6876 comp="nsx-manager" subcomp="manager"] BaseException thrown while executing task instance taskinstance-100656 com.vmware.vshield.edge.exception.EdgeVmDeploymentFailedException: nested exception is com.vmware.vshield.vsm.inventory.vcoperations.OvfManagerInternalErrorException:
core-services:1100:OVF Manager internal error. For more details, refer to the rootCauseString or the VC logs:
Managed object id datastore-26 of type Datastore was not found in VC.

The key part of the message that is of interest is the following:

“Managed object id datastore-26 of type Datastore was not found in VC.”

Continue reading “NSX Troubleshooting Scenario 13 – Solution”

NSX Troubleshooting Scenario 13

Welcome to the thirteenth installment of my NSX troubleshooting series. What I hope to do in these posts is share some of the common issues I run across from day to day. Each scenario will be a two-part post. The first will be an outline of the symptoms and problem statement along with bits of information from the environment. The second will be the solution, including the troubleshooting and investigation I did to get there.

The Scenario

As always, we’ll start with a brief problem statement:

“After recovering from a storage outage, we’re unable to re-deploy any of our missing DLRs and ESGs. Help!”

With this type of a problem description, the first order of business is to find out EXACTLY what happened. After a lengthy discussion with the fictional customer, we were able to piece together the following sequence of events:

  1. The SAN suffered a catastrophic failure.
  2. All of the LUNs were continuously replicated to another SAN over the years, so these replicated LUNs were presented to the hosts in the compute-a cluster.
  3. After a rescan, the VMFS volumes were re-signatured and the datastores and all files were again accessible.
  4. All of the VMs on those datastores were manually added back to the vCenter Inventory except the DLRs and ESGs.
  5. All DLRs and ESGs were deleted from the datastore so that they could be freshly re-deployed.

The customer did realize that in point number 5 above that any ESGs re-added to the inventory would no longer be valid because of mismatched UUIDs. Deleting these from disk and re-deploying was a good idea.

NSX is throwing many high and critical events because of the missing ESG and DLR appliances, as expected.

tshoot13a-1

There are six appliances in total, including three DLRs and three ESGs.

Continue reading “NSX Troubleshooting Scenario 13”

Cisco nenic Driver Issue During NSX Upgrades

The nenic driver versions prior to 1.0.11.0 may cause an outage during NSX upgrades.

If you are planning an NSX upgrade in a Cisco UCS environment, pay close attention to your ‘nenic’ driver version before you begin. The nenic driver is the new native driver replacement for the older vmklinux enic driver. It’s used exclusively for the Cisco VIC adapters found in UCS systems and is now the default in vSphere 6.5 and 6.7.

We’ve seen several instances now where Cisco VIC adapters can go link-down in an error state during NSX VIB upgrades. It doesn’t appear to matter what version of NSX is being upgraded from/to, but the common denominator is an older nenic driver version. This seems to be reproducible with nenic driver version 1.0.0.2 and possibly others. Version 1.0.11.0 and later appear to correct this problem. At the time of writing, 1.0.26.0 is the latest version available.

You can obtain your current nenic driver and firmware version using the following command:

# esxcli network nic get -n vmnicX

Before you upgrade your drivers, be sure to reach out to Cisco to ensure your firmware is also at the recommended release version. Quite often vendors have a recommended driver/firmware combination for maximum stability and performance.

I expect a KB article and an update to the NSX release notes to be made public soon but wanted to ensure this information got out there as soon as possible.

NSX Troubleshooting Scenario 12 – Solution

Welcome to the twelfth installment of a new series of NSX troubleshooting scenarios. Thanks to everyone who took the time to comment on the first half of the scenario. Today I’ll be performing some troubleshooting and will show how I came to the solution.

Please see the first half for more detail on the problem symptoms and some scoping.

Getting Started

As you’ll recall in the first half, our fictional customer was getting some unexpected behavior from a couple of firewall rules. Despite the rules being properly constructed, one VM called linux-a3 continued to be accessible via SSH.

tshoot12a-2
The two rules in question – 1007 and 1008 – look to be constructed correctly.

We confirmed that the IP addresses for the machines in the security group where translated correctly by NSX and that the ruleset didn’t appear to be the problem. Let’s recap what we know:

  1. VM linux-a2 seems to be working correctly and SSH traffic is blocked.
  2. VM linux-a3 doesn’t seem to respect rule 1007 for some reason and remains accessible via SSH from everywhere.
  3. Host esx-a3 where linux-a3 resides doesn’t appear to log any activity for rule 1007 or 1008 even though those rules are configured to log.
  4. The two VMs are on different ESXi hosts (esx-a1 and esx-a3).
  5. VMs linux-a2 and linux-a3 are in different dvPortgroups.

Given these statements, there are several things I’d want to check:

  1. How can the two VMs have proper IP connectivity in VXLAN and VLAN porgroups as observed?
  2. Is the DFW working at all on host esx-a3?
  3. Did the last rule publication make it to host esx-a3 and does it match what we see in the UI?
  4. Is the DFW (slot-2) dvfilter applied to linux-a3 correctly?

Continue reading “NSX Troubleshooting Scenario 12 – Solution”

NSX Troubleshooting Scenario 12

Welcome to the twelfth installment of my NSX troubleshooting series. What I hope to do in these posts is share some of the common issues I run across from day to day. Each scenario will be a two-part post. The first will be an outline of the symptoms and problem statement along with bits of information from the environment. The second will be the solution, including the troubleshooting and investigation I did to get there.

For this scenario today, I’ve created some supplementary video content to go along this post:

The Scenario

As always, we’ll start with a brief problem statement:

“I am just getting started with the NSX distributed firewall and see that the rules are not behaving as they should be. I have two VMs, linux-a2 and linux-a3 that should allow SSH from only one specific jump box. The linux-a3 VM can be accessed via SSH from anywhere! Why is this happening?”

To get started with this scenario, we’ll most certainly need to look at how the DFW rules are constructed to get the desired behavior. The immense flexibility of the distributed firewall allows for dozens of different ways to achieve what is described.

Here are the two VMs in question:

tshoot12a-4
The VM linux-a2 is currently on host esx-a1 with IP address 172.16.15.10. It’s sitting on a logical switch.

And linux-a3:

tshoot12a-5
The VM linux-a3 is currently on host esx-a3 with IP address 172.16.15.11. It’s sitting on a VLAN backed dvPortgroup.

There are a couple of interesting observations above. The first is that both VMs have a security tag applied called ‘Linux-A VMs’. The other is a bit more of an oddity – one VM is in a distributed switch VLAN backed portgroup called dvpg-a-vlan15, and the other is in a VXLAN backed logical switch. Despite this, both VMs are in the same 172.16.15.0/24 subnet.

Continue reading “NSX Troubleshooting Scenario 12”

Removing All Universal Objects using PowerNSX and PowerShell Scripting

A requirement for a transit NSX manager appliance before it can assume the standalone role.

Cross-vCenter NSX is an awesome feature. Introduced back with NSX 6.2, it breaks down barriers and allows the spanning of logical networks well beyond what was possible before. Adding and synchronizing additional secondary NSX managers and their associated vCenter Servers is a relatively simple process and generally just works. But what about moving a secondary back to a standalone manager? Not quite so simple, unfortunately.

The process should be straight forward – disconnect all the VMs from the universal logical switches, make the secondary manager a standalone and then go through the documented removal process.

From a high level, that’s correct, but you’ll be stopped quickly in your tracks by the issue I outlined in NSX Troubleshooting Scenario 7. Before a secondary NSX manager can become a standalone, all universal objects must be removed from it.

uniremove-1

Now, assuming Cross-VC NSX will still be used and there will be other secondary managers that still exist after this one is removed, we don’t want to completely remove all universal objects as they’ll still be used by the primary and other secondaries.

In this situation, the process to get a secondary NSX manager back to a standalone would look something like this:

  1. Remove all VMs from universal logical switches at the secondary location.
  2. Use the ‘Remove Secondary Manager’ option from the ‘Installation and Upgrade’ section in the vSphere Client. This will change the secondary’s role to ‘Transit’ and effectively stops all universal synchronization with the primary.
  3. Remove all universal objects from the new ‘Transit’ NSX manager. These universal objects were originally all created on the primary manager and synchronized to this one while it was a secondary.
  4. Once all universal objects have been removed from the ‘Transit’ manager, it’s role can be changed to ‘Standalone’.

Much of the confusion surrounding this process revolves around a transitional NSX manager role type aptly named ‘Transit’. When a manager assumes the ‘Transit’ role, it is effectively disconnected from the primary and all universal synchronization to it stops. Even though it won’t synchronize, all the universal objects are preserved. This is done because Cross-VC NSX is designed to allow any of the secondary NSX managers to assume the primary role if necessary.

uniremove-2

Continue reading “Removing All Universal Objects using PowerNSX and PowerShell Scripting”

Limiting User Scope and Permissions in NSX

Using REST API calls to limit NSX user permissions to specific objects only.

There is a constant stream of new features added with each release of NSX, but not all of the original features have survived. NSX Data Security was one such feature, but VMware also removed the ‘Limit Scope’ option for user permissions in the NSX UI with the release of 6.2.0 back in 2015. Every so often I’ll get a customer asking where this feature went.

The ‘Limit Scope’ feature allows you to limit specific NSX users to specific objects within the inventory. For example, you may want to provide an application owner with full access to only one specific edge load balancer, and to ensure they have access to nothing else in NSX.

The primary reason that the feature was scrapped in 6.2 was because of UI problems that would occur for users restricted to only specific resources. To view the UI properly and as intended, you’d need access to the ‘global root’ object that is the parent for all other NSX managed objects. VMware KB 2136534 is about the only source I could find that discusses this.

REST API Calls Still Exist

Although the ‘Limit Scope’ option was removed from the UI in 6.2 and later, you may be surprised to discover that the API calls for this feature still exist.

To show how this works, I’ll be running through a simple scenario in my lab. For this test, we’ll assume that there are two edges – mercury-esg1 and mercury-dlr that are related to a specific application deployment. A vCenter user called test in the vswitchzero.net domain requires access to these two edges, but we don’t want them to be able to access anything else.

limitscope-1
We want to limit access to only edge-4 and edge-5 for the ‘test’ user.

The two edges in question have morefs edge-4 and edge-5 respectively. For more information on finding moref IDs for NSX objects, see my post on the subject here.

Continue reading “Limiting User Scope and Permissions in NSX”